Get started with Oracle REST Data Services (ORDS) and Docker

  1. Overview
  2. Autonomous Database
    1. Oracle Content Delivery Network
  3. ORDS Latest on Docker
    1. Dockerfile for ORDS Entrypoint
  4. Docker volume for ORDS configuration
    1. Configuration for Customer Managed ORDS
  5. Start it up!
    1. Verify
  6. Conclusion

Overview

Welcome to the third instalment of my series on using Oracle REST Data Services (ORDS), NGINX, Docker, SSL and Autonomous Database! In this article, I will show you how to quickly get started using ORDS and Docker. Together we will walk through the basics of building the Docker image, storing configuration in a Docker volume, running multiple ORDS instances and balancing the load using NGINX. With the help of this guide, you will be able to have a load balanced Customer Managed ORDS with Autonomous Database up and running in no time. To recap on the previous articles:

  • Load Balancing ORDS with NGINX introduced the concept of load balancing and the most basic of configurations to get started with NGINX running in docker. That was entirely using HTTP as the transport protocol.
  • HTTPS Load Balance: NGINX & ORDS took that a step further by using a self signed certificate so that the traffic between client and server was over the more secure HTTPS protocol. That was with ORDS instances running on port 8080 and 8090.

Autonomous Database – hosted and managed for free

Autonomous Database

In this article the ORDS instances will be running in Docker and sharing a configuration for an Autonomous Database hosted on Oracle Cloud Infrastructure Free Tier resources. The prerequisite for this article is an understanding of Installing and Configuring Customer Managed ORDS on Autonomous Database. The database has ORDS and APEX already installed. However, the credentials for ORDS Runtime user and PLSQL Gateway user are not known so the ords install adb command instruction will be used to create and configure additional users in the database to be used by our new ORDS instances.

Oracle Content Delivery Network

In the previous article we had the APEX images in the global/doc_root directory. It is much easier to not have to configure an ORDS instance to serve those static files and to use the Oracle Content Deliver Network instead. One should note that by default, the APEX installation in the Autonomous Database does not use the Oracle CDN for the APEX static resources.  So if you have not done so already, use Oracle CDN for the APEX images. The URL to use will depend on the version of APEX in use. At the time of writing, that is APEX 22.2.0. Once you have made this change the next APEX upgrade will keep the IMAGE_PREFIX parameter in synch. See
https://support.oracle.com/epmos/faces/DocumentDisplay?id=2817084.1 and https://blogs.oracle.com/apex/post/running-customer-managed-ords-on-autonomous-database-heres-how-to-get-ready-for-apex-211-upgrade for more information on using Oracle CDN with APEX

begin
  apex_instance_admin.set_parameter(
  p_parameter => 'IMAGE_PREFIX',
  p_value => 'https://static.oracle.com/cdn/apex/22.2.0/' );
  commit;
end;

ORDS Latest on Docker

As shown in the previous article it is already straight forward to use ORDS from the command line to configure and run in standalone mode. In doing so, you are satisfying the most fundamental requirement for ORDS by providing a supported Java Runtime Environment for it to run in. Running ORDS in Docker takes care of that dependancy and provides a consistent structure. For your convenience, I have defined a Dockerfile to create an image with the latest version of ORDS built in. It does require the JDK 17 image from Oracle Container Registry jdk repository. To use images from the Oracle Container Registry you must first sign in using your Oracle Account to accept the license agreement for the Oracle image. Once you have accepted the licence, follow the installation instructions on the page to login and pull the jdk:17 image:

> docker login container-registry.oracle.com
Username: <Oracle Account Username>
Password: <Oracle Account Password>
Login successful.

> docker pull container-registry.oracle.com/java/jdk:17
17: Pulling from java/jdk
0b93191bf088: Pull complete 
f5a748ad7565: Pull complete 
004350aa024a: Pull complete 
Digest: sha256:6ca4abe688e437a2189e54e42fc8325ed9d7230286f61bfb0199b8e693423f70
Status: Downloaded newer image for container-registry.oracle.com/java/jdk:17
container-registry.oracle.com/java/jdk:17

That will pull into your local Docker repository the most recent Oracle JDK 17 build.

Dockerfile for ORDS Entrypoint

The configuration is quite simple. A couple of folders are exposed for providing configuration and library extensions. That configuration directory is essential but in the majority of cases, customers do not have custom extensions so the lib/ext folder will not be used in this article. Similarly, although the Dockerfile specifies that both port 8080 and port 8443 should be exposed, we will only be using port 8080 for HTTP traffic in this article. It is NGINX that will be terminating the HTTPS traffic before routing upstream to our ORDS instances.

The Dockerfile we’ll use to create the ORDS image is available at ORDS_Latest_Dockerfile. Contents listed below.

#
# Defines a docker image, based on the Oracle JDK image, to run Oracle REST Data Services. During the image building 
# process the most recent version of ORDS will be automatically downloaded and extracted.
#
# Volumes for configuration and lib/ext are defined.
#
# docker run -p 8080:8080 -v ords-adb-config:/opt/ords-config/ -v ords-lib-ext:/opt/ords/latest/lib/ext ords-latest/oraclejdk
#
# See https://peterobrien.blog/ for more information and examples.
#
FROM container-registry.oracle.com/java/jdk:17
MAINTAINER Peter O'Brien
ENV LATEST=/opt/ords-latest/
ENV CONFIG=/opt/ords-config/
WORKDIR $LATEST
ADD https://download.oracle.com/otn_software/java/ords/ords-latest.zip $LATEST
RUN jar xf ords-latest.zip; rm ords-latest.zip; chmod +x bin/ords
VOLUME $LATEST/lib/ext/ $CONFIG
EXPOSE 8080
EXPOSE 8443
WORKDIR $CONFIG
ENTRYPOINT ["/opt/ords-latest/bin/ords"]
CMD ["serve"]

To use the above Dockerfile and build an image locally called ords-latest/oraclejdk use the following command

> docker build --tag ords-latest/oraclejdk \
https://gist.githubusercontent.com/pobalopalous/fc6ab4ee777f6b7f32a400e920df682d/raw/ORDS_Latest_Dockerfile

Downloading build context from remote url: https://gist.githubusercontent.com/pobalopalous/fc6ab4ee777f6b7f32a400e920df682d/raw/ORDS_Latest_Dockerfile [===============Downloading build context from remote url: https://gist.githubusercontent.com/pobalopalous/fc6ab4ee777f6b7f32a400e920df682d/raw/ORDS_Latest_Dockerfile [==================================================>]     878B/878B
Downloading build context from remote url: https://gist.githubusercontent.com/pobalopalous/fc6ab4ee777f6b7f32a400e920df682d/raw/ORDS_Latest_Dockerfile [==================================================>]     878B/878B
Sending build context to Docker daemon   2.56kB
Step 1/13 : FROM container-registry.oracle.com/java/jdk:17
 ---> 4945318567e9
Step 2/13 : MAINTAINER Peter O'Brien
 ---> Using cache
 ---> 1bb5b3ea1d92
Step 3/13 : ENV LATEST=/opt/ords-latest/
 ---> Using cache
 ---> 4798e9cbc8d1
Step 4/13 : ENV CONFIG=/opt/ords-config/
 ---> Using cache
 ---> a1f6e0bf441c
Step 5/13 : WORKDIR $LATEST
 ---> Using cache
 ---> 1b961db4ee2d
Step 6/13 : ADD https://download.oracle.com/otn_software/java/ords/ords-latest.zip $LATEST
Downloading [==================================================>]  94.62MB/94.62MB
 ---> Using cache
 ---> f6d009ada2f1
Step 7/13 : RUN jar xf ords-latest.zip; rm ords-latest.zip; chmod +x bin/ords
 ---> Using cache
 ---> f6d20c737486
Step 8/13 : VOLUME $LATEST/lib/ext/ $CONFIG
 ---> Using cache
 ---> fde34609973e
Step 9/13 : EXPOSE 8080
 ---> Using cache
 ---> 77933cb86baa
Step 10/13 : EXPOSE 8443
 ---> Using cache
 ---> 094fc3d8332b
Step 11/13 : WORKDIR $CONFIG
 ---> Using cache
 ---> 2d1b41e2c6f0
Step 12/13 : ENTRYPOINT ["/opt/ords-latest/bin/ords"]
 ---> Using cache
 ---> 9974ac45526d
Step 13/13 : CMD ["serve"]
 ---> Using cache
 ---> 4cbe74b80bb5
Successfully built 4cbe74b80bb5
Successfully tagged ords-latest/oraclejdk:latest

You now have an image in your local Docker repository ready to run. Note that the base image is an Oracle JDK 17 one. You can of course change that to something else. At the time of writing, only Oracle JDK 11 and 17 are supported Java Runtime Environments for ORDS.

Docker volume for ORDS configuration

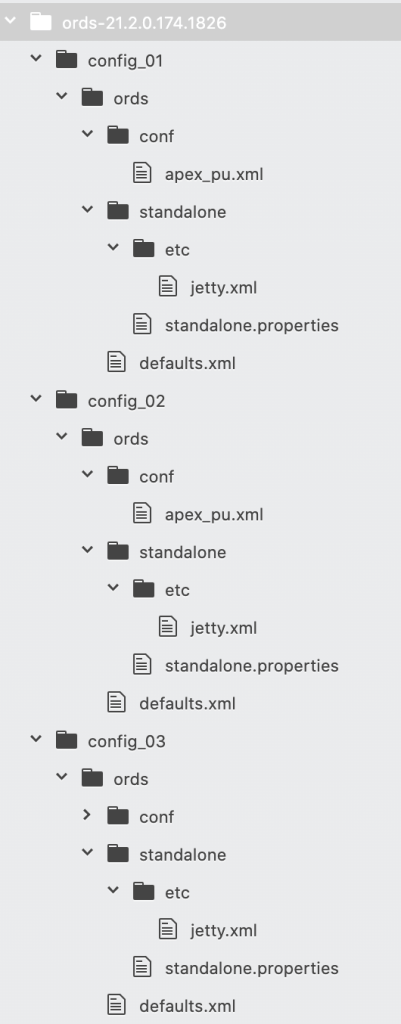
Now it’s time to start putting the ORDS configuration together. In the previous article I outlined a configuration folder structure which was defined on the host computer file system. We are deviating from that in two ways. First, as outlined above, we will not have any APEX images in the global/doc_root directory because we are using the Oracle CDN with APEX in the hosted Autonomous Database. Second, we’re using a Docker volume, rather than the local filesystem, to store all the configuration.

Docker volumes are an ideal way to persist data generated by and used by Docker containers. They provide several benefits, such as:

  • Data isolation: Docker volumes are independent of the underlying filesystem, which ensures that the data persists even if the container is moved to a different host.
  • Easy deployment: Docker volumes can be shared across multiple containers and hosts, making it easy to deploy applications in different environments.
  • Data security: Docker volumes are stored outside the container, so they are not affected by any changes within the container. This ensures that your data remains secure and consistent.
  • Performance: Docker volumes are stored on the host system, which can be faster than using shared storage. This can improve the performance of your containers.

The first configuration item for a Customer Managed ORDS on Autonomous Database is the wallet and getting that wallet zip file into the Docker volume involves a few steps that may not be intuitive if you are not familiar with Docker volumes. You see, to copy a file into a Docker volume, one must do that through a running container, but before we have a running container, we must first create the volume.

> docker volume create ords-adb-config
ords-adb-config

Let’s assume you have downloaded your Autonomous Database wallet zip file to your ~/Downloads directory. For example: ~/Downloads/Wallet_DB202301101106.zip. We’re going to put it in the ords-adb-config volume as /opt/ords-config/Wallet_Autonomous.zip but first we must start a container to use it.

> docker run --detach --rm --name ords-latest \
             -v ords-adb-config:/opt/ords-config/ \
             ords-latest/oraclejdk

Note that we’re not mapping to any ports and once we’re finished with this container it will be removed. Let’s copy that wallet zip file. We know the name of the container is ords-latest because that’s the name we gave in the docker run command. Your wallet file name will be different but we’re going to copy it to /opt/ords-config/Wallet_Autonomous.zip to keep things simple for subsequent commands. If you are going to have multiple pools, you will have to have distinct filenames.

> docker cp ~/Downloads/Wallet_DB202301101106.zip \
            ords-latest:/opt/ords-config/Wallet_Autonomous.zip

That ords-latest container is no longer required. It only came into existence to allow you to copy the zip file. When you stop the container it should be removed automatically.

> docker stop ords-latest

Configuration for Customer Managed ORDS

The wallet zip file is a good start but now it’s time to run through the Customer Managed ORDS with Autonomous Database install step which will create additional users in the database and store the necessary pool settings in the ords-adb-config Docker volume. We’re going to use the non-interactive silent installation so will have to provide the passwords for the existing ADMIN user, and the two users to create. Referring back to the ORDS documentation, the ords install adb command is…

ords install adb --admin-user <DATABASE USER> \
                 --db-user <DATABASE USER> \
                 --gateway-user <DATABASE USER>
                 --wallet <PATH TO ZIP FILE>
                 --wallet-service-name <NET SERVICE NAME>
                 --feature-sdw <BOOLEAN>
                 --feature-db-api <BOOLEAN> \
                 --feature-rest-enabled-sql <BOOLEAN> \
                 --password-stdin < adbs_passwords.txt

Let’s create that file with the passwords to use. We can delete it once the ords install adb command completes. Create the adbs_passwords.txt file with three passwords on each line:

<PASSWORD FOR admin-user>
<PASSWORD FOR db-user>
<PASSWORD FOR gateway-user>

In my case the adbs_passwords.txt file looks like this:

MyADMIN_password_1s_a_s@cret
K@@PThe!RuntimeUserPr1vate
G@teWayUs3r!IsHidden

With my passwords file I can pass all these details in one command as I run it in Docker. Note that the entire command line also specifies -i which instructs the docker engine to use standard input ( STDIN ) for the container.

> docker run -i -v ords-adb-config:/opt/ords-config/ \
             install adb \
             --admin-user ADMIN \
             --db-user ORDS_PUBLIC_USER2 \
             --gateway-user ORDS_PLSQL_GATEWAY2 \
             --wallet /opt/ords-config/Wallet_Autonomous.zip \
             --wallet-service-name db202301101106_low \
             --feature-sdw true \
             --feature-db-api true \
             --feature-rest-enabled-sql true \
             --password-stdin <  adbs_passwords.txt

ORDS: Release 22.4 Production on Mon Mar 06 09:52:30 2023

Copyright (c) 2010, 2023, Oracle.

Configuration:
  /opt/ords-config/

Oracle REST Data Services - Non-Interactive Customer Managed ORDS for Autonomous Database
Connecting to Autonomous database user: ADMIN TNS Service: db202301101106_low
Retrieving information
Checking Autonomous database user: ORDS_PLSQL_GATEWAY2 TNS Service: db202301101106_low
The setting named: db.wallet.zip.path was set to: /opt/ords-config/Wallet_Autonomous.zip in configuration: default
The setting named: db.wallet.zip.service was set to: db202301101106_low in configuration: default
The setting named: db.username was set to: ORDS_PUBLIC_USER2 in configuration: default
The setting named: db.password was set to: ****** in configuration: default
The setting named: plsql.gateway.mode was set to: proxied in configuration: default
The setting named: feature.sdw was set to: true in configuration: default
The global setting named: database.api.enabled was set to: true
The setting named: restEnabledSql.active was set to: true in configuration: default
The setting named: security.requestValidationFunction was set to: ords_util.authorize_plsql_gateway in configuration: default
2023-03-06T09:52:38.256Z INFO        Connecting to Autonomous database user: ADMIN TNS Service: db202301101106_low
------------------------------------------------------------
Date       : 06 Mar 2023 09:52:38
Release    : Oracle REST Data Services 22.4.4.r0411526

Database   : Oracle Database 19c Enterprise Edition  
DB Version : 19.18.0.1.0
------------------------------------------------------------
Container Name: C4TOSECRETNQ2JA_DB202301101106
------------------------------------------------------------

[*** script: ords_runtime_user.sql] 

PL/SQL procedure successfully completed.

2023-03-06T09:52:42.532Z INFO        ... Verifying Autonomous Database runtime user
[*** script: ords_gateway_user.sql] 

PL/SQL procedure successfully completed.

2023-03-06T09:52:43.674Z INFO        ... Verifying Autonomous Database gateway user
2023-03-06T09:52:43.675Z INFO        Completed configuring for Customer Managed Oracle REST Data Services version 22.4.4.r0411526. Elapsed time: 00:00:05.407 

[*** Info: Completed configuring for Customer Managed Oracle REST Data Services version 22.4.4.r0411526. Elapsed time: 00:00:05.407 
 ]
2023-03-06T09:52:43.720Z INFO        To run in standalone mode, use the ords serve command:
2023-03-06T09:52:43.723Z INFO        ords --config /opt/ords-config serve
2023-03-06T09:52:43.723Z INFO        Visit the ORDS Documentation to access tutorials, developer guides and more to help you get started with the new ORDS Command Line Interface (http://oracle.com/rest).

Note that because the Docker entrypoint for the image that we built earlier was specified as /opt/ords-latest/bin/ords which means we can run the ords command line with any supported commands and arguments.

Don’t forget to rm adbs_passwords.txt. You do not need it anymore.

In summary, we’ve just told ORDS to use the wallet zip file and the ADMIN credentials to connect to the hosted service, create some users and persist configuration details on the ords-adb-config volume. The docker container exits because the command is complete. You can see the ORDS configuration by running the ords config list command.

> docker run -v ords-adb-config:/opt/ords-config/ \
             ords-latest/oraclejdk config list

ORDS: Release 22.4 Production on Mon Mar 06 19:07:27 2023

Copyright (c) 2010, 2023, Oracle.

Configuration:
  /opt/ords-config/

Database pool: default

Setting                              Value                                    Source     
----------------------------------   --------------------------------------   -----------
database.api.enabled                 true                                     Global     
db.password                          ******                                   Pool Wallet
db.username                          ORDS_PUBLIC_USER2                        Pool       
db.wallet.zip.path                   /opt/ords-config/Wallet_Autonomous.zip   Pool       
db.wallet.zip.service                db202301101106_low                       Pool       
feature.sdw                          true                                     Pool       
plsql.gateway.mode                   proxied                                  Pool       
restEnabledSql.active                true                                     Pool       
security.requestValidationFunction   ords_util.authorize_plsql_gateway        Pool       

No doubt you will remember this from the previous article about HTTPS and NGINX with ORDS. There’s one more configuration setting to address. That’s to tell ORDS what header key / value pair to use to trust that the request was received by a load balancer over HTTPS even though ORDS is receiving traffic over HTTP.

docker run -v ords-adb-config:/opt/ords-config/ \
  ords-latest/oraclejdk \
  config set security.httpsHeaderCheck "X-Forwarded-Proto: https"

At this point we have a Docker volume ords-adb-config which has all the configuration settings necessary to run one or more Customer Managed ORDS with Autonomous Database instances as we see fit.

Start it up!

From the previous article you have a NGINX configuration that you have running in Docker to talk to two ORDS instances listening on port 8080 and 8090. Now let’s replace those ORDS instances with ones running in Docker with the above ords-adb-config Docker volume. You can leave the NGINX container running but if you have not done so already, shutdown those ORDS instances.

Up until now, we have not specified a container name when running ORDS in Docker. For convenience, we’ll refer to the container listening on port 8080 as ords-latest-8080 and the other one as ords-latest-8090.

> docker run --detach --rm --name ords-latest-8080 \
             -p 8080:8080 \
             -v ords-adb-config:/opt/ords-config/ \
             ords-latest/oraclejdk
9e0d8ec541bc5c360c7e156153cfd8f6437d61ab2d4f627c887f03d7384a56e6

> docker run --detach --rm --name ords-latest-8090 \
             -p 8090:8080 \
             -v ords-adb-config:/opt/ords-config/ \
             ords-latest/oraclejdk
7a36de7fb14e54710181c43caa6fb2aa9dfdf013f5afa32405378da61a9a13e0

Verify

To check that they are up and running have a look at the process list.

> docker ps
CONTAINER ID   IMAGE                   COMMAND                  CREATED        STATUS        PORTS                                                                      NAMES
2c11ababaf1b   ords-latest/oraclejdk   "/opt/ords-latest/bi…"   4 hours ago    Up 4 hours    8443/tcp, 0.0.0.0:8090->8080/tcp, :::8090->8080/tcp                        ords-latest-8090
7fd8c821be64   nginx                   "/docker-entrypoint.…"   6 hours ago    Up 6 hours    0.0.0.0:80->80/tcp, :::80->80/tcp, 0.0.0.0:443->443/tcp, :::443->443/tcp   optimistic_kilby
9e0d8ec541bc   30e6e561dc7d            "/opt/ords-latest/bi…"   6 hours ago    Up 6 hours    0.0.0.0:8080->8080/tcp, :::8080->8080/tcp                                  ords-latest-8080

Also use the docker logs command to keep track of the activity and status. We’ve given specific names for the two ORDS containers so we can refer to them directly,

> docker logs -f ords-latest-8080

ORDS: Release 22.4 Production on Mon Mar 06 13:48:57 2023

Copyright (c) 2010, 2023, Oracle.

Configuration:
  /opt/ords-config/

2023-03-06T13:48:58.335Z INFO        HTTP and HTTP/2 cleartext listening on host: 0.0.0.0 port: 8080
2023-03-06T13:48:58.389Z INFO        Disabling document root because the specified folder does not exist: /opt/ords-config/global/doc_root
2023-03-06T13:49:07.009Z INFO        Configuration properties for: |default|lo|
...
Mapped local pools from /opt/ords-config/databases:
  /ords/                              => default                        => VALID     


2023-03-06T13:49:14.790Z INFO        Oracle REST Data Services initialized
Oracle REST Data Services version : 22.4.4.r0411526
Oracle REST Data Services server info: jetty/10.0.12
Oracle REST Data Services java info: Java HotSpot(TM) 64-Bit Server VM 17.0.6+9-LTS-190
> docker logs -f ords-latest-8090      

ORDS: Release 22.4 Production on Mon Mar 06 13:56:22 2023

Copyright (c) 2010, 2023, Oracle.

Configuration:
  /opt/ords-config/

2023-03-06T13:56:23.011Z INFO        HTTP and HTTP/2 cleartext listening on host: 0.0.0.0 port: 8080
2023-03-06T13:56:23.066Z INFO        Disabling document root because the specified folder does not exist: /opt/ords-config/global/doc_root
2023-03-06T13:56:32.683Z INFO        Configuration properties for: |default|lo|
...
Mapped local pools from /opt/ords-config/databases:
  /ords/                              => default                        => VALID     


2023-03-06T13:56:32.683Z INFO        Oracle REST Data Services initialized
Oracle REST Data Services version : 22.4.4.r0411526
Oracle REST Data Services server info: jetty/10.0.12
Oracle REST Data Services java info: Java HotSpot(TM) 64-Bit Server VM 17.0.6+9-LTS-190

As a reminder, to check the logs for the NGINX container you’ll have to specify the container name that was allocated at runtime. In my case it is optimistic_kilby.

> docker logs -f optimistic_kilby
/docker-entrypoint.sh: /docker-entrypoint.d/ is not empty, will attempt to perform configuration
/docker-entrypoint.sh: Looking for shell scripts in /docker-entrypoint.d/
/docker-entrypoint.sh: Launching /docker-entrypoint.d/10-listen-on-ipv6-by-default.sh
10-listen-on-ipv6-by-default.sh: info: Getting the checksum of /etc/nginx/conf.d/default.conf
10-listen-on-ipv6-by-default.sh: info: Enabled listen on IPv6 in /etc/nginx/conf.d/default.conf
/docker-entrypoint.sh: Launching /docker-entrypoint.d/20-envsubst-on-templates.sh
/docker-entrypoint.sh: Launching /docker-entrypoint.d/30-tune-worker-processes.sh
/docker-entrypoint.sh: Configuration complete; ready for start up
 to: 192.168.5.2:8080 {GET / HTTP/1.1} upstream_response_time 0.155 request_time 0.155
172.17.0.1 - - [06/Mar/2023:13:52:58 +0000] "GET /ords/ HTTP/1.1" 301 169 "-" "Mozilla/5.0 (Macintosh; Intel Mac OS X 10_15_7) AppleWebKit/537.36 (KHTML, like Gecko) Chrome/110.0.0.0 Safari/537.36"
 to: 192.168.5.2:8090 {GET /ords/ HTTP/1.1} upstream_response_time 2.356 request_time 2.356
 to: 192.168.5.2:8080 {GET /ords/f?p=4550:1:117375695883225::::: HTTP/1.1} upstream_response_time 2.101 request_time 2.101
 to: 192.168.5.2:8090 {GET / HTTP/1.1} upstream_response_time 0.006 request_time 0.006
172.17.0.1 - - [06/Mar/2023:13:53:03 +0000] "GET /ords/ HTTP/1.1" 301 169 "-" "Mozilla/5.0 (Macintosh; Intel Mac OS X 10_15_7) AppleWebKit/537.36 (KHTML, like Gecko) Chrome/110.0.0.0 Safari/537.36"
 to: 192.168.5.2:8080 {GET /ords/ HTTP/1.1} upstream_response_time 2.045 request_time 2.045

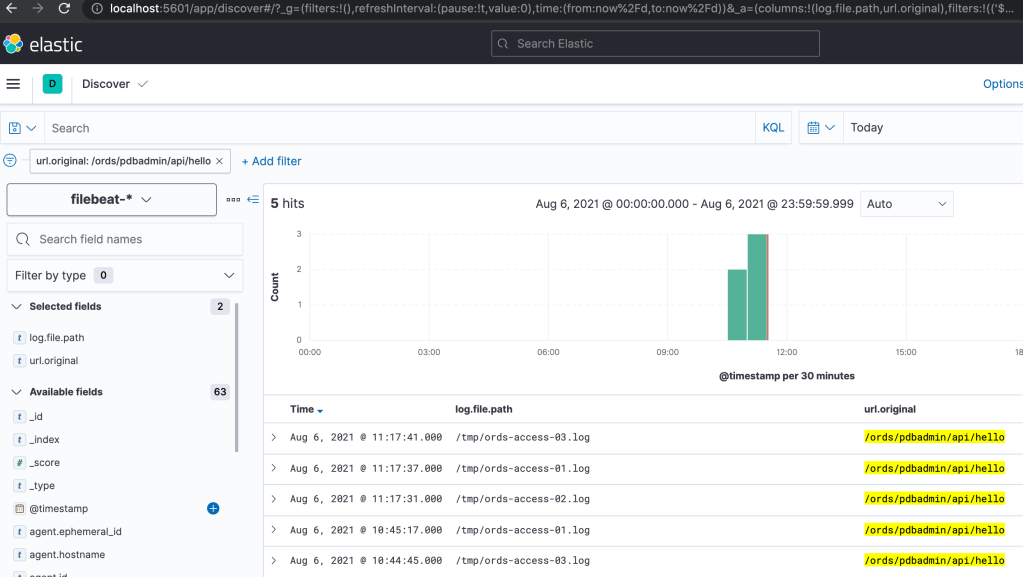
From the NGINX logs you can see that traffic is being alternated between the ORDS instance listening on port 8080 and 8090.

As before, the request goes over HTTPS through NGINX and routed upstream to an ORDS instance.

You can stop a container and restart it to confirm the failover works as before.

Conclusion

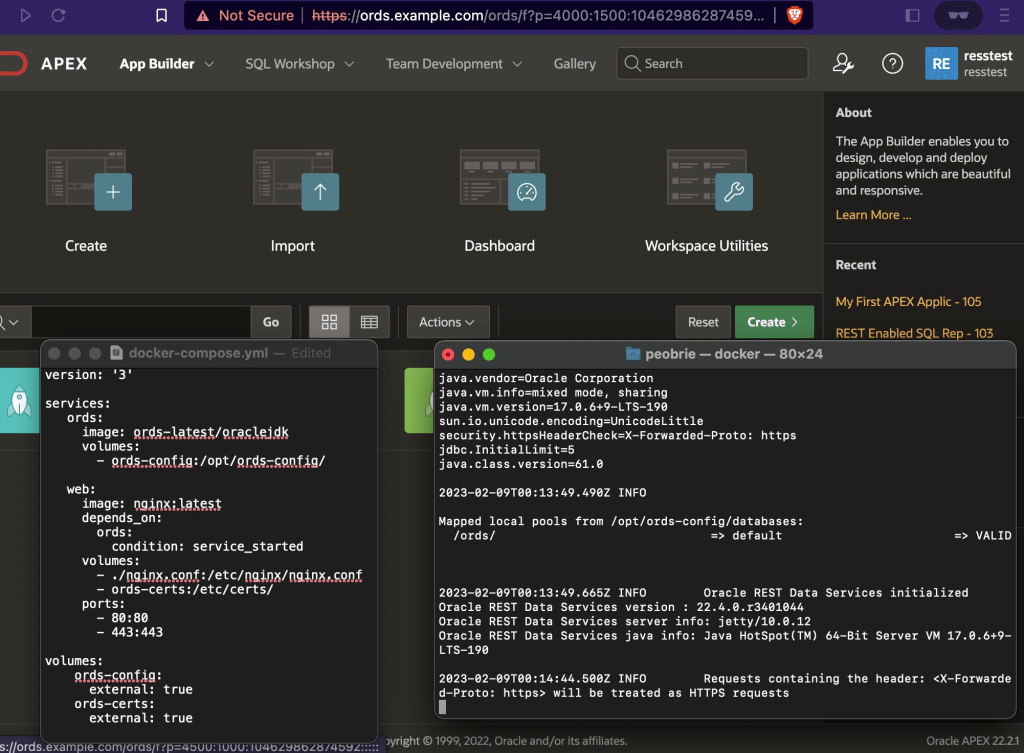
Building on the previous articles you now have both NGINX and ORDS running in Docker and using an Autonomous Database. This is still effectively a development / proof of concept environment because the DNS entry and SSL certificate are not properly setup to operate seamlessly. The nginx.conf is hardcoded with two upstream ORDS instances to use and the containers are using two specific ports on the host machine. In the next article we’ll look at using docker compose so that we have more flexibility around this.

Using the Dockerfile from this article you have created an ORDS image which can be used to run ORDS commands and update your configuration in ords-adbs-config. As an additional exercise you can look into increasing pool size (jdbc.MaxLimit) and doing a rolling restart of the two ORDS docker containers to pick up that configuration change.

Leave a comment and let me know how you get on.

HTTPS Load Balance: NGINX & ORDS


This article is part of a series about using ORDS on Docker with NGINX, SSL and Oracle Autonomous Database. The previous article is Load Balancing ORDS with NGINX which introduced the concept of load balancing and the most basic of configurations to get started with NGINX running in docker. That was entirely using HTTP as the transport protocol.


  1. ORDS Instances
  2. A word about folder structure
  3. Certificate for HTTPS
    1. Self Signed Certificate
      1. Generate a Private Key and Certificate
  4. NGINX
    1. Configuration
    2. Run
  5. Try it out
    1. Balancing act – round robin
    2. Forcing HTTPS
    3. Failover and Recover
  6. Trust me
  7. Conclusion

Around this time two years ago, in the Load Balancing ORDS with NGINX article, I covered what was certainly the quickest way to spin up a load balancer in front of your ORDS instances: NGINX with Load Balancing configuration and docker official NGINX image. It’s time to build on that to configure the load balancer for HTTPS traffic and to demonstrate that not only is a round robin routing policy in place but also the desired failover / recovery when an ORDS instance is stopped and started.

In this article I will go through the steps of generating a self signed certificate so that HTTPS traffic can be encrypted. Then I will walk through the configuration of NGINX to receive requests over HTTPS and distribute those requests to ORDS instances running on the same machine which accept unencrypted traffic. The first thing we need are two ORDS instances configured for the same database.

ORDS Instances

In this example there is one database and two ORDS instances running in standalone mode on different ports. Both ORDS instances will be sharing the same configuration directory. The configuration directory not only contains the pool and global settings but the global/doc_root directory contains the APEX image files that are required for Oracle APEX to operate. It is recommended to use the APEX CDN where possible but in this case the files have been downloaded and extract from apex.oracle.com.

/path/to/config/ directory structure
|
|-databases/
|    |-default/
|        |-pool.xml
|-global/
     |-doc_root/
     |   |-i/
     |      |-apex_version.txt 
     |      |-etc.
     |-settings.xml

The configuration is fairly standard but there are two important configuration settings needed so that the ORDS instances will accept requests from the load balancer over HTTP even though the load balancer is receiving the requests over HTTPS. These settings are security.httpsHeaderCheck and security.externalSessionTrustedOrigins.

~/Downloads/ords-22.4.3.033.1239/bin/ords --config /path/to/config config set security.httpsHeaderCheck "X-Forwarded-Proto: https"

~/Downloads/ords-22.4.3.033.1239/bin/ords --config /path/to/config config set security.externalSessionTrustedOrigins "https://ords.example.com"

You’ll notice that the most recent released version of ORDS is being used from the downloads directory that it was extracted to. Of course you are free to download and run ORDS in whatever directory makes sense for your system.

The security.httpsHeaderCheck setting tells ORDS what header, and value, to look for to confirm that the load balancer received the request over HTTPS. The security.externalSessionTrustedOrigins setting tells ORDS that requests with these Origin values can be trusted in a secured context.

The ORDS instances are started in two separate terminal windows relying on 8080 to be the default port for one and specifying 8090 as the port for the second instances.

~/Downloads/ords-22.4.3.033.1239/bin/ords --config /path/to/config serve
...
Configuration:
  /path/to/config

INFO        HTTP and HTTP/2 cleartext listening on host: 0.0.0.0 port: 8080
INFO        The document root is serving static resources located in: /path/to/config/global/doc_root
...
INFO        Oracle REST Data Services initialized
Oracle REST Data Services version : 22.4.3.r0331239
Oracle REST Data Services server info: jetty/10.0.12
Oracle REST Data Services java info: Java HotSpot(TM) 64-Bit Server VM 11.0.13+10-LTS-370

That ORDS instance can be verified to be accessible using http://localhost:8080/ords/

~/Downloads/ords-22.4.3.033.1239/bin/ords --config /path/to/config serve --port 8090

...
Configuration:
  /path/to/config

INFO        HTTP and HTTP/2 cleartext listening on host: 0.0.0.0 port: 8090
INFO        The document root is serving static resources located in: /path/to/config/global/doc_root
...
INFO        Oracle REST Data Services initialized
Oracle REST Data Services version : 22.4.3.r0331239
Oracle REST Data Services server info: jetty/10.0.12
Oracle REST Data Services java info: Java HotSpot(TM) 64-Bit Server VM 11.0.13+10-LTS-370

That ORDS instance can be verified to be accessible using http://localhost:8090/ords/

A word about folder structure

There are going to be files involved in this exercise and instead of repeating which files are where I’ll outline the folder structure for the nginx configuration here. Everything is going to exist under a directory called ords-nginx in the user home directory.

~/ords-nginx/ directory structure
|
|-nginx.conf <- configuration file
|-certs/
     |-nginx.crt <- certificate for the domain
     |-nginx.key <- RSA private key

Certificate for HTTPS

A certificate is required for HTTPS to make sure that the website you are visiting is secure. Secure in this context means that the data sent between client and website is not intercepted by malicious actors. Without the certificate, the website would not be secure, and any data sent between the website and the user could be compromised. In general, certificates are issued by Certificate Authorities ( CA) that are trusted by most browsers. In this article, for convenience, we’ll use a self signed certificate rather than one issued by a CA.

A self-signed SSL certificate is an identity certificate that is signed and issued by the same entity that is using it. It is used to secure a network connection between two or more systems and is used to prove the identity of a server or website. Self-signed SSL certificates are free to generate, but they are not trusted by web browsers and other clients, so they are not recommended for use on public websites. They are, however, useful for internal networks, where trust is already established.

The certificate Common Name attribute corresponds to the website address. Typically there would be a domain name service ( DNS ) which resolves that name to a specific IP address and server. In this article I’m taking a short cut and not using a DNS but rather telling my machine that ords.example.com is actually the local IP address 127.0.0.1. There are other options such as Dnsmasq that can make defining a custom domain name in your network a bit easier. For now, I have an entry in /etc/hosts that looks like this:

##
# Host Database
#
# localhost is used to configure the loopback interface
# when the system is booting.  Do not change this entry.
##
127.0.0.1	localhost
127.0.0.1       ords.example.com

When I send a request to https://ords.example.com/ it will be routed to the 127.0.0.1 loopback address. Now that little bit of network traffic configuration is in place it’s time to create a self signed certificate for the ords.example.com host name. Browsers will report the self signed certificate as Not Secure because it can not be verified with a trusted Certificate Authority, but the traffic will be encrypted.

The goal is to have a self signed certificate for traffic to an address that is actually a local machine

Self Signed Certificate

A self signed certificate is a certificate that is not signed by a trusted Certificate Authority (CA) and is used for testing purposes or for applications that are only accessed within a trusted network. In other words, not accessed from the internet. If your goal is to have nginx as a load balancer accepting traffic from the public then after you have completed the setup in this article, replace the self signed certificates with a certificate for your domain which you have obtained from a CA.

To generate our self signed certificate for ords.example.com we’ll use openssl which is most likely already installed on your operating system. Open a terminal window, change your working directory to ~/ords-nginx/ and follow these steps to create a self signed certificate using openssl.

Generate a Private Key and Certificate

A public-private key pair is a set of two cryptographic keys, consisting of a public key and a private key. The public key is used for encryption and decryption, while the private key is used for signing and verification. Public keys are exchanged between two parties and can be used to encrypt data to be sent securely. Private keys are kept secret and are used to prove the identity of the sender. The two keys are mathematically related and are used together to establish a secure communication link.

Using openssl one can have separate distinct steps to generate a private key, generate a Certificate Signing Request and generate the certificate. We can also do all that with a single openssl command executed in the ~/ords-nginx/ directory:

> openssl req -x509 -nodes -days 365 \
              -newkey rsa:2048 \
              -keyout certs/nginx.key \
              -out certs/nginx.crt 

Generating a 2048 bit RSA private key
.................................................+++++
....+++++
writing new private key to 'certs/nginx.key'
-----
You are about to be asked to enter information that will be incorporated
into your certificate request.
What you are about to enter is what is called a Distinguished Name or a DN.
There are quite a few fields but you can leave some blank
For some fields there will be a default value,
If you enter '.', the field will be left blank.
-----
Country Name (2 letter code) []:
State or Province Name (full name) []:
Locality Name (eg, city) []:
Organization Name (eg, company) []:
Organizational Unit Name (eg, section) []:
Common Name (eg, fully qualified host name) []:ords.example.com
Email Address []:

That will generate a 2048-bit RSA private key called nginx.key and a self signed certificate for the ords.example.com host name called nginx.crt. You will note that the majority of prompts are left empty and the only field that a value is entered for is Common Name. And that’s it! You have successfully created a self signed certificate using openssl and that certificate will remain valid for 365 days. You can now use this certificate with nginx.

NGINX

This section has two parts: create the configuration and run the nginx docker container with that configuration.

Configuration

Create the ~/ords-nginx/nginx.conf file as below. I will summarise what each line does but you should refer to nginx documentation for further details on the nginx configuration entries.

# No specific connection processing instructions
events {}

# The configuration for http(s) traffic
http {
# Log format to use for access log. 
# This will show which server a request gets routed to.
    log_format upstreamlog '$server_name to: $upstream_addr {$request} '
   'upstream_response_time $upstream_response_time'
   ' request_time $request_time';

# List of servers to route to. Call that list 'ords'.
# Running in docker so host.docker.internal used to point to
# host machine which is running ORDS instances.
    upstream ords {
        server host.docker.internal:8080;
        server host.docker.internal:8090;
    }

# Configure a http server for port 80
# All requests are redirected to https
    server {
        listen 80 default_server;
        listen [::]:80 default_server;
        server_name _;
        return 301 https://$host$request_uri;
    }

# Configure a https server for port 443
    server {
        listen 443 ssl default_server;
        listen [::]:443 ssl default_server;
        ssl_certificate /etc/certs/nginx.crt;
        ssl_certificate_key /etc/certs/nginx.key;
# Specify the format to apply to access log
        access_log /var/log/nginx/access.log upstreamlog;
# Any requests get passed upstream to the 'ords' list
        location / {
            proxy_pass http://ords;
# Tells the upstream server what hostname the client used
            proxy_set_header Host $host;
# Tells the upstream server that https was used
            proxy_set_header X-Forwarded-Proto https;
        }
    }
}

The very first line is an empty events {} section. This is the section where directives that affect connection processing are specified. We have no particular connection processing needs beyond the default so it’s left empty. If we didn’t have this section here a [emerg] no “events” section in configuration message will appear in the logs.

The http section of the configuration has the important stuff. In that, as outlined by the above comments we have:

  • An access log format which will include information on which upstream server a request is routed to. This will be useful later to confirm round-robin routing and seamless failover / recovery occurs.
  • A list of servers to route traffic to. We have two in this example but it could be any number of ORDS instances.
  • A server configuration to listen on port 80 but redirect all requests to use HTTPS and therefore port 443.
  • A server configuration to list on port 443
    • Specifies the file paths for the certificate and key files we generated earlier.
    • Specifies the access log format to use.
    • Specifies that for any location in the request URL the requested should be routed the ‘ords’ upstream servers.
      • Irrespective of what the upstream server host name is, the Host header is set to whatever the client provided in the request. This is essential so that when ORDS must generated absolute URL values for a response the URL will be usable to the client.
      • A header is set which corresponds to the ORDS configuration security.httpsHeaderCheck which was mentioned at the top of this article. This confirms to ORDS that although the upstream server received a request over HTTP, the load balancer received the request from the client over HTTPS.

Now that you have an NGINX configuration file it can be put to work.

Run

The ORDS instances are running in standalone mode, listening for HTTP requests on port 8080 and 8090 respectively. Let’s start NGINX in a docker container. While still in that ~/ords-nginx/ directory run the following:

docker run -p 80:80 -p 443:443 \
-v ${PWD}/nginx.conf:/etc/nginx/nginx.conf:ro \
-v ${PWD}/certs/:/etc/certs/:ro \
-d nginx

That will run NGINX in a docker container using the specific configuration as well as certificate and key files. Since the -d option is specified, the container is running in the background so the only output you will have seen is a long list of letters and numbers which is the container id. It will look like: 422598c154ee68db4ee6ffd3ed91e591fa19215539b3486517842f0ac47c6874

For a more human friendly way of referring to the container you can use the name which was automatically generated for it. You could run docker ps to get a list of the running containers and look for the nginx one or use docker inspect to get the container name.

> docker inspect 422598c154...c6874 \
         --format '{{.Name}}' 

/epic_gates

Your container name will be different. The leading slash can be ignored. Let’s use that name to tail the docker container log.

> docker logs -f /epic_gates

docker logs -f /epic_gates
/docker-entrypoint.sh: /docker-entrypoint.d/ is not empty, will attempt to perform configuration
/docker-entrypoint.sh: Looking for shell scripts in /docker-entrypoint.d/
/docker-entrypoint.sh: Launching /docker-entrypoint.d/10-listen-on-ipv6-by-default.sh
10-listen-on-ipv6-by-default.sh: info: Getting the checksum of /etc/nginx/conf.d/default.conf
10-listen-on-ipv6-by-default.sh: info: Enabled listen on IPv6 in /etc/nginx/conf.d/default.conf
/docker-entrypoint.sh: Launching /docker-entrypoint.d/20-envsubst-on-templates.sh
/docker-entrypoint.sh: Launching /docker-entrypoint.d/30-tune-worker-processes.sh
/docker-entrypoint.sh: Configuration complete; ready for start up

Leave that tailing log open because we’re now going to use it to see the load balancer at work.

Try it out

This section is where the rubber hits the road. We’ll look at confirming round robin balancing, the redirect from HTTP to HTTPS, as well as the failover and recovery when upstream servers go down or come back up again.

Balancing act – round robin

Perform a simple test be running the following curl command twice:

> curl --head --insecure https://ords.example.com/ords/sql-developer

HTTP/1.1 200 OK
Server: nginx/1.23.3
Date: Sat, 11 Feb 2023 23:53:22 GMT
Content-Type: text/html
Connection: keep-alive

The response will indicate that you are talking to nginx and that the request was processed without error. Those curl command options are important. The --head option means that the request action is HEAD and not GET so there’s no body in the response to display and the --insecure option means do not verify the certificate that the server is using. The latter part is important because the certificate is not signed by any trusted CA. What’s significant at this stage is what shows up in the nginx log. See how there are two entries because we had two requests. One went to upstream server listening on port 8080 and the next request went to the next server. That’s round robin routing in action.

 to: 192.168.5.2:8080 {HEAD /ords/sql-developer HTTP/1.1} upstream_response_time 0.022 request_time 0.022
 to: 192.168.5.2:8090 {HEAD /ords/sql-developer HTTP/1.1} upstream_response_time 0.019 request_time 0.019

Forcing HTTPS

In the nginx.conf we have a server definition which redirects all HTTP traffic on port 80 to HTTPS on port 443. This can be verified very simply with a request to a HTTP.

> curl --insecure --include http://ords.example.com/ords/sql-developer
HTTP/1.1 301 Moved Permanently
Server: nginx/1.23.3
Date: Sun, 12 Feb 2023 00:07:51 GMT
Content-Type: text/html
Content-Length: 169
Connection: keep-alive
Location: https://ords.example.com/ords/sql-developer

<html>
<head><title>301 Moved Permanently</title></head>
<body>
<center><h1>301 Moved Permanently</h1></center>
<hr><center>nginx/1.23.3</center>
</body>
</html>

Failover and Recover

The load balancer can share the request processing load across upstream servers but that is not the only thing it brings to the party. When there is a new release of ORDS it would be great to have little, or even none what so ever, downtime while doing the upgrade. When one server is brought down, nginx will identify that it is no longer available and will seamless hand the request over to the next server. The load balancer will continue to check on all upstream servers and when a server is back online will proceed to route requests to it. Let’s take a look at that failover and recovery.

In this example I’ll use APEX (https://ords.example.com/ords/) but you could use SQL Developer Web (https://ords.example.com/ords/sql-developer) if your environment does not have an APEX installation.

Open a browser to https://ords.example.com/ords/ and if you have not done so already, acknowledge the browser’s warning about the self signed certificate and proceed to the page. Login to APEX and navigate through the dashboard. In the nginx docker container log you will see the requests being routed to upstream server ports 8080 and 8090.

to: 192.168.5.2:8080 {GET /ords/f?p=4050:9:13779192078464::::: HTTP/1.1} upstream_response_time 3.288 request_time 3.288
to: 192.168.5.2:8090 {GET /i/libraries/jquery-migrate/3.4.0/jquery-migrate-3.4.0.min.js?v=22.2.0 HTTP/1.1} upstream_response_time 0.008 request_time 0.008
to: 192.168.5.2:8080 {GET /i/libraries/apex/minified/widget.report.min.js?v=22.2.0 HTTP/1.1} upstream_response_time 0.004 request_time 0.005
to: 192.168.5.2:8090 {GET /i/libraries/oraclejet/12.1.3/js/libs/oj/v12.1.3/resources/nls/localeElements.js HTTP/1.1} upstream_response_time 0.010 request_time 0.009
to: 192.168.5.2:8080 {GET /i/apex_ui/img/favicons/favicon.ico HTTP/1.1} upstream_response_time 0.008 request_time 0.008

Now shutdown the ORDS instance that is listening on port 8080 but continue to navigate around APEX in the browser. Although no error displayed in the browser you will see an upstream routing failure mentioned in the logs and then handing that request over to the next upstream server. Then all subsequent requests only go to that upstream server listening on port 8090.

2023/02/09 22:30:49 [error] 30#30: *11 connect() failed (111: Connection refused) while connecting to upstream, client: 172.17.0.1, server: , request: "GET /i/libraries/jquery-migrate/3.4.0/jquery-migrate-3.4.0.min.js?v=22.2.0 HTTP/1.1", upstream: "http://192.168.5.2:8080/i/libraries/jquery-migrate/3.4.0/jquery-migrate-3.4.0.min.js?v=22.2.0", host: "ords.example.com", referrer: "https://ords.example.com/"
to: 192.168.5.2:8080, 192.168.5.2:8090 {GET /i/libraries/jquery-migrate/3.4.0/jquery-migrate-3.4.0.min.js?v=22.2.0 HTTP/1.1} upstream_response_time 0.001, 0.009 request_time 0.010
to: 192.168.5.2:8090 {GET /i/libraries/oraclejet/12.1.3/js/libs/oj/v12.1.3/resources/nls/localeElements.js HTTP/1.1} upstream_response_time 0.007 request_time 0.007
to: 192.168.5.2:8090 {GET /i/apex_ui/img/favicons/favicon.ico HTTP/1.1} upstream_response_time 0.007 request_time 0.007
to: 192.168.5.2:8090 {GET /ords/f?p=4050:115:13779192078464:::115,116,117:: HTTP/1.1} upstream_response_time 3.566 request_time 3.565

Bring the first ORDS server back up while continuing to use APEX in your browser and you’ll see it does not take long before we’re back to a round robin routing to both upstream servers.

to: 192.168.5.2:8090 {GET /ords/f?p=4050:9:13779192078464::::: HTTP/1.1} upstream_response_time 3.859 request_time 3.859
to: 192.168.5.2:8090 {GET /i/libraries/jquery-migrate/3.4.0/jquery-migrate-3.4.0.min.js?v=22.2.0 HTTP/1.1} upstream_response_time 0.008 request_time 0.009
to: 192.168.5.2:8080 {GET /i/libraries/apex/minified/widget.report.min.js?v=22.2.0 HTTP/1.1} upstream_response_time 0.082 request_time 0.082
to: 192.168.5.2:8090 {GET /i/libraries/oraclejet/12.1.3/js/libs/oj/v12.1.3/resources/nls/localeElements.js HTTP/1.1} upstream_response_time 0.005 request_time 0.005
to: 192.168.5.2:8080 {GET /i/apex_ui/img/favicons/favicon.ico HTTP/1.1} upstream_response_time 0.007 request_time 0.007

Trust me

The first time you point your browser to the https://ords.example.com there will be an error displayed because the certificate presented by nginx is self signed. Your browser is unable to verify the certificate and will display an ERR_CERT_AUTHORITY_INVALID message. However, since you know that you have generated the certificate yourself you can tell the browser to proceed.

The browser can also show you the information it has received from the certificate.

You can proceed to use ORDS through nginx with this certificate or arrange for a certificate issued by a certificate authority.

Conclusion

If you’ve gotten this far and followed the steps, you can now run a secure HTTPS load balancer in front of multiple ORDS instances. Congratulations!

As mentioned in a previous article about NGINX, those ORDS instances could be on Apache Tomcat, Oracle WebLogic Server and as shown in this article, ORDS standalone too.

These articles are part of a series that will cover taking advantage of containerised services for using ORDS in the most optimal, scalable and robust manner possible. Stay tuned.

Scaling ORDS and NGINX with docker compose

The next article in this series Quickly getting started with Oracle REST Data Services (ORDS) and Docker will build on this NGINX configuration to show you how to quickly get started using ORDS and Docker. Together we will walk through the basics of building the Docker image, storing configuration in a Docker volume, running multiple ORDS instances and balancing the load using NGINX.


Where did that request go?

In previous posts I’ve covered Load Balancing ORDS with NGINX and ORDS Access Logs in Kibana topics which sets things up nicely for the next logic topic: identifying which ORDS instance the load balancer routed a particular request to.

Separate access logs for each instance

In ORDS Access Logs in Kibana I used filebeat apache module to watch access logs that will have entries in an apache log format. The modules.d/apache.yml file was edited to look for files in a particular location. For this exercise we’ll have 3 ORDS instances writing their access logs to separate files. Since this is a temporary environment, I’ll write to the /tmp/ directory. You will want to use a different directory for a more permanent setup.

modules.d/apache.yml

# Module: apache
# Docs: https://www.elastic.co/guide/en/beats/filebeat/7.13/filebeat-module-apache.html

- module: apache
  # Access logs
  access:
    enabled: true

    # Set custom paths for the log files. If left empty,
    # Filebeat will choose the paths depending on your OS.
    var.paths: ["/tmp/ords-access*.log"]

  # Error logs
  error:
    enabled: false

    # Set custom paths for the log files. If left empty,
    # Filebeat will choose the paths depending on your OS.
    #var.paths:

Separate configuration files

Configuration directory structure

There will be 3 separate ORDS instances running in standalone mode on the same machine all listening on different ports and writing their access logs to different files.

  • Port 9085 => /tmp/ords-access-01.log
  • Port 9090 => /tmp/ords-access-02.log
  • Port 9095 => /tmp/ords-access-03.log

The nginx load balancer will listen on port 8080 and round robin route to the three separate ports.

I have extracted ORDS 21.2.0 distribution zip file to /scratch/ords-21.2.0.174.1826/ and created three distinct configuration directories under that: config_01, config_02, config_03. They all have the same ords/defaults.xml and ords/conf/apex_pu.xml. These files define how to connect to the database.

However, the standalone/standalone.properties specifies a different port and the standalone/etc/jetty.xml specifies a different log location.

Example configuration: config_01

# config_01
# ords/standalone/standalone.properties
jetty.port=9085
standalone.context.path=/ords

<?xml version="1.0"?>
<!DOCTYPE Configure PUBLIC "-//Jetty//Configure//EN" "http://www.eclipse.org/jetty/configure.dtd">
<Configure id="Server" class="org.eclipse.jetty.server.Server">
    <Ref id="Handlers">
      <Call name="addHandler">
        <Arg>
          <New id="RequestLog" class="org.eclipse.jetty.server.handler.RequestLogHandler">
            <Set name="requestLog">
              <New id="RequestLogImpl" class="org.eclipse.jetty.server.CustomRequestLog">
                <Arg>/tmp/ords-access-01.log</Arg>
                <Arg>%{remote}a - %u %t "%r" %s %O "%{Referer}i" "%{User-Agent}i"</Arg>
              </New>
            </Set>
          </New>
        </Arg>
      </Call>
    </Ref>
</Configure>

Repeat the configuration for config_02 and config_3 but change the jetty.port and the access log filename.

Start up the services

The same ords.war will be used with each instance, taking advantage of the -Dconfig.dir=/path/to/config/ startup option. Let’s do this in separate terminal windows.

java -Dconfig.dir=/scratch/ords-21.2.0.174.1826/config_01 -jar /scratch/ords-21.2.0.174.1826/ords.war standalone
java -Dconfig.dir=/scratch/ords-21.2.0.174.1826/config_02 -jar /scratch/ords-21.2.0.174.1826/ords.war standalone
java -Dconfig.dir=/scratch/ords-21.2.0.174.1826/config_03 -jar /scratch/ords-21.2.0.174.1826/ords.war standalone

When they complete the startup process you should see something like this in each terminal window:

2021-08-06T09:27:10.516Z INFO        Oracle REST Data Services initialized
Oracle REST Data Services version : 21.2.0.r1741826
Oracle REST Data Services server info: jetty/9.4.42.v20210604

The nginx.conf will specify the 3 servers to route to. Since I’m running nginx in a docker container, I’ll have to refer to host.docker.internal as the hostname.

events {}
http {
    upstream ords {
        server host.docker.internal:9085;
        server host.docker.internal:9090;
        server host.docker.internal:9095;
    }

    server {
        location / {
            proxy_pass http://ords;
            proxy_set_header Host $host;
        }
    }
}

Refer back to Load Balancing ORDS with NGINX for more information on this configuration. Once the nginx.conf change is made, startup the load balancer.

docker run -p 8080:80 -v ${PWD}/nginx.conf:/etc/nginx/nginx.conf:ro -d nginx

In my case I’ll use curl to access an ORDS service already defined in the database: curl http://localhost:8080/ords/pdbadmin/api/hello and can see an entry in one of the /tmp/ords-access-*.log files.

Review the logs

Follow the steps in ORDS Access Logs in Kibana for starting up Elasticsearch, Kibana and Filebeat. Once that’s all started, use your browser to access http://localhost:5601/ and navigate to Analytics/Discover to see all the log entries from all three access logs.

Using curl again, I have made some further requests to the ORDS REST service at http://localhost:8080/ords/pdbadmin/api/hello and can see that the requests are distributed across the three ORDS standalone instances.

Filebeat-* index pattern used to discover log entries for a specific URL

Summary

There are a number of processes running at this stage but one now has a visual representation of the access logs for each ORDS instances. To recap…

  • Three ORDS standalone instances listening on separate ports and recording access logs to separate files
  • NGINX Load Balancer listing on port 8080 and routing to all three ORDS instances using the default round robin policy
  • Elasticsearch is providing a datastore for log entries
  • Filebeat monitors the log files and pushes changes to Elasticsearch. It expects the file entries to be in an apache log format
  • Kibana provides browser based access to the data in Elasticsearch and has been configured with a Filebeat index pattern definition to make discovering log entries easier

With all this in place, one can see which ORDS instance processed a particular request.