Oracle APEX is the world’s most popular enterprise low-code application platform that enables you to build scalable, secure enterprise apps, with world-class features. These apps can be deployed anywhere – cloud or on-premises. https://apex.oracle.com
Oracle APEX 23.2 was made generally available earlier this month ( November 2023 ). The announcement mentions some new functionality highlights but the release notes are more thorough in going through what is new. What this blog post is particularly interest in is this one…
Quick SQL Updates
Create, maintain, and review application data models with minimal typing, lighting-fast SQL generation, and a built-in entity relationship diagram.
apex.oracle.com
Quick SQL is a markdown-like shorthand syntax that expands to standards-based Oracle SQL. It is useful to rapidly design and prototype data models. Previously, Quick SQL was only available within APEX but it is now available at https://github.com/oracle/quicksql and a distribution of Quick SQL is available through ORDS 23.3.0.
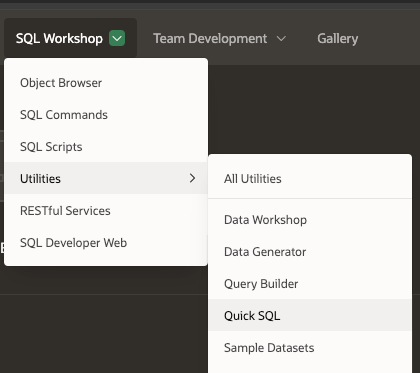
Within APEX the feature is a utility accessible from the SQL Workshop menu.
QuickSQL is a Utility in the SQL Workshop
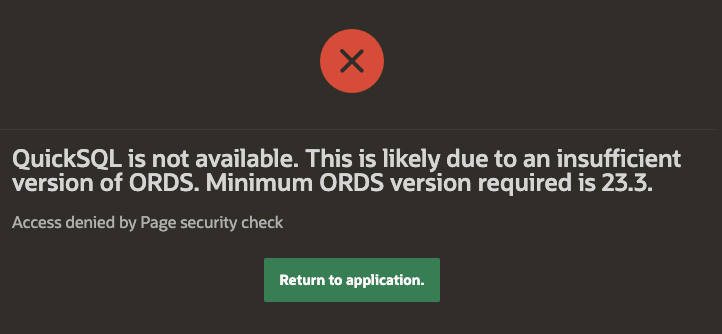
However, if you are running APEX 23.2 to use Quick SQL you must be running it with at least ORDS 23.3.0 to avoid this error message…
What you see when you’re not running ORDS 23.3.0 or above
QuickSQL is not available. This is likely due to an insufficient version of ORDS. Minimum ORDS version required is 23.3.
Solution is simple. Upgrade to ORDS 23.3.0 which was released October 23rd 2023. See oracle.com/rest for download link, etc. In other words, it’s…
What about the Autonomous Database?
At the time of writing the hosted Autonomous Database service offerings on cloud.oracle.com has not been upgraded to ORDS 23.3.0 yet. The current workaround is to use Customer Managed ORDS with Autonomous Database. Although the version of ORDS Metadata in your Autonomous Database will be ORDS 23.2.3 it will work fine with ORDS 23.3.0.
December Update on Autonomous Database
Most Autonomous Database production regions are running ORDS 23.3.0 now so this Quick SQL is not available issue should no longer occur.
Picture this…you’ve been working happily with ORDS for ages and realise that it’s time to upgrade but in your upgrade test environment you start seeing issues with ORDS not being able to create connections at runtime and nothing works!
No matter what you try to do, it’s ORA-20031: Management of Schema enablement has been restricted to ORDS_ADMINISTRATOR_ROLE privilege error messages everywhere!
It is not immediately obvious but the root cause is likely to be the Oracle Database Vault feature that has been doing such a good job in protecting data in the database. Database Vault is a security feature designed to provide additional layers of protection for sensitive data, and can enhance the security of data-driven applications. The sort of data-driven applications that one would use with ORDS. Users can encounter this hurdle while working with this combination of ORDS and Database Vault when upgrading ORDS. This happens especially when ORDS was initially installed first and then Database Vault enabled afterwards.
commit; end; / 2 3 4 5 6 7 8 9 10 11 ’BEGIN * ERROR at line 1: ORA-20031: Management of Schema enablement has been restricted to ORDS_ADMINISTRATOR_ROLE privilege. ORA-06512: at “ORDS_METADATA.ORDS”, line 183 ORA-06512: at “ORDS_METADATA.ORDS_INTERNAL”, line 1048 ORA-01031: insufficient privileges ORA-06512: at “ORDS_METADATA.ORDS_INTERNAL”, line 456 ORA-06512: at “ORDS_METADATA.ORDS_INTERNAL”, line 468 ORA-06512: at “ORDS_METADATA.ORDS_INTERNAL”, line 468 ORA-06512: at “ORDS_METADATA.ORDS_INTERNAL”, line 1034 ORA-06512: at “ORDS_METADATA.ORDS_INTERNAL”, line 922 ORA-06512: at “ORDS_METADATA.ORDS_INTERNAL”, line 1063 ORA-06512: at “ORDS_METADATA.ORDS”, line 167 ORA-06512: at line 3
Welcome to the third instalment of my series on using Oracle REST Data Services (ORDS), NGINX, Docker, SSL and Autonomous Database! In this article, I will show you how to quickly get started using ORDS and Docker. Together we will walk through the basics of building the Docker image, storing configuration in a Docker volume, running multiple ORDS instances and balancing the load using NGINX. With the help of this guide, you will be able to have a load balanced Customer Managed ORDS with Autonomous Database up and running in no time. To recap on the previous articles:
Load Balancing ORDS with NGINX introduced the concept of load balancing and the most basic of configurations to get started with NGINX running in docker. That was entirely using HTTP as the transport protocol.
HTTPS Load Balance: NGINX & ORDS took that a step further by using a self signed certificate so that the traffic between client and server was over the more secure HTTPS protocol. That was with ORDS instances running on port 8080 and 8090.
Autonomous Database – hosted and managed for free
Autonomous Database
In this article the ORDS instances will be running in Docker and sharing a configuration for an Autonomous Database hosted on Oracle Cloud Infrastructure Free Tier resources. The prerequisite for this article is an understanding of Installing and Configuring Customer Managed ORDS on Autonomous Database. The database has ORDS and APEX already installed. However, the credentials for ORDS Runtime user and PLSQL Gateway user are not known so the ords install adb command instruction will be used to create and configure additional users in the database to be used by our new ORDS instances.
Oracle Content Delivery Network
In the previous article we had the APEX images in the global/doc_root directory. It is much easier to not have to configure an ORDS instance to serve those static files and to use the Oracle Content Deliver Network instead. One should note that by default, the APEX installation in the Autonomous Database does not use the Oracle CDN for the APEX static resources. So if you have not done so already, use Oracle CDN for the APEX images. The URL to use will depend on the version of APEX in use. At the time of writing, that is APEX 22.2.0. Once you have made this change the next APEX upgrade will keep the IMAGE_PREFIX parameter in synch. See https://support.oracle.com/epmos/faces/DocumentDisplay?id=2817084.1 and https://blogs.oracle.com/apex/post/running-customer-managed-ords-on-autonomous-database-heres-how-to-get-ready-for-apex-211-upgrade for more information on using Oracle CDN with APEX
As shown in the previous article it is already straight forward to use ORDS from the command line to configure and run in standalone mode. In doing so, you are satisfying the most fundamental requirement for ORDS by providing a supported Java Runtime Environment for it to run in. Running ORDS in Docker takes care of that dependancy and provides a consistent structure. For your convenience, I have defined a Dockerfile to create an image with the latest version of ORDS built in. It does require the JDK 17 image from Oracle Container Registry jdk repository. To use images from the Oracle Container Registry you must first sign in using your Oracle Account to accept the license agreement for the Oracle image. Once you have accepted the licence, follow the installation instructions on the page to login and pull the jdk:17 image:
That will pull into your local Docker repository the most recent Oracle JDK 17 build.
Dockerfile for ORDS Entrypoint
The configuration is quite simple. A couple of folders are exposed for providing configuration and library extensions. That configuration directory is essential but in the majority of cases, customers do not have custom extensions so the lib/ext folder will not be used in this article. Similarly, although the Dockerfile specifies that both port 8080 and port 8443 should be exposed, we will only be using port 8080 for HTTP traffic in this article. It is NGINX that will be terminating the HTTPS traffic before routing upstream to our ORDS instances.
The Dockerfile we’ll use to create the ORDS image is available at ORDS_Latest_Dockerfile. Contents listed below.
#
# Defines a docker image, based on the Oracle JDK image, to run Oracle REST Data Services. During the image building
# process the most recent version of ORDS will be automatically downloaded and extracted.
#
# Volumes for configuration and lib/ext are defined.
#
# docker run -p 8080:8080 -v ords-adb-config:/opt/ords-config/ -v ords-lib-ext:/opt/ords/latest/lib/ext ords-latest/oraclejdk
#
# See https://peterobrien.blog/ for more information and examples.
#
FROM container-registry.oracle.com/java/jdk:17
MAINTAINER Peter O'Brien
ENV LATEST=/opt/ords-latest/
ENV CONFIG=/opt/ords-config/
WORKDIR $LATEST
ADD https://download.oracle.com/otn_software/java/ords/ords-latest.zip $LATEST
RUN jar xf ords-latest.zip; rm ords-latest.zip; chmod +x bin/ords
VOLUME $LATEST/lib/ext/ $CONFIG
EXPOSE 8080
EXPOSE 8443
WORKDIR $CONFIG
ENTRYPOINT ["/opt/ords-latest/bin/ords"]
CMD ["serve"]
To use the above Dockerfile and build an image locally called ords-latest/oraclejdk use the following command
> docker build --tag ords-latest/oraclejdk \
https://gist.githubusercontent.com/pobalopalous/fc6ab4ee777f6b7f32a400e920df682d/raw/ORDS_Latest_Dockerfile

Downloading build context from remote url: https://gist.githubusercontent.com/pobalopalous/fc6ab4ee777f6b7f32a400e920df682d/raw/ORDS_Latest_Dockerfile [===============Downloading build context from remote url: https://gist.githubusercontent.com/pobalopalous/fc6ab4ee777f6b7f32a400e920df682d/raw/ORDS_Latest_Dockerfile [==================================================>]     878B/878B
Downloading build context from remote url: https://gist.githubusercontent.com/pobalopalous/fc6ab4ee777f6b7f32a400e920df682d/raw/ORDS_Latest_Dockerfile [==================================================>]     878B/878B
Sending build context to Docker daemon   2.56kB
Step 1/13 : FROM container-registry.oracle.com/java/jdk:17
 ---> 4945318567e9
Step 2/13 : MAINTAINER Peter O'Brien
 ---> Using cache
 ---> 1bb5b3ea1d92
Step 3/13 : ENV LATEST=/opt/ords-latest/
 ---> Using cache
 ---> 4798e9cbc8d1
Step 4/13 : ENV CONFIG=/opt/ords-config/
 ---> Using cache
 ---> a1f6e0bf441c
Step 5/13 : WORKDIR $LATEST
 ---> Using cache
 ---> 1b961db4ee2d
Step 6/13 : ADD https://download.oracle.com/otn_software/java/ords/ords-latest.zip $LATEST
Downloading [==================================================>]  94.62MB/94.62MB
 ---> Using cache
 ---> f6d009ada2f1
Step 7/13 : RUN jar xf ords-latest.zip; rm ords-latest.zip; chmod +x bin/ords
 ---> Using cache
 ---> f6d20c737486
Step 8/13 : VOLUME $LATEST/lib/ext/ $CONFIG
 ---> Using cache
 ---> fde34609973e
Step 9/13 : EXPOSE 8080
 ---> Using cache
 ---> 77933cb86baa
Step 10/13 : EXPOSE 8443
 ---> Using cache
 ---> 094fc3d8332b
Step 11/13 : WORKDIR $CONFIG
 ---> Using cache
 ---> 2d1b41e2c6f0
Step 12/13 : ENTRYPOINT ["/opt/ords-latest/bin/ords"]
 ---> Using cache
 ---> 9974ac45526d
Step 13/13 : CMD ["serve"]
 ---> Using cache
 ---> 4cbe74b80bb5
Successfully built 4cbe74b80bb5
Successfully tagged ords-latest/oraclejdk:latest
You now have an image in your local Docker repository ready to run. Note that the base image is an Oracle JDK 17 one. You can of course change that to something else. At the time of writing, only Oracle JDK 11 and 17 are supported Java Runtime Environments for ORDS.
Docker volume for ORDS configuration
Now it’s time to start putting the ORDS configuration together. In the previous article I outlined a configuration folder structure which was defined on the host computer file system. We are deviating from that in two ways. First, as outlined above, we will not have any APEX images in the global/doc_root directory because we are using the Oracle CDN with APEX in the hosted Autonomous Database. Second, we’re using a Docker volume, rather than the local filesystem, to store all the configuration.
Docker volumes are an ideal way to persist data generated by and used by Docker containers. They provide several benefits, such as:
Data isolation: Docker volumes are independent of the underlying filesystem, which ensures that the data persists even if the container is moved to a different host.
Easy deployment: Docker volumes can be shared across multiple containers and hosts, making it easy to deploy applications in different environments.
Data security: Docker volumes are stored outside the container, so they are not affected by any changes within the container. This ensures that your data remains secure and consistent.
Performance: Docker volumes are stored on the host system, which can be faster than using shared storage. This can improve the performance of your containers.
The first configuration item for a Customer Managed ORDS on Autonomous Database is the wallet and getting that wallet zip file into the Docker volume involves a few steps that may not be intuitive if you are not familiar with Docker volumes. You see, to copy a file into a Docker volume, one must do that through a running container, but before we have a running container, we must first create the volume.
Let’s assume you have downloaded your Autonomous Database wallet zip file to your ~/Downloads directory. For example: ~/Downloads/Wallet_DB202301101106.zip. We’re going to put it in the ords-adb-config volume as /opt/ords-config/Wallet_Autonomous.zip but first we must start a container to use it.
Note that we’re not mapping to any ports and once we’re finished with this container it will be removed. Let’s copy that wallet zip file. We know the name of the container is ords-latest because that’s the name we gave in the docker run command. Your wallet file name will be different but we’re going to copy it to /opt/ords-config/Wallet_Autonomous.zip to keep things simple for subsequent commands. If you are going to have multiple pools, you will have to have distinct filenames.
That ords-latest container is no longer required. It only came into existence to allow you to copy the zip file. When you stop the container it should be removed automatically.
> docker stop ords-latest
Configuration for Customer Managed ORDS
The wallet zip file is a good start but now it’s time to run through the Customer Managed ORDS with Autonomous Database install step which will create additional users in the database and store the necessary pool settings in the ords-adb-config Docker volume. We’re going to use the non-interactive silent installation so will have to provide the passwords for the existing ADMIN user, and the two users to create. Referring back to the ORDS documentation, the ords install adb command is…
Let’s create that file with the passwords to use. We can delete it once the ords install adb command completes. Create the adbs_passwords.txt file with three passwords on each line:
<PASSWORD FOR admin-user>
<PASSWORD FOR db-user>
<PASSWORD FOR gateway-user>
In my case the adbs_passwords.txt file looks like this:
With my passwords file I can pass all these details in one command as I run it in Docker. Note that the entire command line also specifies -i which instructs the docker engine to use standard input ( STDIN ) for the container.
ORDS: Release 22.4 Production on Mon Mar 06 09:52:30 2023
Copyright (c) 2010, 2023, Oracle.
Configuration: /opt/ords-config/
Oracle REST Data Services - Non-Interactive Customer Managed ORDS for Autonomous Database Connecting to Autonomous database user: ADMIN TNS Service: db202301101106_low Retrieving information Checking Autonomous database user: ORDS_PLSQL_GATEWAY2 TNS Service: db202301101106_low The setting named: db.wallet.zip.path was set to: /opt/ords-config/Wallet_Autonomous.zip in configuration: default The setting named: db.wallet.zip.service was set to: db202301101106_low in configuration: default The setting named: db.username was set to: ORDS_PUBLIC_USER2 in configuration: default The setting named: db.password was set to: ****** in configuration: default The setting named: plsql.gateway.mode was set to: proxied in configuration: default The setting named: feature.sdw was set to: true in configuration: default The global setting named: database.api.enabled was set to: true The setting named: restEnabledSql.active was set to: true in configuration: default The setting named: security.requestValidationFunction was set to: ords_util.authorize_plsql_gateway in configuration: default 2023-03-06T09:52:38.256Z INFO Connecting to Autonomous database user: ADMIN TNS Service: db202301101106_low ------------------------------------------------------------ Date : 06 Mar 2023 09:52:38 Release : Oracle REST Data Services 22.4.4.r0411526
Database : Oracle Database 19c Enterprise Edition DB Version : 19.18.0.1.0 ------------------------------------------------------------ Container Name: C4TOSECRETNQ2JA_DB202301101106 ------------------------------------------------------------
[*** script: ords_runtime_user.sql]
PL/SQL procedure successfully completed.
2023-03-06T09:52:42.532Z INFO ... Verifying Autonomous Database runtime user [*** script: ords_gateway_user.sql]
PL/SQL procedure successfully completed.
2023-03-06T09:52:43.674Z INFO ... Verifying Autonomous Database gateway user 2023-03-06T09:52:43.675Z INFO Completed configuring for Customer Managed Oracle REST Data Services version 22.4.4.r0411526. Elapsed time: 00:00:05.407
[*** Info: Completed configuring for Customer Managed Oracle REST Data Services version 22.4.4.r0411526. Elapsed time: 00:00:05.407 ] 2023-03-06T09:52:43.720Z INFO To run in standalone mode, use the ords serve command: 2023-03-06T09:52:43.723Z INFO ords --config /opt/ords-config serve 2023-03-06T09:52:43.723Z INFO Visit the ORDS Documentation to access tutorials, developer guides and more to help you get started with the new ORDS Command Line Interface (http://oracle.com/rest).
Note that because the Docker entrypoint for the image that we built earlier was specified as /opt/ords-latest/bin/ords which means we can run the ords command line with any supported commands and arguments.
Don’t forget to rmadbs_passwords.txt. You do not need it anymore.
In summary, we’ve just told ORDS to use the wallet zip file and the ADMIN credentials to connect to the hosted service, create some users and persist configuration details on the ords-adb-config volume. The docker container exits because the command is complete. You can see the ORDS configuration by running the ords config list command.
> docker run -v ords-adb-config:/opt/ords-config/ \
             ords-latest/oraclejdk config list

ORDS: Release 22.4 Production on Mon Mar 06 19:07:27 2023

Copyright (c) 2010, 2023, Oracle.

Configuration:
  /opt/ords-config/

Database pool: default

Setting                              Value                                    Source
----------------------------------   --------------------------------------   -----------
database.api.enabled                 true                                     Global
db.password                          ******                                   Pool Wallet
db.username                          ORDS_PUBLIC_USER2                        Pool
db.wallet.zip.path                   /opt/ords-config/Wallet_Autonomous.zip   Pool
db.wallet.zip.service                db202301101106_low                       Pool
feature.sdw                          true                                     Pool
plsql.gateway.mode                   proxied                                  Pool
restEnabledSql.active                true                                     Pool
security.requestValidationFunction   ords_util.authorize_plsql_gateway        Pool
No doubt you will remember this from the previous article about HTTPS and NGINX with ORDS. There’s one more configuration setting to address. That’s to tell ORDS what header key / value pair to use to trust that the request was received by a load balancer over HTTPS even though ORDS is receiving traffic over HTTP.
docker run -v ords-adb-config:/opt/ords-config/ \
  ords-latest/oraclejdk \
  config set security.httpsHeaderCheck "X-Forwarded-Proto: https"
At this point we have a Docker volume ords-adb-config which has all the configuration settings necessary to run one or more Customer Managed ORDS with Autonomous Database instances as we see fit.
Start it up!
From the previous article you have a NGINX configuration that you have running in Docker to talk to two ORDS instances listening on port 8080 and 8090. Now let’s replace those ORDS instances with ones running in Docker with the above ords-adb-config Docker volume. You can leave the NGINX container running but if you have not done so already, shutdown those ORDS instances.
Up until now, we have not specified a container name when running ORDS in Docker. For convenience, we’ll refer to the container listening on port 8080 as ords-latest-8080 and the other one as ords-latest-8090.
To check that they are up and running have a look at the process list.
> docker ps
CONTAINER ID   IMAGE                   COMMAND                  CREATED        STATUS        PORTS                                                                      NAMES
2c11ababaf1b   ords-latest/oraclejdk   "/opt/ords-latest/bi…"   4 hours ago    Up 4 hours    8443/tcp, 0.0.0.0:8090->8080/tcp, :::8090->8080/tcp                        ords-latest-8090
7fd8c821be64   nginx                   "/docker-entrypoint.…"   6 hours ago    Up 6 hours    0.0.0.0:80->80/tcp, :::80->80/tcp, 0.0.0.0:443->443/tcp, :::443->443/tcp   optimistic_kilby
9e0d8ec541bc   30e6e561dc7d            "/opt/ords-latest/bi…"   6 hours ago    Up 6 hours    0.0.0.0:8080->8080/tcp, :::8080->8080/tcp                                  ords-latest-8080
Also use the docker logs command to keep track of the activity and status. We’ve given specific names for the two ORDS containers so we can refer to them directly,
> docker logs -f ords-latest-8080

ORDS: Release 22.4 Production on Mon Mar 06 13:48:57 2023

Copyright (c) 2010, 2023, Oracle.

Configuration:
  /opt/ords-config/

2023-03-06T13:48:58.335Z INFO        HTTP and HTTP/2 cleartext listening on host: 0.0.0.0 port: 8080
2023-03-06T13:48:58.389Z INFO        Disabling document root because the specified folder does not exist: /opt/ords-config/global/doc_root
2023-03-06T13:49:07.009Z INFO        Configuration properties for: |default|lo|
...
Mapped local pools from /opt/ords-config/databases:
  /ords/                              => default                        => VALID


2023-03-06T13:49:14.790Z INFO        Oracle REST Data Services initialized
Oracle REST Data Services version : 22.4.4.r0411526
Oracle REST Data Services server info: jetty/10.0.12
Oracle REST Data Services java info: Java HotSpot(TM) 64-Bit Server VM 17.0.6+9-LTS-190
> docker logs -f ords-latest-8090

ORDS: Release 22.4 Production on Mon Mar 06 13:56:22 2023

Copyright (c) 2010, 2023, Oracle.

Configuration:
  /opt/ords-config/

2023-03-06T13:56:23.011Z INFO        HTTP and HTTP/2 cleartext listening on host: 0.0.0.0 port: 8080
2023-03-06T13:56:23.066Z INFO        Disabling document root because the specified folder does not exist: /opt/ords-config/global/doc_root
2023-03-06T13:56:32.683Z INFO        Configuration properties for: |default|lo|
...
Mapped local pools from /opt/ords-config/databases:
  /ords/                              => default                        => VALID


2023-03-06T13:56:32.683Z INFO        Oracle REST Data Services initialized
Oracle REST Data Services version : 22.4.4.r0411526
Oracle REST Data Services server info: jetty/10.0.12
Oracle REST Data Services java info: Java HotSpot(TM) 64-Bit Server VM 17.0.6+9-LTS-190
As a reminder, to check the logs for the NGINX container you’ll have to specify the container name that was allocated at runtime. In my case it is optimistic_kilby.
> docker logs -f optimistic_kilby
/docker-entrypoint.sh: /docker-entrypoint.d/ is not empty, will attempt to perform configuration
/docker-entrypoint.sh: Looking for shell scripts in /docker-entrypoint.d/
/docker-entrypoint.sh: Launching /docker-entrypoint.d/10-listen-on-ipv6-by-default.sh
10-listen-on-ipv6-by-default.sh: info: Getting the checksum of /etc/nginx/conf.d/default.conf
10-listen-on-ipv6-by-default.sh: info: Enabled listen on IPv6 in /etc/nginx/conf.d/default.conf
/docker-entrypoint.sh: Launching /docker-entrypoint.d/20-envsubst-on-templates.sh
/docker-entrypoint.sh: Launching /docker-entrypoint.d/30-tune-worker-processes.sh
/docker-entrypoint.sh: Configuration complete; ready for start up
 to: 192.168.5.2:8080 {GET / HTTP/1.1} upstream_response_time 0.155 request_time 0.155
172.17.0.1 - - [06/Mar/2023:13:52:58 +0000] "GET /ords/ HTTP/1.1" 301 169 "-" "Mozilla/5.0 (Macintosh; Intel Mac OS X 10_15_7) AppleWebKit/537.36 (KHTML, like Gecko) Chrome/110.0.0.0 Safari/537.36"
 to: 192.168.5.2:8090 {GET /ords/ HTTP/1.1} upstream_response_time 2.356 request_time 2.356
 to: 192.168.5.2:8080 {GET /ords/f?p=4550:1:117375695883225::::: HTTP/1.1} upstream_response_time 2.101 request_time 2.101
 to: 192.168.5.2:8090 {GET / HTTP/1.1} upstream_response_time 0.006 request_time 0.006
172.17.0.1 - - [06/Mar/2023:13:53:03 +0000] "GET /ords/ HTTP/1.1" 301 169 "-" "Mozilla/5.0 (Macintosh; Intel Mac OS X 10_15_7) AppleWebKit/537.36 (KHTML, like Gecko) Chrome/110.0.0.0 Safari/537.36"
 to: 192.168.5.2:8080 {GET /ords/ HTTP/1.1} upstream_response_time 2.045 request_time 2.045
From the NGINX logs you can see that traffic is being alternated between the ORDS instance listening on port 8080 and 8090.
As before, the request goes over HTTPS through NGINX and routed upstream to an ORDS instance.
You can stop a container and restart it to confirm the failover works as before.
Conclusion
Building on the previous articles you now have both NGINX and ORDS running in Docker and using an Autonomous Database. This is still effectively a development / proof of concept environment because the DNS entry and SSL certificate are not properly setup to operate seamlessly. The nginx.conf is hardcoded with two upstream ORDS instances to use and the containers are using two specific ports on the host machine. In the next article we’ll look at using docker compose so that we have more flexibility around this.
Using the Dockerfile from this article you have created an ORDS image which can be used to run ORDS commands and update your configuration in ords-adbs-config. As an additional exercise you can look into increasing pool size (jdbc.MaxLimit) and doing a rolling restart of the two ORDS docker containers to pick up that configuration change.
This article is part of a series about using ORDS on Docker with NGINX, SSL and Oracle Autonomous Database. The previous article is Load Balancing ORDS with NGINX which introduced the concept of load balancing and the most basic of configurations to get started with NGINX running in docker. That was entirely using HTTP as the transport protocol.
Around this time two years ago, in the Load Balancing ORDS with NGINX article, I covered what was certainly the quickest way to spin up a load balancer in front of your ORDS instances: NGINX with Load Balancing configuration and docker official NGINX image. It’s time to build on that to configure the load balancer for HTTPS traffic and to demonstrate that not only is a round robin routing policy in place but also the desired failover / recovery when an ORDS instance is stopped and started.
In this article I will go through the steps of generating a self signed certificate so that HTTPS traffic can be encrypted. Then I will walk through the configuration of NGINX to receive requests over HTTPS and distribute those requests to ORDS instances running on the same machine which accept unencrypted traffic. The first thing we need are two ORDS instances configured for the same database.
ORDS Instances
In this example there is one database and two ORDS instances running in standalone mode on different ports. Both ORDS instances will be sharing the same configuration directory. The configuration directory not only contains the pool and global settings but the global/doc_root directory contains the APEX image files that are required for Oracle APEX to operate. It is recommended to use the APEX CDN where possible but in this case the files have been downloaded and extract from apex.oracle.com.
The configuration is fairly standard but there are two important configuration settings needed so that the ORDS instances will accept requests from the load balancer over HTTP even though the load balancer is receiving the requests over HTTPS. These settings are security.httpsHeaderCheck and security.externalSessionTrustedOrigins.
~/Downloads/ords-22.4.3.033.1239/bin/ords --config /path/to/config config set security.httpsHeaderCheck "X-Forwarded-Proto: https"

~/Downloads/ords-22.4.3.033.1239/bin/ords --config /path/to/config config set security.externalSessionTrustedOrigins "https://ords.example.com"
You’ll notice that the most recent released version of ORDS is being used from the downloads directory that it was extracted to. Of course you are free to download and run ORDS in whatever directory makes sense for your system.
The security.httpsHeaderCheck setting tells ORDS what header, and value, to look for to confirm that the load balancer received the request over HTTPS. The security.externalSessionTrustedOrigins setting tells ORDS that requests with these Origin values can be trusted in a secured context.
The ORDS instances are started in two separate terminal windows relying on 8080 to be the default port for one and specifying 8090 as the port for the second instances.
~/Downloads/ords-22.4.3.033.1239/bin/ords --config /path/to/config serve
...
Configuration:
  /path/to/config

INFO        HTTP and HTTP/2 cleartext listening on host: 0.0.0.0 port: 8080
INFO        The document root is serving static resources located in: /path/to/config/global/doc_root
...
INFO        Oracle REST Data Services initialized
Oracle REST Data Services version : 22.4.3.r0331239
Oracle REST Data Services server info: jetty/10.0.12
Oracle REST Data Services java info: Java HotSpot(TM) 64-Bit Server VM 11.0.13+10-LTS-370
~/Downloads/ords-22.4.3.033.1239/bin/ords --config /path/to/config serve --port 8090

...
Configuration:
  /path/to/config

INFO        HTTP and HTTP/2 cleartext listening on host: 0.0.0.0 port: 8090
INFO        The document root is serving static resources located in: /path/to/config/global/doc_root
...
INFO        Oracle REST Data Services initialized
Oracle REST Data Services version : 22.4.3.r0331239
Oracle REST Data Services server info: jetty/10.0.12
Oracle REST Data Services java info: Java HotSpot(TM) 64-Bit Server VM 11.0.13+10-LTS-370
There are going to be files involved in this exercise and instead of repeating which files are where I’ll outline the folder structure for the nginx configuration here. Everything is going to exist under a directory called ords-nginx in the user home directory.
~/ords-nginx/ directory structure
|
|-nginx.conf <- configuration file
|-certs/
     |-nginx.crt <- certificate for the domain
     |-nginx.key <- RSA private key
Certificate for HTTPS
A certificate is required for HTTPS to make sure that the website you are visiting is secure. Secure in this context means that the data sent between client and website is not intercepted by malicious actors. Without the certificate, the website would not be secure, and any data sent between the website and the user could be compromised. In general, certificates are issued by Certificate Authorities ( CA) that are trusted by most browsers. In this article, for convenience, we’ll use a self signed certificate rather than one issued by a CA.
A self-signed SSL certificate is an identity certificate that is signed and issued by the same entity that is using it. It is used to secure a network connection between two or more systems and is used to prove the identity of a server or website. Self-signed SSL certificates are free to generate, but they are not trusted by web browsers and other clients, so they are not recommended for use on public websites. They are, however, useful for internal networks, where trust is already established.
The certificate Common Name attribute corresponds to the website address. Typically there would be a domain name service ( DNS ) which resolves that name to a specific IP address and server. In this article I’m taking a short cut and not using a DNS but rather telling my machine that ords.example.com is actually the local IP address 127.0.0.1. There are other options such as Dnsmasq that can make defining a custom domain name in your network a bit easier. For now, I have an entry in /etc/hosts that looks like this:
##
# Host Database
#
# localhost is used to configure the loopback interface
# when the system is booting.  Do not change this entry.
##
127.0.0.1	localhost
127.0.0.1       ords.example.com
When I send a request to https://ords.example.com/ it will be routed to the 127.0.0.1 loopback address. Now that little bit of network traffic configuration is in place it’s time to create a self signed certificate for the ords.example.com host name. Browsers will report the self signed certificate as Not Secure because it can not be verified with a trusted Certificate Authority, but the traffic will be encrypted.
The goal is to have a self signed certificate for traffic to an address that is actually a local machine
Self Signed Certificate
A self signed certificate is a certificate that is not signed by a trusted Certificate Authority (CA) and is used for testing purposes or for applications that are only accessed within a trusted network. In other words, not accessed from the internet. If your goal is to have nginx as a load balancer accepting traffic from the public then after you have completed the setup in this article, replace the self signed certificates with a certificate for your domain which you have obtained from a CA.
To generate our self signed certificate for ords.example.com we’ll use openssl which is most likely already installed on your operating system. Open a terminal window, change your working directory to ~/ords-nginx/ and follow these steps to create a self signed certificate using openssl.
Generate a Private Key and Certificate
A public-private key pair is a set of two cryptographic keys, consisting of a public key and a private key. The public key is used for encryption and decryption, while the private key is used for signing and verification. Public keys are exchanged between two parties and can be used to encrypt data to be sent securely. Private keys are kept secret and are used to prove the identity of the sender. The two keys are mathematically related and are used together to establish a secure communication link.
Using openssl one can have separate distinct steps to generate a private key, generate a Certificate Signing Request and generate the certificate. We can also do all that with a single openssl command executed in the ~/ords-nginx/ directory:
> openssl req -x509 -nodes -days 365 \
              -newkey rsa:2048 \
              -keyout certs/nginx.key \
              -out certs/nginx.crt

Generating a 2048 bit RSA private key
.................................................+++++
....+++++
writing new private key to 'certs/nginx.key'
-----
You are about to be asked to enter information that will be incorporated
into your certificate request.
What you are about to enter is what is called a Distinguished Name or a DN.
There are quite a few fields but you can leave some blank
For some fields there will be a default value,
If you enter '.', the field will be left blank.
-----
Country Name (2 letter code) []:
State or Province Name (full name) []:
Locality Name (eg, city) []:
Organization Name (eg, company) []:
Organizational Unit Name (eg, section) []:
Common Name (eg, fully qualified host name) []:ords.example.com
Email Address []:
That will generate a 2048-bit RSA private key called nginx.key and a self signed certificate for the ords.example.com host name called nginx.crt. You will note that the majority of prompts are left empty and the only field that a value is entered for is Common Name. And that’s it! You have successfully created a self signed certificate using openssl and that certificate will remain valid for 365 days. You can now use this certificate with nginx.
NGINX
This section has two parts: create the configuration and run the nginx docker container with that configuration.
Configuration
Create the ~/ords-nginx/nginx.conf file as below. I will summarise what each line does but you should refer to nginx documentation for further details on the nginx configuration entries.
# No specific connection processing instructions
events {}

# The configuration for http(s) traffic
http {
# Log format to use for access log.
# This will show which server a request gets routed to.
    log_format upstreamlog '$server_name to: $upstream_addr {$request} '
   'upstream_response_time $upstream_response_time'
   ' request_time $request_time';

# List of servers to route to. Call that list 'ords'.
# Running in docker so host.docker.internal used to point to
# host machine which is running ORDS instances.
    upstream ords {
        server host.docker.internal:8080;
        server host.docker.internal:8090;
    }

# Configure a http server for port 80
# All requests are redirected to https
    server {
        listen 80 default_server;
        listen [::]:80 default_server;
        server_name _;
        return 301 https://$host$request_uri;
    }

# Configure a https server for port 443
    server {
        listen 443 ssl default_server;
        listen [::]:443 ssl default_server;
        ssl_certificate /etc/certs/nginx.crt;
        ssl_certificate_key /etc/certs/nginx.key;
# Specify the format to apply to access log
        access_log /var/log/nginx/access.log upstreamlog;
# Any requests get passed upstream to the 'ords' list
        location / {
            proxy_pass http://ords;
# Tells the upstream server what hostname the client used
            proxy_set_header Host $host;
# Tells the upstream server that https was used
            proxy_set_header X-Forwarded-Proto https;
        }
    }
}
The very first line is an empty events {} section. This is the section where directives that affect connection processing are specified. We have no particular connection processing needs beyond the default so it’s left empty. If we didn’t have this section here a [emerg] no “events” section in configuration message will appear in the logs.
The http section of the configuration has the important stuff. In that, as outlined by the above comments we have:
An access log format which will include information on which upstream server a request is routed to. This will be useful later to confirm round-robin routing and seamless failover / recovery occurs.
A list of servers to route traffic to. We have two in this example but it could be any number of ORDS instances.
A server configuration to listen on port 80 but redirect all requests to use HTTPS and therefore port 443.
A server configuration to list on port 443
Specifies the file paths for the certificate and key files we generated earlier.
Specifies the access log format to use.
Specifies that for any location in the request URL the requested should be routed the ‘ords’ upstream servers.
Irrespective of what the upstream server host name is, the Host header is set to whatever the client provided in the request. This is essential so that when ORDS must generated absolute URL values for a response the URL will be usable to the client.
A header is set which corresponds to the ORDS configuration security.httpsHeaderCheck which was mentioned at the top of this article. This confirms to ORDS that although the upstream server received a request over HTTP, the load balancer received the request from the client over HTTPS.
Now that you have an NGINX configuration file it can be put to work.
Run
The ORDS instances are running in standalone mode, listening for HTTP requests on port 8080 and 8090 respectively. Let’s start NGINX in a docker container. While still in that ~/ords-nginx/ directory run the following:
That will run NGINX in a docker container using the specific configuration as well as certificate and key files. Since the -d option is specified, the container is running in the background so the only output you will have seen is a long list of letters and numbers which is the container id. It will look like: 422598c154ee68db4ee6ffd3ed91e591fa19215539b3486517842f0ac47c6874
For a more human friendly way of referring to the container you can use the name which was automatically generated for it. You could run docker ps to get a list of the running containers and look for the nginx one or use docker inspect to get the container name.
Your container name will be different. The leading slash can be ignored. Let’s use that name to tail the docker container log.
> docker logs -f /epic_gates

docker logs -f /epic_gates
/docker-entrypoint.sh: /docker-entrypoint.d/ is not empty, will attempt to perform configuration
/docker-entrypoint.sh: Looking for shell scripts in /docker-entrypoint.d/
/docker-entrypoint.sh: Launching /docker-entrypoint.d/10-listen-on-ipv6-by-default.sh
10-listen-on-ipv6-by-default.sh: info: Getting the checksum of /etc/nginx/conf.d/default.conf
10-listen-on-ipv6-by-default.sh: info: Enabled listen on IPv6 in /etc/nginx/conf.d/default.conf
/docker-entrypoint.sh: Launching /docker-entrypoint.d/20-envsubst-on-templates.sh
/docker-entrypoint.sh: Launching /docker-entrypoint.d/30-tune-worker-processes.sh
/docker-entrypoint.sh: Configuration complete; ready for start up
Leave that tailing log open because we’re now going to use it to see the load balancer at work.
Try it out
This section is where the rubber hits the road. We’ll look at confirming round robin balancing, the redirect from HTTP to HTTPS, as well as the failover and recovery when upstream servers go down or come back up again.
Balancing act – round robin
Perform a simple test be running the following curl command twice:
The response will indicate that you are talking to nginx and that the request was processed without error. Those curl command options are important. The --head option means that the request action is HEAD and not GET so there’s no body in the response to display and the --insecure option means do not verify the certificate that the server is using. The latter part is important because the certificate is not signed by any trusted CA. What’s significant at this stage is what shows up in the nginx log. See how there are two entries because we had two requests. One went to upstream server listening on port 8080 and the next request went to the next server. That’s round robin routing in action.
 to: 192.168.5.2:8080 {HEAD /ords/sql-developer HTTP/1.1} upstream_response_time 0.022 request_time 0.022
 to: 192.168.5.2:8090 {HEAD /ords/sql-developer HTTP/1.1} upstream_response_time 0.019 request_time 0.019
Forcing HTTPS
In the nginx.conf we have a server definition which redirects all HTTP traffic on port 80 to HTTPS on port 443. This can be verified very simply with a request to a HTTP.
> curl --insecure --include http://ords.example.com/ords/sql-developer
HTTP/1.1 301 Moved Permanently
Server: nginx/1.23.3
Date: Sun, 12 Feb 2023 00:07:51 GMT
Content-Type: text/html
Content-Length: 169
Connection: keep-alive
Location: https://ords.example.com/ords/sql-developer

<html>
<head><title>301 Moved Permanently</title></head>
<body>
<center><h1>301 Moved Permanently</h1></center>
<hr><center>nginx/1.23.3</center>
</body>
</html>
Failover and Recover
The load balancer can share the request processing load across upstream servers but that is not the only thing it brings to the party. When there is a new release of ORDS it would be great to have little, or even none what so ever, downtime while doing the upgrade. When one server is brought down, nginx will identify that it is no longer available and will seamless hand the request over to the next server. The load balancer will continue to check on all upstream servers and when a server is back online will proceed to route requests to it. Let’s take a look at that failover and recovery.
In this example I’ll use APEX (https://ords.example.com/ords/) but you could use SQL Developer Web (https://ords.example.com/ords/sql-developer) if your environment does not have an APEX installation.
Open a browser to https://ords.example.com/ords/ and if you have not done so already, acknowledge the browser’s warning about the self signed certificate and proceed to the page. Login to APEX and navigate through the dashboard. In the nginx docker container log you will see the requests being routed to upstream server ports 8080 and 8090.
to: 192.168.5.2:8080 {GET /ords/f?p=4050:9:13779192078464::::: HTTP/1.1} upstream_response_time 3.288 request_time 3.288
to: 192.168.5.2:8090 {GET /i/libraries/jquery-migrate/3.4.0/jquery-migrate-3.4.0.min.js?v=22.2.0 HTTP/1.1} upstream_response_time 0.008 request_time 0.008
to: 192.168.5.2:8080 {GET /i/libraries/apex/minified/widget.report.min.js?v=22.2.0 HTTP/1.1} upstream_response_time 0.004 request_time 0.005
to: 192.168.5.2:8090 {GET /i/libraries/oraclejet/12.1.3/js/libs/oj/v12.1.3/resources/nls/localeElements.js HTTP/1.1} upstream_response_time 0.010 request_time 0.009
to: 192.168.5.2:8080 {GET /i/apex_ui/img/favicons/favicon.ico HTTP/1.1} upstream_response_time 0.008 request_time 0.008
Now shutdown the ORDS instance that is listening on port 8080 but continue to navigate around APEX in the browser. Although no error displayed in the browser you will see an upstream routing failure mentioned in the logs and then handing that request over to the next upstream server. Then all subsequent requests only go to that upstream server listening on port 8090.
Bring the first ORDS server back up while continuing to use APEX in your browser and you’ll see it does not take long before we’re back to a round robin routing to both upstream servers.
to: 192.168.5.2:8090 {GET /ords/f?p=4050:9:13779192078464::::: HTTP/1.1} upstream_response_time 3.859 request_time 3.859
to: 192.168.5.2:8090 {GET /i/libraries/jquery-migrate/3.4.0/jquery-migrate-3.4.0.min.js?v=22.2.0 HTTP/1.1} upstream_response_time 0.008 request_time 0.009
to: 192.168.5.2:8080 {GET /i/libraries/apex/minified/widget.report.min.js?v=22.2.0 HTTP/1.1} upstream_response_time 0.082 request_time 0.082
to: 192.168.5.2:8090 {GET /i/libraries/oraclejet/12.1.3/js/libs/oj/v12.1.3/resources/nls/localeElements.js HTTP/1.1} upstream_response_time 0.005 request_time 0.005
to: 192.168.5.2:8080 {GET /i/apex_ui/img/favicons/favicon.ico HTTP/1.1} upstream_response_time 0.007 request_time 0.007
Trust me
The first time you point your browser to the https://ords.example.com there will be an error displayed because the certificate presented by nginx is self signed. Your browser is unable to verify the certificate and will display an ERR_CERT_AUTHORITY_INVALID message. However, since you know that you have generated the certificate yourself you can tell the browser to proceed.
The browser can also show you the information it has received from the certificate.
You can proceed to use ORDS through nginx with this certificate or arrange for a certificate issued by a certificate authority.
Conclusion
If you’ve gotten this far and followed the steps, you can now run a secure HTTPS load balancer in front of multiple ORDS instances. Congratulations!
As mentioned in a previous article about NGINX, those ORDS instances could be on Apache Tomcat, Oracle WebLogic Server and as shown in this article, ORDS standalone too.
These articles are part of a series that will cover taking advantage of containerised services for using ORDS in the most optimal, scalable and robust manner possible. Stay tuned.
Scaling ORDS and NGINX with docker compose
The next article in this series Get started with Oracle REST Data Services (ORDS) and Docker will build on this NGINX configuration to show you how to quickly get started using ORDS and Docker. Together we will walk through the basics of building the Docker image, storing configuration in a Docker volume, running multiple ORDS instances and balancing the load using NGINX.
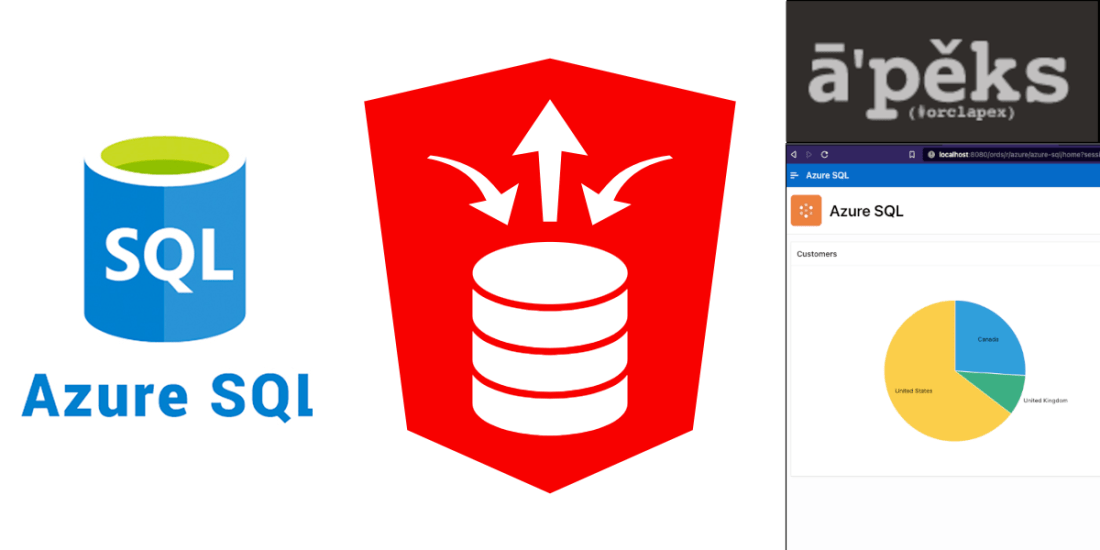
One of the big announcements this month was the Oracle Database Service for Microsoft Azure. With this new fully managed service, Azure customers can seamlessly build Azure applications using the high-performance, high-availability, and automated management of Oracle Database services such as Autonomous Database running on OCI. Did you know that even before this announcement you could have a REST interface to Azure SQL through ORDS?
In this article I’ll show you how I have data from a hosted Azure SQL database used in an APEX application all made possible through ORDS. Although I’m using released products it is important to point out that using ORDS with SQL Server is not officially supported. Therefore, although you can use this approach, you mind find a use case that does not work. For example, an unsupported column data type.
This is your goal, sample data from Azure SQL rendered in an APEX application
Azure SQL Sample Database
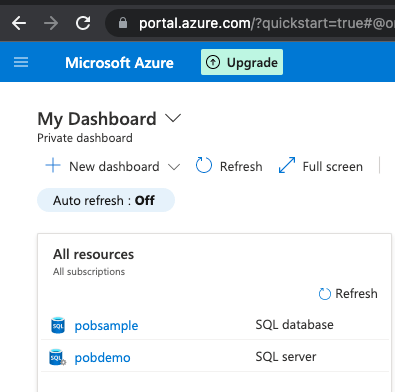
To get started, if you do not have an Azure SQL database already, head over to https://portal.azure.com/ and set yours up. By default you will get a functional, but empty database. In my case, I selected Sample for Use existing data option in the Additional Settings section of the create database sequence so that I had some data in place.
Create your database with sample data
SQL Server and Database
The overall process from zero involves creating an SQL Server ( pobdemo in my case ) and an SQL Database ( pobsample in my case ) which can be accessed outside of Azure.
You will also need to create some logins and users to access the database so Azure Data Studio, or some other client for working with Azure SQL will be needed. The administrator user should not be used for anything more than managing the database.
One login will be used by ORDS to verify the pool connection configuration. It does not require any specific privileges in the database just the ability to make a connection over JDBC. The login could be any value but for consistency we’ll call it ORDS_PUBLIC_USER
CREATE LOGIN ORDS_PUBLIC_USER WITH PASSWORD = '< keep this secret >';
The other login and database user is for the account that will be used to interact with the database. In this example: ords_demo
CREATE LOGIN ords_demo WITH PASSWORD = '< keep this secret >';
CREATE USER ords_demo FROM LOGIN ords_demo;
ALTER ROLE db_datareader ADD MEMBER [ords_demo];
ALTER ROLE db_datawriter ADD MEMBER [ords_demo];
Configure ORDS
Now that we have our database accounts let’s configure ORDS. In my case I already have an ORDS instance setup with the default pool configured for my Oracle 19c database and APEX is installed.
The directory that I extracted the ORDS 22.2.0 distribution to is ~/Downloads/ords-22.2.0.172.1758/ and the configuration directory is ~/Documents/Personal/azure_sql/. That directory looks like this:
The configuration for the azure_sql pool was achieved as follows while the configuration directory is the working directory. Note that you will need to know your JDBC connection string from your Azure Dashboard. You’ll find that under Show database connection strings.
See the ‘Show database connection strings’ to get your JDBC connection string
Armed with that information it is time to configure your azure_sql pool:
~/Downloads/ords-22.2.0.172.1758/bin/ords config --db-pool azure_sql set db.connectionType customurl

~/Downloads/ords-22.2.0.172.1758/bin/ords config --db-pool azure_sql set db.customURL jdbc:sqlserver://<rest of the JDBC connection string from Azure dashboard>

~/Downloads/ords-22.2.0.172.1758/bin/ords config --db-pool azure_sql set jdbc.driverName com.microsoft.sqlserver.jdbc.SQLServerDriver

~/Downloads/ords-22.2.0.172.1758/bin/ords config --db-pool azure_sql set db.credentialsSource request

~/Downloads/ords-22.2.0.172.1758/bin/ords config --db-pool azure_sql set restEnabledSql.active true

~/Downloads/ords-22.2.0.172.1758/bin/ords config --db-pool azure_sql set db.username ORDS_PUBLIC_USER
Every command entry should show a message confirming that the setting was applied. Now to set the password for ORDS_PUBLIC_USER. That should be treated as a secret:
~/Downloads/ords-22.2.0.172.1758/bin/ords config --db-pool azure_sql secret db.password

Enter the database password:
Confirm password:
The setting named: db.password was set to: ****** in configuration: azure_sql
When done, assuming that you are using the same pool name, your databases/azure_sql/pool.xml should look like this but without the comments:
<?xml version="1.0" encoding="UTF-8" standalone="no"?>
<!DOCTYPE properties SYSTEM "http://java.sun.com/dtd/properties.dtd">
<properties>
<comment>Saved on Fri Oct 11 11:21:28 IST 2019</comment>
<entry key="db.connectionType">customurl</entry>
<entry key="db.customURL">jdbc:sqlserver://your_sql_server.database.windows.net:1433;database=your_sql_db;encrypt=true;trustServerCertificate=false;hostNameInCertificate=*.database.windows.net;loginTimeout=30;</entry>
<entry key="jdbc.driverName">com.microsoft.sqlserver.jdbc.SQLServerDriver</entry>
<!-- username for account required to verify pool connection details are
correct. User does not require special privileges -->
<entry key="db.username">ORDS_PUBLIC_USER</entry>
<!-- Credentials in the request will be used to create injected DB connection
and ORDS Role will be SQL Developer. Authentication mode will be ANY_SCHEMA -->
<entry key="db.credentialsSource">request</entry>
<!-- REST Enabled SQL must be enabled -->
<entry key="restEnabledSql.active">true</entry>
</properties>
One of the settings is the JDBC driver to use ( jdbc.driverName ) and that is com.microsoft.sqlserver.jdbc.SQLServerDriver but ORDS does not ship with that JDBC driver. Download the SQL Server JDBC driver and copy the Java 11 jar into the ORDS lib/ext directory. In my case that is ~/Downloads/ords-22.2.0.172.1758/lib/ext
Time to startup ORDS in standalone mode and verify the connection pool is loaded correctly.
~/Downloads/ords-22.2.0.172.1758/bin/ords serve

ORDS: Release 22.2 Production on Fri Jul 29 13:52:06 2022

Copyright (c) 2010, 2022, Oracle.
...
2022-07-29T13:52:10.561Z INFO        Configuration properties for: |azure_sql|lo|
gopherProxySet=false
awt.toolkit=sun.lwawt.macosx.LWCToolkit
java.specification.version=11
...
2022-07-29T13:52:45.126Z INFO        Oracle REST Data Services initialized
Oracle REST Data Services version : 22.2.0.r1721758
Oracle REST Data Services server info: jetty/9.4.46.v20220331
Oracle REST Data Services java info: Java HotSpot(TM) 64-Bit Server VM 11.0.13+10-LTS-370
Test REST Enabled SQL
If you have gotten this far without errors that means ORDS can connect to the Azure SQL database using the db.username account and therefore the custom connection aspect of the pool configuration is correct. Now to confirm the REST Enabled SQL can use that pool configuration to access the database with basic authentication credentials provided. For that we’ll use the login that is a user in the database and cURL to submit a GET request
curl -u ords_demo http://localhost:8080/ords/azure_sql/_/sql
Enter host password for user 'ords_demo': ********
{
 "database_product_name":"Microsoft SQL Server",
 "database_product_version":"12.00.312",
 "database_major_version":12,
 "database_minor_version":0,
 "env":{"defaultTimeZone":"UTC","ordsVersion":"22.2.0.r1721758"}
}
We could just stop here and just use REST Enabled SQL directly with our Azure SQL database but let’s do something really interesting with APEX, which is probably why you’re here. First, a few words about how APEX works with SQL Server natively: it does not.
SQL Server Syntax
APEX has powerful support for consuming data over REST services including the ability to construct queries for Oracle and MySQL which are executed through ORDS REST Enabled SQL. This allows for a very dynamic no code approach to developing applications. See previous article How to use the Oracle Database Tools Service to provide MySQL data to APEX on this topic.
APEX does not provide the same level of support for SQL Server. Although one can configure an ORDS pool so that REST Enabled SQL can be used, APEX will not recognise the database type when you try create the REST Enabled SQL reference. All is not lost though. The work around is to write ORDS REST Services which have the specific SQL Server statements. Those services make the REST Enabled SQL calls and return the response. They are effectively custom wrapper services.
APEX calls custom ORDS Service which calls ORDS REST Enabled SQL which talks to Azure SQL
Now, on with the APEX adventure…
APEX Workspace
In my local Oracle database I have APEX installed and have created a workspace called AZURE which is using the AZURE database schema. That schema has been REST Enabled too.
The ‘azure’ workspace is in the ‘AZURE’ schema and that schema is REST Enabled
This AZURE database schema in the Oracle database will have the REST Services ( module/template/handler ) defined and those services will make the REST Enabled SQL calls. For convenience these services are not secured but obviously should be if they are to be used in a real world scenario. What is secured is the REST Enabled SQL endpoint. A username and password for the database user in Azure SQL must be provided but rather than having that in plain text in the handler source we’ll use an APEX Web Credential that the AZURE schema will have access to.
APEX Web Credentials
Web Credentials are a really useful feature in APEX that allows you to store authentication credentials for external REST services or REST Enabled SQL services. We’ll use that in our ORDS Service handler pl/sql block but more on that later. First, let’s define a Web Credential in the workspace.
Web Credential with Azure SQL username and password
There are a few things to highlight about the above Credentials for Azure
The Static Identifier is Credentials_for_Azure – we will refer to that later in the ORDS handler
The Authentication Type is Basic Authentication – the REST Enabled SQL endpoint uses this Authentication Type
The Valid for URLs specifies host.docker.internal as the server address. Remember how I said that Oracle 19c database was running in docker? Localhost would just point to the running container in my case. This is how the database can address the host machine ( my laptop ) which is running ORDS.
Stating the obvious here but it’s significant that you can change the username and password in the Web Credential without modifying the handler. Just thought I’d mention that.
And now with the Web Credential in place lets define the services in the AZURE schema that will submit SQL queries over REST Enabled SQL to Azure SQL database.
Wrapper Services
We’re going to define two services which follow this pattern: send a query, return the response. This relies on the APEX_WEB_SERVICE.MAKE_REST_REQUEST function to create the POST request, with Content-Type application/sql, and return the payload response. The previously defined Web Credentials are used to authenticate those requests.
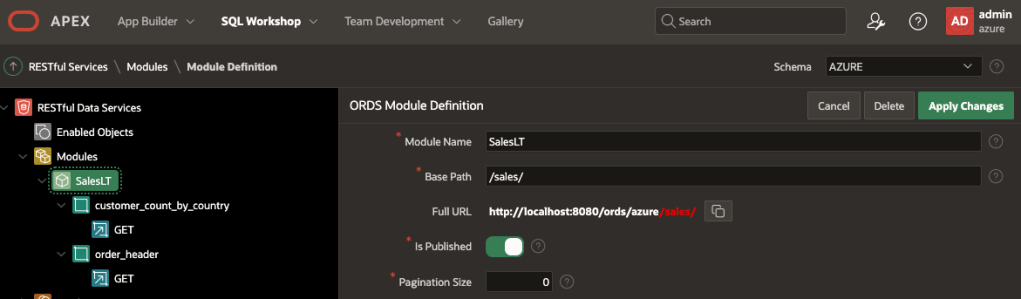
The module, templates and handlers can be defined in APEX or SQL Developer Web. One module with Base Path/sales/ along with two templates: customer_count_by_country and order_header.
One module with /sales/ Base Path and two templatesOf course the ORDS REST Services can be edited in SQL Developer Web too
Handler for /sales/customer_count_by_country
This handler executes an aggregation query to get the number of customers with a Main Office in each country.
DECLARE
  l_clob    CLOB;
  l_result  VARCHAR2(32767);
BEGIN
  APEX_WEB_SERVICE.g_request_headers.delete();
  APEX_WEB_SERVICE.g_request_headers(1).name := 'Content-Type';
  APEX_WEB_SERVICE.g_request_headers(1).value := 'application/sql';

  l_clob := APEX_WEB_SERVICE.make_rest_request(
    p_url         => 'http://host.docker.internal:8080/ords/azure_sql/_/sql',
    p_http_method => 'POST',
    p_credential_static_id => 'Credentials_for_Azure',
    p_body => 'select address.CountryRegion, count(CustomerAddress.CustomerID) as "CustomerCount"
from SalesLT.Address, SalesLt.CustomerAddress
where CustomerAddress.AddressID = Address.AddressID and CustomerAddress.AddressType = ''Main Office''
group by address.CountryRegion'
  );

HTP.print(l_clob);

END;
Handler for /sales/order_header
This handler executes a basic query to get all records from the SalesOrderHeader table.
DECLARE
  l_clob    CLOB;
  l_result  VARCHAR2(32767);
BEGIN
  APEX_WEB_SERVICE.g_request_headers.delete();
  APEX_WEB_SERVICE.g_request_headers(1).name := 'Content-Type';
  APEX_WEB_SERVICE.g_request_headers(1).value := 'application/sql';
  -- Get the XML response from the web service.
  l_clob := APEX_WEB_SERVICE.make_rest_request(
    p_url         => 'http://host.docker.internal:8080/ords/azure_sql/_/sql',
    p_http_method => 'POST',
    p_credential_static_id => 'Credentials_for_Azure',
    p_body => 'SELECT * FROM [SalesLT].[SalesOrderHeader]'
  );
  HTP.print(l_clob);
END;
Service Handler Walkthrough
Keep in mind that these handlers execute in the AZURE database schema which is the schema for the APEX Workspace we’ll create the Data Source references and APEX Application in. Both handlers follow these steps:
Set the Content-Type header to application/sql
Make a POST request with Web Credentials for authentication and a query
Write the REST Enabled SQL result to the HTTP Response stream.
There’s no validation on the response, or parsing that response to change the structure. We’ll leave it to APEX to figure out how to parse the response payload.
Now is it a good time to verify that the two handlers work. We can invoke them through cURL. Remember the schema alias is azure, the module base path is /sales/ so the URL will begin with http://localhost:8080/ords/azure/sales/
Now is a good time to reiterate that the ORDS REST Services are not protected and if the Azure SQL database you’re connecting to had any sensitive data it should be protected but that’s not the focus of this article.
As you can see from the above tests, these are REST Enabled SQL responses with lots of information about the statement executed, the metadata of the columns when all we’re really interested in is the data at items.resultSet.items. That will be relevant when we look into Data Sources.
APEX Data Sources
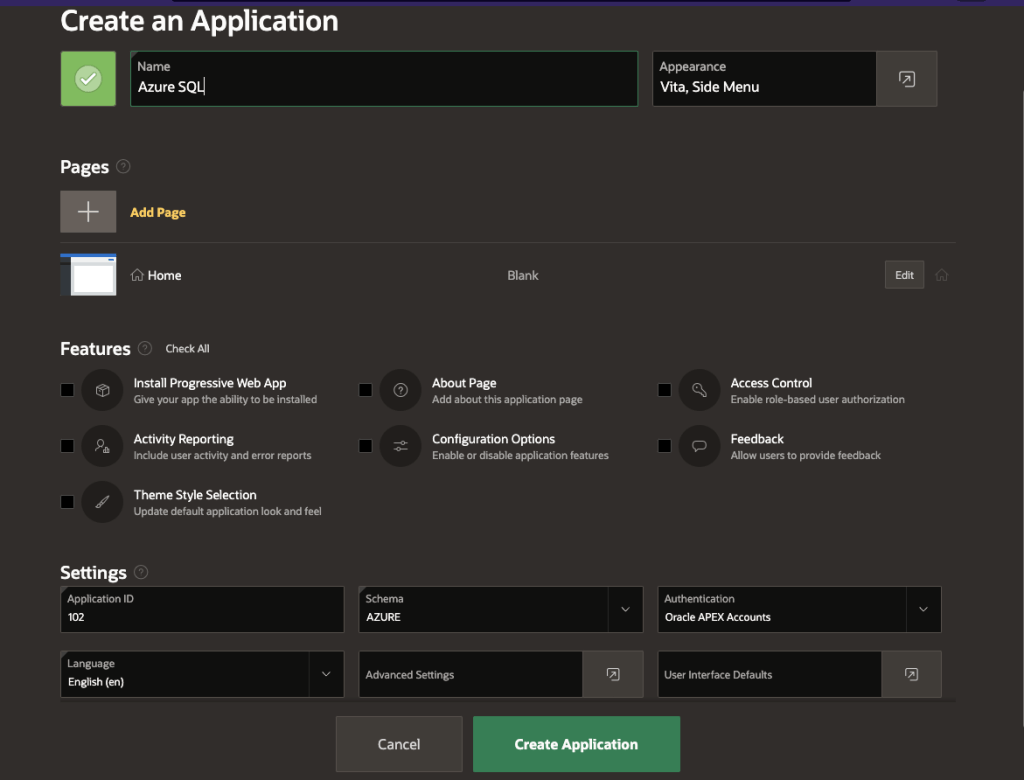
Let’s create a basic APEX application called Azure SQL with just the defaults.
Basic application with a Home page
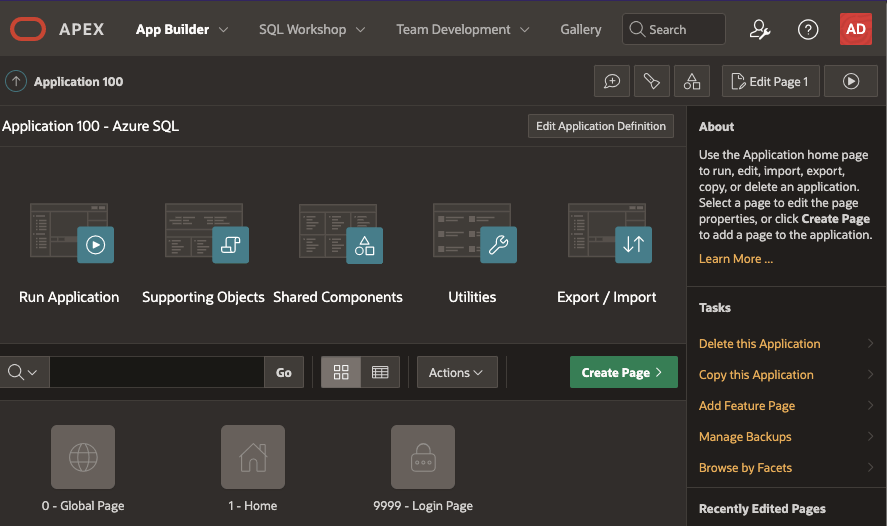
Once created, edit the application and navigate to the Shared Components section.
Shared Components is where Data Source references can be defined
The Data Source references section has various options for getting data over REST.
Data Sources section has lots of options
Define REST Data Sources for both endpoints but specify their REST Data Source Type as Simple HTTP.
Note the URL has host.docker.internal has the server name because the Oracle database is running in Docker
Remember how the REST Enabled SQL response structure contains lots of metadata? For Data Profile specify the Row Selector as items.resultSet.items so that APEX can find the array of rows that it can interrogate for Data Profile.
The Row Selector must be specified to find the data in the response
Two Data Source references must be defined. In my case I also defined synchronisation for the AzureSalesHeader Data Source to pull in data to a local table. I’ll cover that in a separate article.
Data Source references that are Simple HTTP types
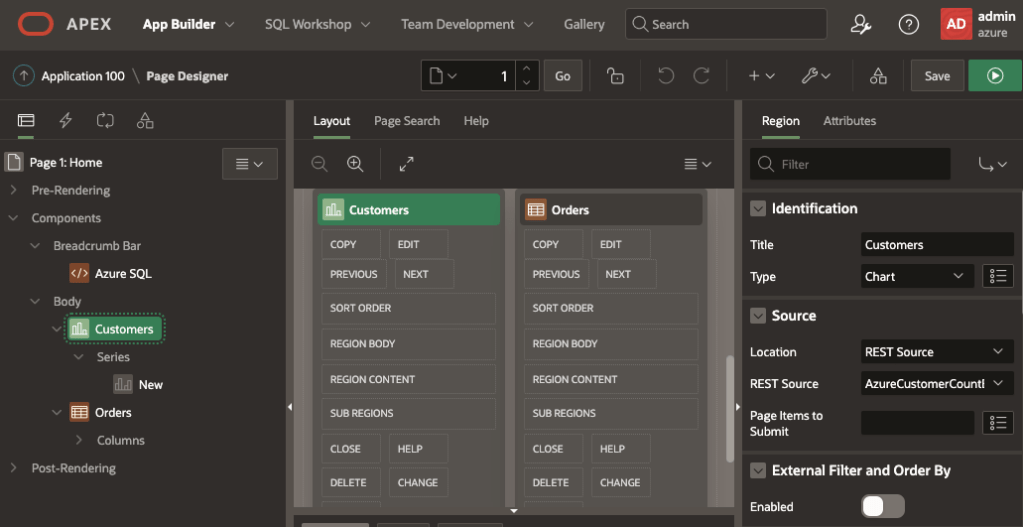
Now let’s put those to use. Edit the Home page and drop in a Chart and a Classic Report to the body. The Chart will use REST SourceAzureCustomerCountByCountry and the Classic Report will use REST SourceAzureSalesHeader.
Source for the components are REST Source
The Classic Report is very basic and includes the column list from the AzureSalesHeader Data Source. For the Customers chart the Series Source Location should be set to Region Source so that it inherits the source from the Chart and columns can be selected.
For the Chart series Source Location is Region Source and the Column Mapping for what to show
With all that in place, run the application to see the Home page with the Chart and Classic Report. Note that by following the default application setup a login is required. Just use the same workspace developer username and password.
Pie Chart and Classic Report with live data from Azure SQL
Conclusion
In theory ORDS REST Enabled SQL can be used with any database that you have a JDBC driver for which will run on Java 11. In practice, only Oracle RDBMS and Oracle Cloud MySQL is supported. Keeping that in mind, the capability of bringing in data from other databases, such as Azure SQL and using it in your APEX applications opens up a lot of integration possibilities.
What projects does this make possible for you now? I’d be really interested to hear about it.
In future articles I will cover synchronisation, joining local with remote data as well as going beyond just select statements.
Addendum to the original article…if you are looking for an approach that is supported you can create database links from Autonomous Database to Non-Oracle databases.