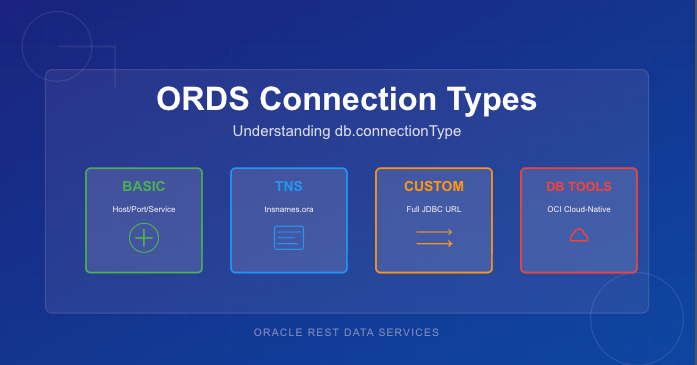
Oracle REST Data Services (ORDS) supports four different ways to create database connection pools, each designed for a specific deployment model or infrastructure environment. While most people are familiar with the common Basic connection settings, the other options—TNS, Custom URL, and Database Tools Connection—offer powerful alternatives when you need more flexibility or cloud-native authentication.
This article provides a concise comparison of all four db.connectionType values, explains when each option makes sense, and lists the configuration settings required for each type.
Why db.connectionType Matters
Every ORDS deployment includes one or more database pools. The connection type determines:
how ORDS constructs the JDBC URL
where host/service metadata comes from
whether credentials are stored locally or remotely
what additional ORDS settings are required
Choosing the right connection type simplifies configuration, avoids hard-coding credentials, and ensures ORDS connects using the most appropriate mechanism for the environment.
The Four ORDS Connection Types
1. Basic — Direct Host/Port/Service Connections
This is the simplest and most commonly used configuration. ORDS constructs the JDBC URL automatically based on host, port, and service name.
Use this when:
the database is customer-managed (on-prem or IaaS)
you want simple, explicit connection parameters
you’re not using TNS descriptors or OCI integrations
Note that as a secret, the db.password value is expected to be persisted in a wallet file locally and set using the ORDS command line interface.
2. TNS — Use tnsnames.ora
When you choose the tns connection type, ORDS reads the connect descriptor from a tnsnames.ora file. This allows you to use advanced Oracle Net features such as load balancing, failover, and connect-time routing.
Use this when:
your organisation standardises on Oracle Net
you need RAC/Service failover descriptors
TNS files already exist and are centrally managed
Required Settings:
db.connectionType=tns
db.tnsDirectory=<directory containing tnsnames.ora>
db.tnsAlias=<alias in tnsnames.ora>
db.username=<db user>
db.password=<secret>
Note that as a secret, the db.password value is expected to be persisted in a wallet file locally and set using the ORDS command line interface. Moreover, the directory containing the tnsnames.ora must be accessible to the ORDS runtime instance. This can be over a networked filesystem but must be readable by the ORDS process.
3. Custom URL — Full JDBC URL Control
The customurl connection type gives you complete control of the JDBC URL. ORDS simply uses whatever you provide. This is the most flexible option and the only one suitable for non-Oracle databases.
Use this when:
you are connecting to MySQL or another JDBC-compatible database
you need URL parameters not supported by Basic or TNS
you prefer to manage the full connection string manually
Required Settings:
db.connectionType=customurl
db.customURL=jdbc:oracle:thin:@//host:port/service
# or MySQL, PostgreSQL etc.
db.username=<db user>
db.password=<secret>
Note that as, a secret the db.password value is expected to be persisted in a wallet file locally and set using the ORDS command line interface. ORDS only ships with the Oracle JDBC driver so if using a different JDBC driver the jar files that must be in the lib/ext directory.
4. Database Tools Connection — Cloud-Native Authentication via OCI
This option integrates ORDS with Oracle Cloud Infrastructure Database Tools, allowing ORDS to use an OCI-managed “Database Tools Connection” object. Credentials are stored in OCI Vault, not in ORDS configuration files. See https://docs.oracle.com/en-us/iaas/database-tools/home.htm for more information on this managed service.
This is the most secure and most cloud-native way to connect ORDS to an Autonomous Database or Oracle Base Database running in OCI.
Use this when:
ORDS is running inside OCI (Compute, Functions, OKE)
you want to avoid storing DB passwords in file systems
you want automatic credential rotation via Vault
you manage DB access through OCI IAM policies
Required Settings:
When your OCI compute instance is configured in a dynamic group which contains a policy granting it access to the dbtools service…
db.connectionType=databaseToolsConnection
db.databaseToolsConnection=<OCID of Database Tools Connection>
When your not running ORDS on an OCI compute instance but you have the OCI Command Line Interface installed…
db.connectionType=databaseToolsConnection
db.databaseToolsConnection=<OCID of Database Tools Connection>
db.authProvider=oci-profile
db.ociProfile=<only if using oci-profile>
Remember: No hostname, port, service name, or password required — OCI provides everything.
Quick Comparison Table
Type
URL Source
Credentials Stored Locally?
Suitable For
Notes
basic
Host/port/service name
Yes
On-prem & simple setups
Most common
tns
tnsnames.ora descriptor
Yes
RAC, complex descriptors
Centralised Net configs
customurl
Full JDBC URL provided by you
Yes
Non-Oracle DBs, exotic configs
Max flexibility
databaseToolsConnection
OCI Database Tools metadata
No
Cloud-native deployments
Best security
Choosing the Right Connection Type
If you’re unsure which to pick, here’s a simple decision flow:
Running on OCI and want the best security? → Use databaseToolsConnection
Need RAC/SCAN/FAN/Load Balancing descriptors? → Use tns
Connecting to MySQL or need a very specific JDBC URL? → Use customurl
Standard on-prem or IaaS database with straightforward networking? → Use basic
Final Thoughts
ORDS has grown far beyond its early single-connection configuration model. Understanding the four db.connectionType settings helps you choose the best option for your environment—whether that’s a classic on-premises Oracle instance or a fully cloud-native, password-free deployment in OCI.
If you’re standardising ORDS across multiple environments, I recommend experimenting with each type in a test pool. You’ll quickly see which one aligns with your organisation’s approach to connectivity, configuration management, and security.
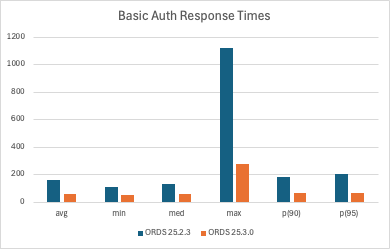
Oracle REST Data Services (ORDS) 25.3.0 has just been released, and one of the highlights for developers is a significant performance improvement for Basic Authentication when paired with the latest Oracle 23ai database patch. In this article, we’ll show real-world “before and after” results from requests to an ORDS handler running in the Autonomous Database (ADB) Frankfurt region, demonstrating how ORDS 25.3.0 drastically reduces authentication response times.
Dramatic improvement on all metrics! All values are milliseconds.
Note: It is recommended to use OAuth for authentication and authorisation rather than Basic Authentication where possible.
Background
Basic Authentication is widely used in ORDS for accessing secured REST endpoints. Note that, one is recommended to use OAuth2 over Basic Authentication for both performance and security reasons. See the ORDS Best Practices document. However, that is not always possible because for some clients their only authentication mechanism available is Basic Authentication. While simple to implement, verifying usernames and passwords can introduce latency, especially under load or in high-frequency request scenarios. Of course the biggest security issue is that one is sending username and password credentials for a database user over the network with every request. Even with HTTPS, it is best to avoid this practice.
For our tests, we used the events query handler from the ORDS sample application. This handler is part of the ORDS Sample Application ( also known as ORDS Concert App ), which you can explore here: ORDS Remix JWT Sample.
All tests were executed against an Autonomous Database instance in the Frankfurt region to ensure realistic production-like conditions.
Test Setup
We compared two configurations:
ORDS 25.2.3 (previous version)
ORDS 25.3.0 (latest release)
Oracle 23ai database with the most recent RU, which contains enhancements specifically for faster ORDS basic authentication. More specifically, that’s RDBMS 23.10 which has been available in Autonomous Database for about a week now.
The test scenario:
A k6 script making 100 sequential requests to the ORDS handler
200ms pause between requests to avoid ADB rate limiting (all requests came from the same IP)
k6 executed from Dublin, with ORDS and the database hosted in Frankfurt, introducing a consistent network latency
The protected service is the ORDS Concert App events handler.
Note: The details of the k6 script and execution environment will be provided in a dedicated section below.
Before: ORDS 25.2.3 Performance
The statistics for ORDS 25.2.3, recorded a few days ago at the same time of day as the latest test, are as follows (all durations in milliseconds):
Metric
Duration (ms)
Avg
160.448
Min
108.257
Med
129.354
Max
1118.475
P90
183.042
P95
204.627
Analysis:
Average response time was ~160ms
Maximum response exceeded 1 second, highlighting potential bottlenecks
P95 and P90 values show noticeable tail latency, which can affect user experience
After: ORDS 25.3.0 Performance
After upgrading to ORDS 25.3.0 and applying the latest Oracle 23ai patch, the same test yielded dramatically improved results:
Metric
Duration (ms)
Avg
59.195
Min
51.607
Med
54.811
Max
273.553
P90
65.565
P95
68.708
Analysis:
Average response time reduced by ~63%
Minimum response time shows roughly a 52% improvement, but compared with the 63% average improvement, it suggests that the fastest possible request was already bounded mostly by network latency (Dublin → Frankfurt).
Maximum response reduced by ~76%
P90 and P95 values significantly lower, resulting in more consistent and predictable performance
The improvements are immediately noticeable for real-world API requests
Why the Improvement Happens
The performance gains are made possible by enhancements in Oracle 23ai that were introduced specifically for ORDS:
Faster verification of username and password
Tight integration as a trusted Oracle database tools application
Optimized authentication path within ORDS 25.3.0
The faster authentication for ORDS basic auth was introduced in RDBMS 23.10
In practice, this means that if basic authentication is your only option because of the client or integration tool used for consuming your ORDS REST services you will see a noticeable improvement in response times, even in high-volume scenarios.
One such example is the Oracle Database API for MongoDB where basic authentication is the only option with the MongoDB Wire protocol interface. Improving the connection time for customers using Oracle RDBMS to persist data for their MongoDB applications was the primary driver for this initiative with ORDS and 23ai.
OAuth Bearer Token Performance
The use of OAuth is still recommended over Basic Authentication because it is more secure. It was dramatically faster than Basic Authentication too but as you can see from these OAuth bearer token test runs for the same service there is almost parity on response times now.
Metric
Duration (ms)
Avg
54.966722 ( 5ms better )
Min
38.9794 ( 12ms better )
Med
45.7988 ( 9ms better )
Max
234.4554 ( 39ms better )
P90
74.56998 ( 9ms worse )
P95
87.19764 ( 18ms worse )
Observations:
Apart from the P90 and P95 metrics the OAuth bearer token is still more performant
These tests just involve 1 single client making sequential requests and the performance profile with multiple concurrent requests should be significantly beter.
Consider using OAuth JWT Profile with an external identify provider for even faster response times.
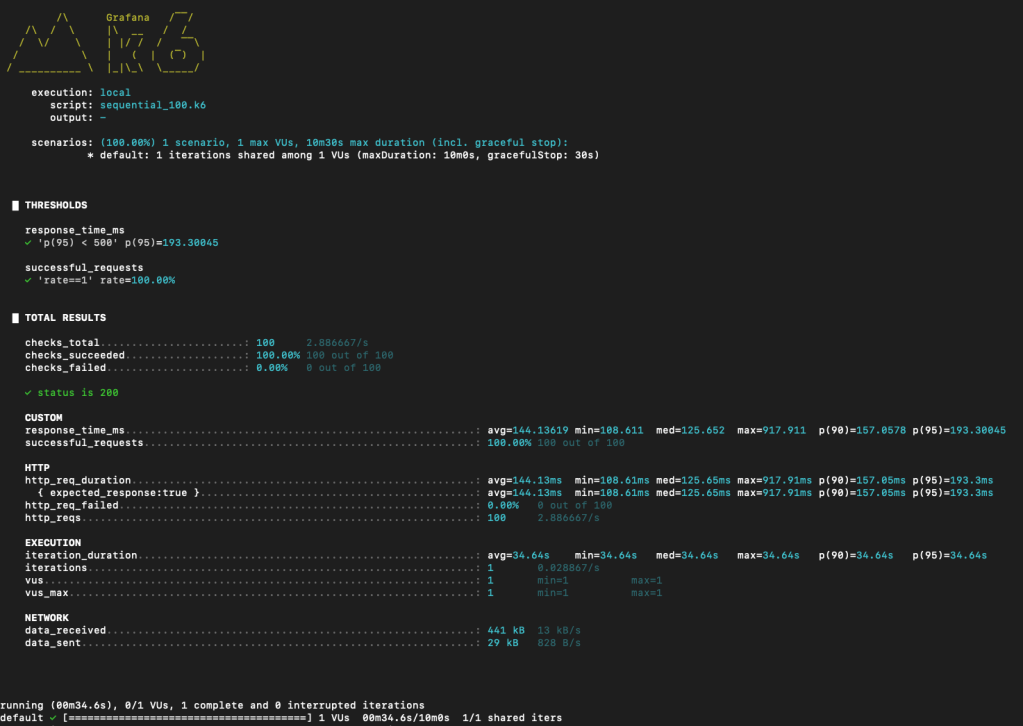
k6 Script Details and Execution
Here is the sequential_100.k6 script that was used to record the response times and avoid the Autonomous Database request rate limiting on the OCI Free Tier.
import http from 'k6/http';
import { check, sleep } from 'k6';
import { Trend, Rate } from 'k6/metrics';
import encoding from 'k6/encoding';

// Test configuration
export let options = {
  vus: 1,              // single VU so requests are sequential
  iterations: 1,      // run default() once (we loop 100 times inside)
  thresholds: {
    // Require 100% of requests to be successful (status 200)
    'successful_requests': ['rate==1'],
    // Example response-time threshold (optional) - adjust to your needs
    'response_time_ms': ['p(95) < 500']
  },
};

// Request details. Change these for your environment.
const URL = 'https://mytenancy-my23ai.adb.eu-frankfurt-1.oraclecloudapps.com/ords/ords_concert_app/authuser/v1/events/';
const USER = 'ORDS_CONCERT_APP';
const PASS = 'MyConcertAppDatabaseUserPassword';

// Basic auth header
const AUTH_HEADER = 'Basic ' + encoding.b64encode(`${USER}:${PASS}`);

// Metrics
let responseTimeTrend = new Trend('response_time_ms');
let successRate = new Rate('successful_requests');

export default function () {
  for (let i = 0; i < 100; i++) {
    // Perform request with Authorization header
    let res = http.get(URL, {
      headers: {
        Authorization: AUTH_HEADER,
        'Accept': 'application/json'
      }
    });

    // Record timing (milliseconds)
    responseTimeTrend.add(res.timings.duration);

    // Assert HTTP 200 for each request and update success rate
    const ok = check(res, {
      'status is 200': (r) => r.status === 200
    });
    successRate.add(ok);

    // Log any failures to console for quick debugging
    if (!ok) {
      console.error(`Request #${i + 1} failed — status: ${res.status}, body: ${res.body ? res.body.slice(0,200) : 'empty'}`);
    }

    // Wait 200 ms between requests to respect rate limits
    sleep(0.2);
  }
}
Some details to call out:
At line 7 we define the test options which specify how many concurrent users ( 1 in this case ) and how many requests to send ( 100 in this case ). Also defined here are some minimum success criteria, also known as thresholds, such as all responses must have HTTP 200 status code and no response should take longer than 500 milliseconds.
At line 19 the details of URL as well as username & password are specified. You will change these to match your environment.
At line 27 custom metrics for response time and success rate are defined. These will be the key metrics that we’re interested in.
At line 33, inside a for loop which is executed 100 times the request is sent, thresholds checked, metrics recorded and then a wait for 200ms. The 200ms wait is to avoid rate limiting because all requests are coming from the same IP address. This 200ms wait is not included in the response metrics.
When executed ( before the ORDS 25.3.0 upgrade ) the response for test run looks like this.
When gathering the statistics I ran the sequential_100.k6 5 times and recorded the average of the various metrics. This was to smooth out any intermittent spikes in network or database activity.
A test run of the same k6 script after ORDS 25.3.0 was rolled out shows improvement with all metrics.
Conclusion
ORDS 25.3.0, when paired with Oracle 23ai and its latest patch, provides a remarkable improvement in Basic Authentication performance.
Key takeaways:
Average authentication response time dropped from ~160ms to ~59ms
Max response time and tail latency drastically reduced
Real-world API workloads benefit from more consistent and faster performance
If Basic Authentication is your only option you will see improvements but you really should be using OAuth2 where you can.
Developers should consider upgrading to ORDS 25.3.0 and applying the latest Oracle 23ai patch to take full advantage of these optimizations.
Oracle provides MCP Server options for your database
If you are serious about building out a secure, scalable and fully integrated MCP experience in your organisation then focus on dedicated Oracle products rather than rolling your own. Start with:
An example of what we want to achieve with the ORDS Concert Application data and an ORDS MCP Server Handler
📍 Introduction
The Model Context Protocol (MCP) is a growing standard for enabling AI tools to interact seamlessly via structured requests. MCP is an open standard that enables AI assistants like Claude, ChatGPT, or Cline to securely connect to external data sources and tools. Think of it as a universal adapter that lets AI models interact with the world beyond their training data.
In this article, we’ll demonstrate how to implement an MCP server directly in Oracle using ORDS (Oracle REST Data Services) and JavaScript MLE (Multilingual Engine). With just a few lines of JavaScript and SQL, you can build an HTTP-based MCP server embedded in your Oracle database. This runs securely, for free, on the hosted Autonomous Database at cloud.oracle.com. Of course, you can choose to run your own setup on-premise too.
Here be dragons! Keep in mind that you are using AI tools where access to your database is being permitted. Even if you are running your LLM inside your network, you are still asking an agent to decide on actions based on what it discovers. Be careful with your data and database resources. Only make accessible what is required for the workflow you want to automate. Use the database security and auditing facilities available.
Security, Security, Security
🔍 What Is MCP?
The Model Context Protocol is a JSON-RPC–based interface for exchanging AI capabilities, models, prompts, and resource metadata. Without MCP, AI assistants are like incredibly smart people locked in a room with no internet, phone, or way to access current information or perform actions. They can only work with what they learned during training. MCP breaks down these walls by providing a standardised way for AI models to:
Stay current with live information
Access real-time data from APIs, databases, and services
Control applications and systems
Retrieve files and documents
Execute actions in the real world
MCP operates on a client-server architecture:
MCP Client: The AI assistant (like Cline or Claude)
MCP Server: A program that provides specific capabilities (tools, resources, or prompts)
The protocol defines how these communicate through three main primitives:
Resources: Static or dynamic content that the AI can reference.
Tools: Functions the AI can execute.
Prompts: Templates that help the AI understand how to use resources and tools effectively in specific contexts.
The MCP specification states that a server should supports methods such as:
initialize: describes the server and its capabilities
tools/list: enumerates available tools
tools/call: executes a named tool
prompts/list: lists available prompts
resources/list: lists downloadable resources
That’s not an exhaustive list and they are not all mandatory to implement. In fact, the only one truly required is initialize but you might find an MCP client that expects others to be implemented.
An MCP server can be local, on the same machine running your MCP client (using standard i/o) or remote (using streamable HTTP). The Model Context Protocol server for the Oracle Database is an example of a local MCP server which is accessed using standard i/o. In this article we’ll implement a HTTP based remote server which will not involve any streamable functionality but will support the synchronous request/response aspects of the specification. Note that the most recent version of the MCP specification(Protocol Revision: 2025-06-18) has removed server side events as a supported transport.
MCP clients (like Claude) expect a standard JSON response structure and often use OAuth2 for authentication. Not every authorisation scenario outlined in the specification will be covered in this article.
🚀 Why ORDS + MLE JavaScript?
ORDS can serve as the HTTP interface for all of this functionality — directly from your Oracle database. By combining ORDS with the JavaScript Multilingual Engine (MLE) in Oracle 23ai, you can:
Implement MCP server methods entirely in server-side JavaScript.
Query live database content when responding to MCP tool calls.
Package and publish database-backed tools to AI agents without building a separate backend service.
Secure everything with OAuth2 client credentials.
This makes it possible to turn your database into an MCP-compatible API that works with modern AI tooling—without leaving the Oracle environment and without sharing more than you need to.
In this example we’ll provide a get_events tool which lists the results of querying the SEARCH_VIEW in the ORDS_CONCERT_APP schema. That information can be gleaned from the REST Enabled endpoint for that view but your AI Assistant does not have access to that. When coding your own MCP Server through ORDS handlers you can provide access to data as you see fit.
Using the Model Context Protocol server for the Oracle Database will give full access to your database schema and therefore is the most powerful option but you’re unlikely to be sharing those DB credentials with anyone else. Implementing your own MCP Server allows you to greatly restrict that access.
🛠️ MCP Handler Implementation in ORDS
There’s some PL/SQL in this article but it is just the invocation of ORDS APIs to create the user defined resources. The real logic is in JavaScript which executes in the database. You can expand on this and implement your own logic for tools, resources or prompts. Refer to the ORDS mle/handler documentation for more information on that.
Note that although we’re using OAuth2 client credentials flow there are other authorisation options available. This is something that one must choose wisely because there are some aspects of the MCP specification with regard to authorisation discovery which is not currently supported by ORDS. Moreover, there are MCP clients that do not implement or support all the options available. In some cases, such as with Claude desktop, that support may only be available for certain paid subscriptions or premium level plans.
In this article we will protect the ORDS module and have a client credentials OAuth2 client which means we have to request an access token manually and then use it in our MCP server reference. That is not ideal but is a limitation of some of the tools used. More about limitations later.
Here’s the actual ORDS module and handler setup used in our implementation…
🧩 1. Setup – REST enable the database schema and grant MLE privileges
This article is based on the ORDS Sample Application so the database account used is ORDS_CONCERT_APP. It will already be REST Enabled but will require the privileges to execute JavaScript in the database. You can run this as an administrator user, such as ADMIN in the Autonomous Database.
GRANT EXECUTE ON JAVASCRIPT TO ORDS_CONCERT_APP;
GRANT EXECUTE DYNAMIC MLE TO ORDS_CONCERT_APP;
🧱 2. Defining the MCP Module and Template
Now, while logged in as the ORDS_CONCERT_APP user run the following to create the structure for your implementation. This will define a path /mcp/server for the service but it will require a handler for the POST method.
BEGIN ORDS.DEFINE_MODULE( p_module_name => 'mcp', p_base_path => '/mcp/');
The handler responds to MCP methods such as initialize, tools/list, and tools/call. Here I detail the JavaScript portion so that section can be described and explained:
      (req, res) => {
        let response = {
          jsonrpc: "2.0",
          id: null
        };

        try {
          const rpc = req.body;
          response.id = rpc.id ?? null;

          if (rpc.jsonrpc !== "2.0" || !rpc.method) {
            response.error = {
              code: -32600,
              message: "Invalid Request"
            };
          } else if (rpc.method === "initialize") {
            // Respond with server capabilities
            response.result = {
              protocolVersion:"2025-06-18",
              capabilities: {
                tools: {listChanged: false}
              },
              serverInfo: {
                name: "ORDSHandlerExampleServer",
                title: "Example MCP Server implemented in ORDS mle/javascript",
                version: "0.0.1"
              }
            };
          } else if (rpc.method === "tools/list") {
            // Respond with tools list
            response.result = {
                tools: [
                    {
                        name: "get_events",
                        title: "Events Information Provider",
                        description: "Get information on ORDS (Oracle REST Data Services) Sample Application events. The events view brings together artist, venue and schedule concert data. The attributes include EVENT_NAME,ARTIST_NAME,ARTIST_ID,EVENT_ID,EVENT_DATE,EVENT_DETAILS,EVENT_STATUS_NAME,EVENT_STATUS_ID,VENUE_ID,VENUE_NAME,CITY_NAME,MUSIC_GENRES",
                        inputSchema: {
                            type: "object"
                        }
                    }
                ]
            };
          } else if (rpc.method === "tools/call") {
            // Call the get_events tool if that was the tool requested
            if (rpc.params.name === "get_events") {
                const query = ''select * from search_view'';
                const res = session.execute(query);
                textContent = [];
                for (let row of res.rows) {
                  textContent.push({type:"text", text: JSON.stringify(row)});
                };

                response.result = {
                    content: textContent,
                    "isError": false
                };
            } else {
               response.error =  {
                    code: -32602,
                    message: "Unknown tool: invalid_tool_name"
                }
            }
          } else {
            // Unsupported method
            response.error = {
              code: -32601,
              message: "Method not found"
            };
          }

        } catch (e) {
          response.error = {
            code: -32700,
            message: "Parse error",
            data: e.message
          };
        }

        res.status(200);
        res.content_type("application/json");
        res.send(JSON.stringify(response));
      }
At line 2, similar to the /rpc/handler example in the previous article, we define the result structure for a successful response. We are expecting that all requests that we should act on will have an id, so the response as an id field. We copy that across at line 9.
Lines 16 – 28 deal with initialisation which tells the MCP client about the MCP server and its capabilities. In this case we’re saying that the MCP server implementation only provides tools and it does not send notifications if the tool definitions change.
Lines 29 – 42 deal with returning the list of tools that the MCP server supports. The description of the tool is important because that is what helps your AI Assistant determine if the tool will be useful for the given workflow.
...
} else if (rpc.method === "tools/list") {
  response.result = {
    tools: [
      {
        name: "get_events",
        title: "Events Information Provider",
        description: "Get information on ORDS (Oracle REST Data Services) Sample Application events. The events view brings together artist, venue and schedule concert data. The attributes include EVENT_NAME,ARTIST_NAME,ARTIST_ID,EVENT_ID,EVENT_DATE,EVENT_DETAILS,EVENT_STATUS_NAME,EVENT_STATUS_ID,VENUE_ID,VENUE_NAME,CITY_NAME,MUSIC_GENRES",
        inputSchema: {
           type: "object"
        }
    ]
  };
} else ...
Lines 43 – 62 are where the real action is. These lines deal with the invocation of the requested tool. In this case the only tool supported is called get_events which is for a specific query on the database. When you are implementing your own MCP server using ORDS handlers you can code this for your own AI integration needs. Note that the specification allows for various content types. For simplicity, in this case, we are constructing an array of text content entries. Although structuredContent could also be used here that content type is not supported by many MCP clients.
... } else if (rpc.method === "tools/call") { if (rpc.params.name === "get_events") { const query = ''select * from search_view''; const res = session.execute(query); textContent = []; for (let row of res.rows) { textContent.push({type:"text", text: JSON.stringify(row)}); };
The remainder of the JavaScript code includes placeholders for listing prompts, resources and a little error handling. You can expand on these as you see fit.
Here’s the full handler definition statement to run in your database:
L_PRIV_ROLES( 1 ) := 'MCPAgentRole'; L_PRIV_MODULES( 1 ) := 'mcp'; ORDS.DEFINE_PRIVILEGE( P_PRIVILEGE_NAME => 'blog.peterobrien.MCPServerExamplePriv', P_ROLES => L_PRIV_ROLES, P_PATTERNS => L_PRIV_PATTERNS, P_MODULES => L_PRIV_MODULES, P_LABEL => 'MCP Server Example Privilege', P_DESCRIPTION => 'Restricts access to the example MCP Server module' ); END; /
Make sure the MCP client you use supports this flow (not all do—see Limitations below).
Speaking of clients, we must now define the OAuth2 client which will get access to this protected service. Note that in this case, in order to be able to use the access token for longer, we’re setting the token duration to 8 hours. This example specifies ChangeMe as the secret to use so now is a good time to choose another value or examine the ORDS_SECURITY documentation for other options for generating secrets.
DECLARE l_client_cred ords_types.t_client_credentials; BEGIN l_client_cred := ORDS_SECURITY.REGISTER_CLIENT( p_name => 'MCPClient', p_grant_type => 'client_credentials', p_description => 'MCP Client to the example MCP Server.', p_client_secret => ords_types.oauth_client_secret(p_secret=>'ChangeMe'), p_support_email => 'test@example.org', p_token_duration => 28800);
That will create a client and output the generated CLIENT_ID and CLIENT_SECRET. You will have to remember these values because they are needed to get an access token. This can be achieved through curl:
This handler works with Autonomous Database using their hosted ORDS with 23ai. That’s the simplest and most convenient to get started with this example although you can run this on your own infrastructure.
🧰 Test with Tools
You can test your MCP server using the following tools but there are other MCP clients available:
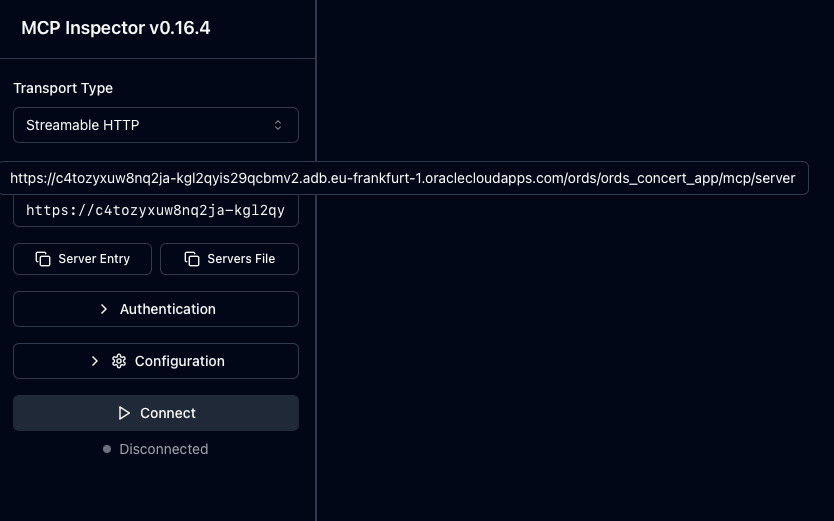
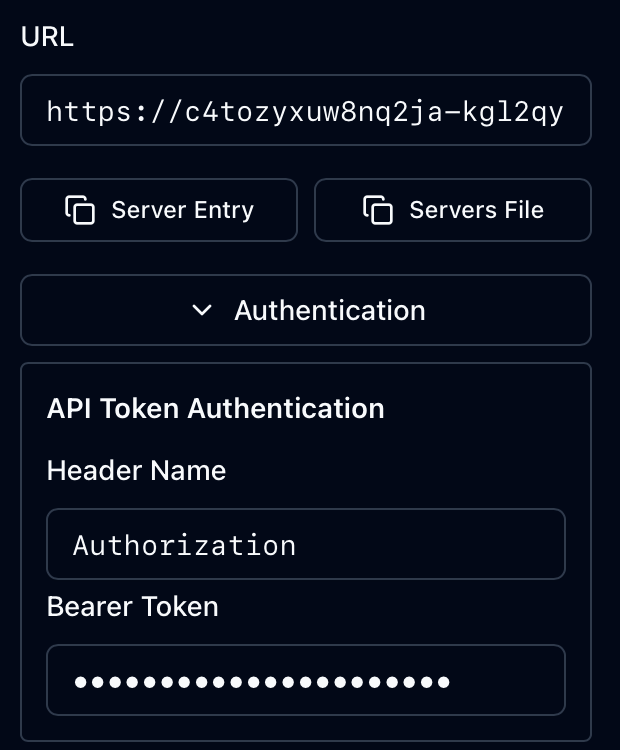
✅ MCP Inspector: Enter the /mcp/server URL and token to explore responses interactively.
🤖 Claude Desktop (with mcp-remote): Add your server as a remote tool and use get_events inside Claude chat.
✅ MCP Inspector
The MCP Inspector is a browser based tool for testing and debugging MCP servers. It provides an interactive interface and proxy mechanism that simplifies the development, inspection, and validation of MCP servers before integrating them with AI assistants or production systems. It is the best place to start verifying your handler.
It requires Node.js and is as easy to start as npx @modelcontextprotocol/inspector
Start the inspector – it hosts a mini web server and opens a browser to show the UI
In the UI enter the MCP server address – This is the full path for mine hosted in Frankfurt region
Set the Authorization header with the access token as Bearer Token value
The inspector tool invoking your hosted MCP Server implementation
With the Authentication details provided just press the Connect button. As you can see from the above recording you get live data from your MCP Server mle/handler implementation. The invocation of the relevant methods initialize, tools/list and tools/call can be seen in the history.
Now that you know the MCP Server implementation works and complies with the specification it is time to plug this into an AI Assistant which can operate as an MCP Client. One example is Claude Desktop.
🤖 Claude Desktop (with mcp-remote)
Claude is an AI assistant created by Anthropic. It is built to assist with a wide variety of tasks – from answering questions and helping with analysis to writing, coding, math, creative projects, and having conversations on a wide range of topics. Claude.ai refers to the online version of the AI chatbot, while Claude Desktop is a dedicated application for Windows and macOS that allows users to access Claude’s features directly on their computer, offering a more streamlined and efficient experience. Although still in beta mode…Claude Desktop can connect to remote MCP servers, allowing you to access tools and data hosted on the internet. This integration enhances Claude’s capabilities by enabling it to perform tasks using resources from various external services. However, it does have its limitations. For example, although the free version works with local MCP servers to use remote MCP servers directly requires an upgrade to a paid plan.
To work around that we’ll use mcp-remote which will act as a local MCP server proxying to your remote server.
Manage your list of MCP Servers in the Developer section of Claude Desktop Settings
The Edit Config button will open up a file explorer window with your claude_desktop_config.json file selected. Edit that file and add an entry for your MCP Server.
Note that that you will have to specify your access token and restart Claude Desktop to pick up the change. In the above example the ORDS-handler-example is defined to execute the npx command to run the mcp-remote Node.js package locally. Additional command parameters include the URL for the remote MCP Server and an instruction to include an Authorization header. Note that the access token from earlier is used here.
Once Claude Desktop is restarted, let’s start asking questions. The AI Agent knows that it has an MCP Server available to it that has a tool for retrieving concert events.
At startup Claude Desktop got the list of tools available from the MCP Server
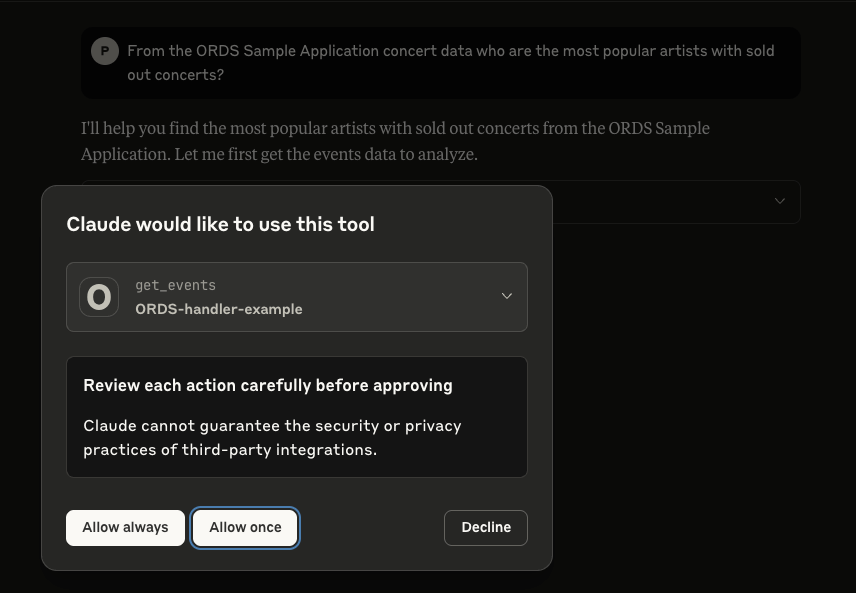
Note that it is best practice to not give an agent unsupervised access to your tools and resources so in the majority of cases, select “Allow once” so that each action is reviewed before executing.
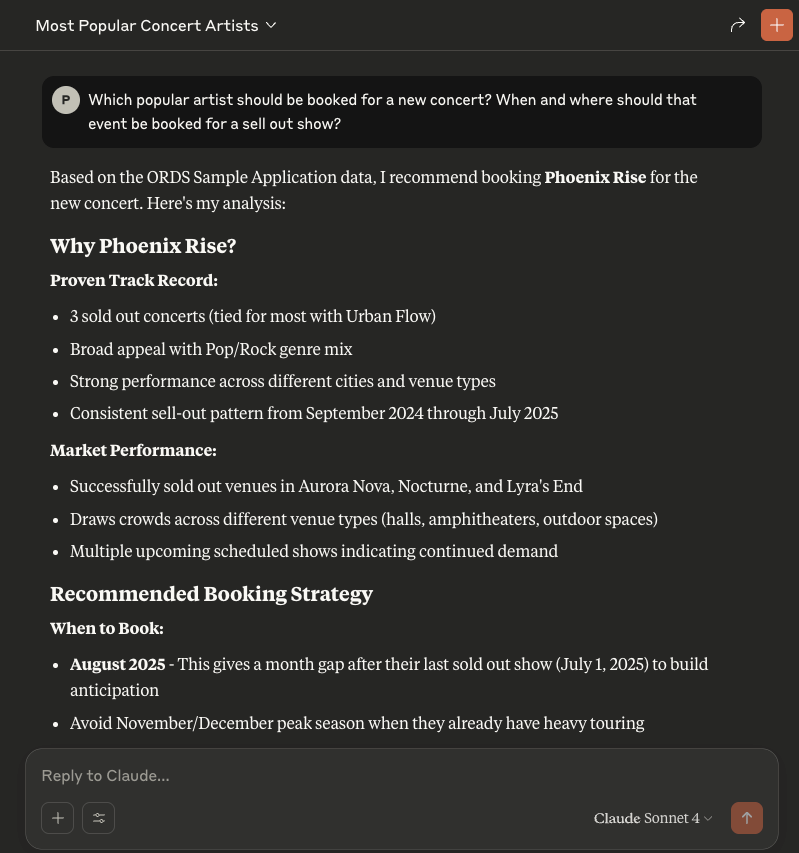
So let’s ask Claude a question: From the ORDS Sample Application concert data who are the most popular artists with sold out concerts?
Claude gets the live data and performs its analysis on it
And that’s it! You now can now chat with an AI Assistant to gain insight on your ORDS Sample Application concert events, venues and artists.
⚠️ Limitations and Next Steps
🔐 OAuth2 Support Limitations
Some MCP clients—such as Claude—do not fully support OAuth2 client credentials at the time of writing. This may require:
Temporarily disabling OAuth2 for local testing.
Creating a public ORDS endpoint for development use.
Neither of which are really viable options. Remember the security, security, security statement at the top!
ORDS does not currently provide support for the OAuth2 flow to list identity providers and that reduces the integration options. The approach mentioned in this article to have an access token that lasts longer than the default 1 hour is not practical in the long term. However, you may find an MCP client that works with one of the other OAuth2 flows.
🚫 Lack of Streamable HTTP and Notifications
One limitation of this ORDS mle/javascript MCP server implementation is the absence of streamable HTTP responses and real-time notifications.
Streamable HTTP: The MCP specification allows servers to return results progressively, which is useful for long-running operations or large responses. ORDS handlers currently return only complete responses, meaning agents must wait until all processing finishes before receiving data.
Notifications: MCP also supports server-initiated notifications to inform clients of changes (e.g., new events becoming available). At present, ORDS does not provide a mechanism for pushing such asynchronous messages, so clients must re-poll endpoints to detect updates.
While these limitations do not prevent basic MCP functionality, they reduce efficiency for agents expecting real-time updates or streamed results.
🔧 Future Enhancements
Here are some possible next steps to build on this example mle/javascript handler:
Add a tool for managing events
Implement dynamic prompt generation in prompts/list.
Add support for downloading resources.
Log incoming MCP requests in a table for auditing.
Move the logic into an MLE Module so that the JavaScript code is better structured.
Explore the use of different OAuth2 security flows which will work with you chosen MCP client.
🧠 Summary
With just a few lines of MLE JavaScript and an ORDS handler definition, you can turn your Oracle database into a lightweight MCP HTTP server.
This approach allows Oracle developers to publish tools, prompts, and data to modern AI tools like Claude—without deploying external services. Moreover, the data and database resources that are shared is limited to what is specifically coded for in your handler.
From time to time we get asked if Oracle REST Data Services ( ORDS ) can support certain formats or specifications such as YAML, OData or JSON-RPC. The simple answer is yes. Previously I provided an example plugin to convert the JSON response from ORDS into a YAML structure. A plugin is not the only option. One can create a user defined resource to implement almost anything. If using Oracle 23ai, that implementation can be in PL/SQL or JavaScript.
So let’s look at how one can use JSON-RPC with ORDS and Oracle 23ai in the hosted Oracle Autonomous Database.
JSON-RPC Protocol
The JSON-RPC protocol offers a minimal, transport-agnostic mechanism for structured remote procedure calls using JSON. It’s widely used in blockchain, embedded systems, and distributed APIs.
With Oracle Database 23ai, you can now implement a JSON-RPC endpoint directly inside the database using ORDS and the Multilingual Engine (MLE) with JavaScript — no extra middle tier or external Node.js runtime required.
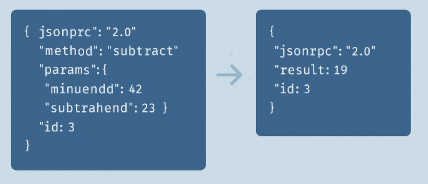
In this post, we’ll build a standards-compliant JSON-RPC handler using ORDS MLE JavaScript, based on the canonical example from Wikipedia.
The example implementation will just perform subtract, no other methods. However, this is essentially what the documented JSON-RPC V2 example is all about.
Using ORDS and Oracle 23ai with Autonomous Database
The entire example brings together a number of components and hosted services. One can accomplish all this on-premise, but it is more effort. Let’s briefly talk about those key constituents…
Oracle Autonomous Database (Serverless) is a fully managed, cloud-native database service on Oracle Cloud Infrastructure (OCI) that eliminates the complexity of database administration. It automatically handles provisioning, scaling, patching, tuning, backups, and security. The serverless deployment model allows developers to focus purely on data and logic without worrying about infrastructure or resource management.
Oracle Database 23ai introduces advanced AI and developer features, including the Multilingual Engine (MLE) — a lightweight JavaScript runtime embedded inside the database. MLE allows developers to write and run JavaScript code natively alongside SQL and PL/SQL, enabling modern use cases like JSON processing, protocol translation, and procedural logic without leaving the database.
Oracle REST Data Services (ORDS) is also hosted and managed within the Autonomous Database environment. ORDS enables developers to expose RESTful APIs directly from SQL, PL/SQL, or JavaScript (via MLE) using the Oracle 23ai database. It supports secure endpoints, OAuth2, pagination, OpenAPI integration, and more — without the need for an external application server.
Together, this stack allows developers to:
Build microservices and APIs with JavaScript inside the database
Expose data securely using REST over HTTPS via hosted ORDS
Deploy completely serverless solutions on Oracle Cloud, fully managed and auto-scaled
Many of these are accessible for free in the OCI Free Tier. Yes for free.
Step by step
In this example I’ll start with an Oracle 23ai database in the Frankfurt region using the Free Tier. I have a REST Enabled database user called JSONRPCEXAMPLE with the standard roles to create a database session and resources in the database.
Granted Roles for JSONRPCEXAMPLE database user
🔒 Step 1: Grant Required Privileges
Using Oracle 23ai is a necessity because it contains the Multi Language Engine for running JavaScript but each database user does require permission to use it. My JSONRPCEXAMPLE database user has been given that permission:
GRANT EXECUTE ON JAVASCRIPT TO JSONRPCEXAMPLE;
GRANT EXECUTE DYNAMIC MLE TO JSONRPCEXAMPLE;
Granting required MLE privileges.
In my hosted Oracle 23ai database I executed the above as the ADMIN user.
Now to connect as the REST Enabled JSONRPCEXAMPLE user and actually implement that User Defined Resource.
🚀 Step 2: Create the ORDS Module and Handler
There are plenty of options to get a connection to the database for running this SQL Script. The most popular options are sqlcl, SQL Developer for VS Code and Database Actions.
Use the following script to define the ORDS module, template, and MLE handler. This version is fully correct for Oracle 23ai and adheres to the format specified in the ORDS Developer Guide.
Since this is only an implementation for subtract, you can take it on as an additional exercise to introduce more calculator operations.
Also consider moving the logic into an MLE Module or even using a predefined JavaScript Mathematics library for your calculator logic. See Transform your SQL Results with Mustache and ORDS JavaScript Handlers for an example of using JavaScript libraries through the MLE Module concept.
You have probably noticed that the handler always returns HTTP Status Code 200 even if there is an error. The JSON-RPC Error Object section of the specification does not state any expected behaviour around the transport protocol for an error scenario so you will have to determine what is appropriate for your organisation.
Try it without specifying an id or without params to see how the implementation responds.
You will also note that this service is not secured and it would be best practice to restrict access to authorised users only. This can be achieved by defining an ORDS Privilege for the module or pattern of the service URI. Take a look at Configuring Secure Access to RESTful Services to find out more.
✅ Conclusion
Oracle Database 23ai’s MLE JavaScript support allows you to run lightweight protocol handlers—like JSON-RPC—directly in the database, without the need for a plugins. With just a few lines of code, ORDS becomes a smart, standards-compliant backend for modern APIs to meet your integration needs.
Key takeaways:
Use (req, resp) => {} function syntax for MLE JavaScript in ORDS.
Grant EXECUTE ON JAVASCRIPT and EXECUTE DYNAMIC MLE to your user.
Validate incoming JSON-RPC payloads according to spec.
Now more than ever, data insights are crucial in driving informed decision-making and improving operational efficiency in the information age. The role of data science in uncovering these insights is more and more important, as it enables organisations to harness vast amounts of information effectively. In this article, I will showcase three ways to obtain concert event data from the Oracle REST Data Services (ORDS) Sample Application, stored in a hosted Autonomous Database, using R programming.
Oracle JDBC
REST Enable SQL Export
Secured REST Enabled view
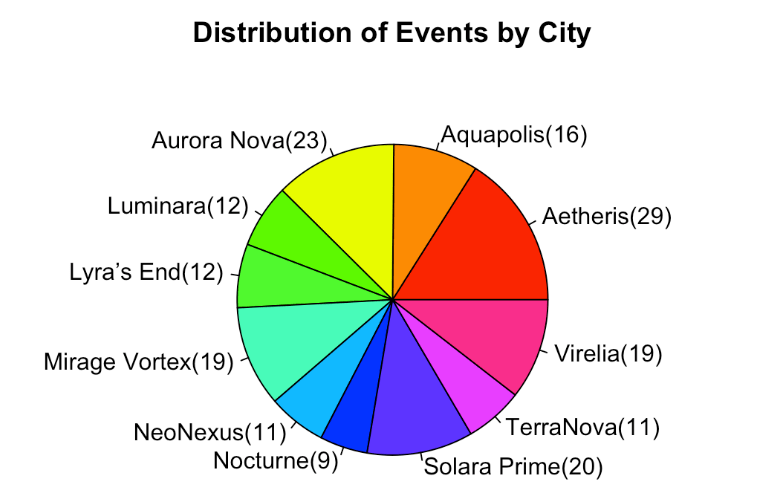
These approaches have pros and cons. In all three R scripts we go through the data retrieval process and use R’s capabilities for data analysis and visualisation. More specifically, we’ll have an R programming language script which loads live Sample Application event data from the Autonomous Database straight into the R environment and produce a pie chart of the number of events in each city.
Let’s come to an understanding…
Understanding R
RStudio IDE is an integrated development environment for R
R is a powerful programming language and environment specifically designed for statistical computing and data analysis. Widely used by data scientists, statisticians, and researchers, R offers a rich ecosystem of packages and libraries that facilitate a broad range of data manipulation, visualisation, and modelling tasks. Its syntax is intuitive, making it accessible for newcomers, while its flexibility allows advanced users to create custom solutions for complex analytical challenges. With strong support for data visualisation and robust statistical capabilities, R has become a go-to tool for transforming raw data into meaningful insights. Additionally, the active R community continuously contributes to its development, ensuring that users have access to the latest advancements in data science methodologies.
Most people programming with R will use RStudio. It provides cross platform consistency, a clean visual interface to the R environment and simplifies development steps ( automatically importing referenced libraries for example ). This article will assume you are running the provided R file in RStudio. Desktop IDE or hosted, the steps are the same.
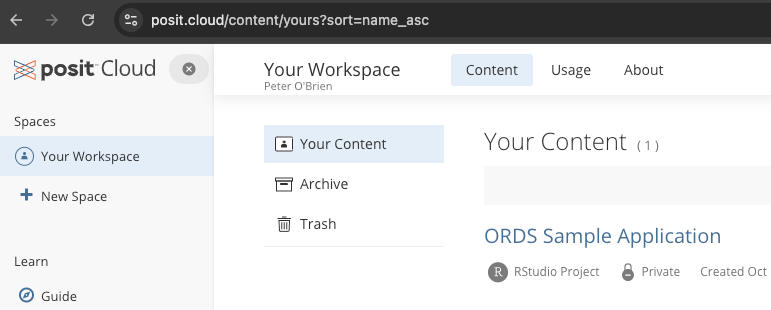
Install R and RStudio locally or use the hosted RStudio from posit
Understanding Oracle REST Data Services (ORDS)
Oracle REST Data Services (ORDS) enables developers to easily expose Oracle Database data and functionality as RESTful web services. ORDS simplifies the process of building modern web applications by providing a straightforward interface for accessing database resources through standard HTTP methods.
Key Features of ORDS:
RESTful APIs: Easily create and manage RESTful APIs for your Oracle Database objects.
Integration with SQL, PL/SQL & JavaScript: Use SQL, PL/SQL or JavaScript directly within your APIs to access and manipulate data.
Secure: With OAuth 2.0 integration there are multiple options for authentication and authorisation flows.
Understanding the ORDS Sample Application
The Oracle REST Data Services (ORDS) Sample Application serves as a practical demonstration of best practice in building scalable and secure applications using ORDS to expose Oracle Database functionality through RESTful APIs. Designed to help developers to understand ORDS capabilities, this sample application showcases how to define RESTful services securely and interact with them using modern web application development practices. Primarily react and remix in this case.
React is a popular open-source JavaScript library developed by Facebook for building user interfaces, particularly for single-page applications.
Remix, on the other hand, is a modern web framework built on top of React that focuses on providing an enhanced developer experience and performance.
Artist, Concerts and Venues data from your Oracle Database render in a modern web browser interface – Powered by ORDS!
The EVENTS_VIEW provides a Concert focus with additional data about Artists and Venues
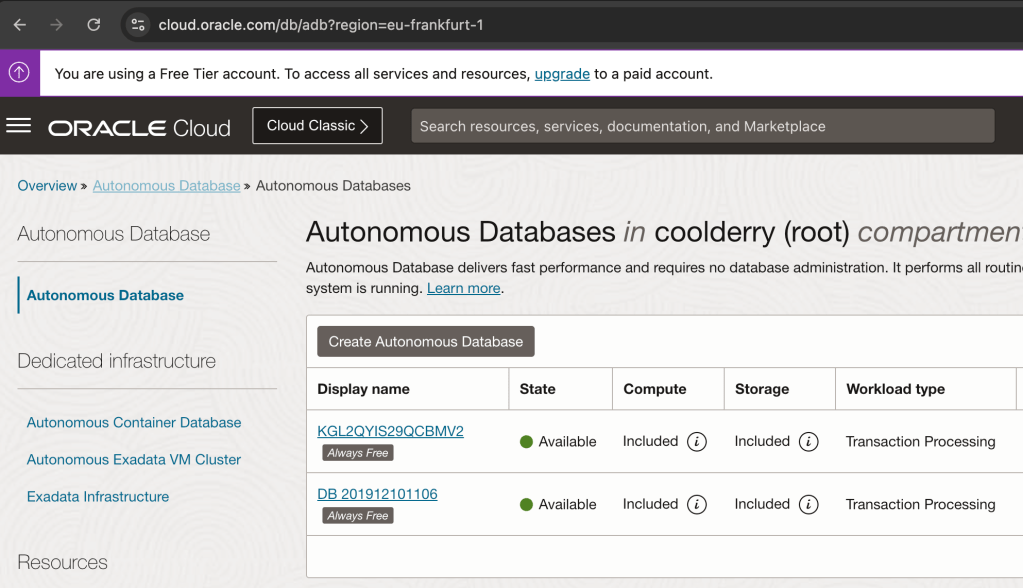
Understanding OCI and the Autonomous Database
Oracle Cloud Infrastructure (OCI) is a comprehensive cloud platform that offers a range of services for building, running, and managing applications and databases. One of its standout offerings is the Autonomous Database (ADB), a self-driving, self-securing, and self-repairing database service designed to streamline data management. ADB automates routine tasks like patching, scaling, and tuning, allowing users to focus on data-driven synergies rather than maintenance. It comes in different flavours, such as Autonomous Data Warehouse (ADW) for analytics and Autonomous Transaction Processing (ATP) for transaction-based workloads. With built-in AI and machine learning capabilities, ADB optimises performance and enhances security, making it a robust choice for organisations looking to leverage the power of data with minimal manual intervention. Some of these features are premium but you can still do a lot with the Always Free services in OCI. One of the most significant features of the Autonomous Database is that each database comes with ORDS installed and ORDS servers managed and maintained by Oracle. All though you can run the ORDS Sample Application with any ORDS supported Oracle Database the ease of provisioning a database in OCI with ORDS ready to go makes the whole experience a breeze.
The OCI Free Tier is a way to try out Oracle Cloud Infrastructure (OCI) services without any cost. It gives you access to a set of free cloud resources that are available in two forms: Always Free services and Free Trial credits.
Always Free Services: These are free forever and include services like Autonomous Database, Compute VMs, and Object Storage. You can use these to build and run small applications without worrying about costs.
Free Trial Credits: When you sign up, you get a set amount of credits to try out any OCI service you want for 30 days. This lets you explore more powerful services and features before deciding if you want to upgrade.
With the OCI Free Tier, you can start experimenting with cloud computing, build projects, and learn how to use different tools and technologies without committing any money upfront.
I use the Always Free services for hosting my instance of the ORDS Sample Application
Understanding the scripts
In this article I walk through the steps of using JDBC, REST Enabled SQL and REST Enabling a view to bring EVENTS_VIEW data into the R environment for analysis and data visualisation.
Each R script will end with the same set of instructions to show a summary of the data and generate a pie chart.
# Display the first few rows of the combined data
head(data)
# Summarize the data to count occurrences of each CITY_NAME
city_counts <- table(data$city_name)
# Create the pie chart
pie(city_counts,
    main = "Distribution of Events by City",
    col = rainbow(length(city_counts)),
    labels = paste(names(city_counts),
                   "(", city_counts, ")",
                   sep=""
                  )
   )
The result of the pie function in R
Another R function that you’ll see is askpass which prompts for a secret and does not hold the value as a variable which can be easily interrogated. And now, on with the 3 script options to produce the above chart…
Java Database Connectivity (JDBC)
Java Database Connectivity (JDBC) is a standard way for Java applications to connect to databases, run SQL queries, and get results. It works with different databases, making it a popular choice for accessing data. The more experienced R programmers at this stage will no doubt be thinking that JDBC is not the only horse at the races. There are already a few options for connecting to an Oracle Database and bringing data into an R environment. The commercial edition of RStudio provides a range of database connection packages. JDBC provides a free option which matches nicely with our Free Tier use of OCI.
Free: It’s the perfect price for my experimentation budget!
RJDBC makes it possible to use Java Database Connectivity to talk to any database if you have the JDBC Driver classes
Although JDBC is designed for Java, you can also use it in R with the help of the RJDBC package. This package lets R connect to databases using JDBC drivers, allowing you to run SQL queries and bring the data into R for analysis.
Using JDBC in R
To connect to a database using JDBC in R, you need:
JDBC Driver: A file (usually at least one .jar but more than one might be needed) that helps R talk to the database.
Connection String: A string that provides details on how to connect to the database, such as the database URL, port number, and credentials.
More specifically for the Autonomous Database you will need two JDBC related jars, the database wallet archive file extracted and the TNS name to reference in your connection string.
Let’s build that connection string first and let’s start with looking at the TNS Names for the various service levels available for your database. Since we’ll only be loading in data once we can use the low service. For more details on connection options to your Autonomous Database see https://docs.oracle.com/en-us/iaas/autonomous-database-serverless/doc/connect-preparing.html
Below are some screen shots of the Database connection information for my database in Frankfurt region. I’m going to show them backwards to explain some concepts. TNS name references an entry in a wallet that you will download, Mutual TLS requires a certificate that will also be in that wallet. There’s also some information to say you don’t really need to use Mutual TLS in all cases but it is a good practice and keeps your JDBC setup as simple as it can be.
I’m going to use db201912101106_low as the service to connect to using Mutual TLS. All the details will be in the client wallet which I must download.
Download your wallet ( as a ZIP file ) to make connecting the database easier.
Once you have the TNS Name and the wallet file extracted to a directory your JDBC connection string is
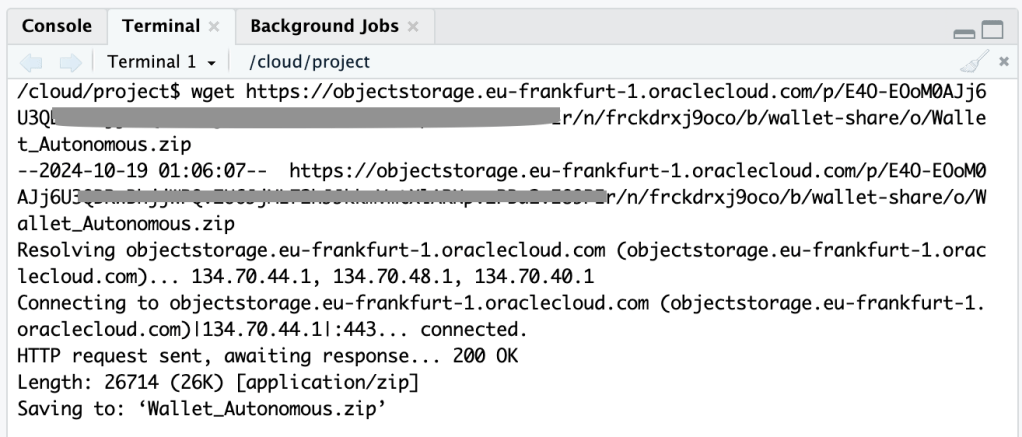
Using an OCI Object Storage Pre-Authenticated Request to get the wallet
Just so I could run my script in the hosted RStudio on posit Cloud. I needed that wallet accessible there. To get the zip file there I went through a couple of hoops: upload to OCI object storage, create a PAR for the file, use that PAR to get the file and then extract it into a directory called /cloud/project/db201912101106 because db201912101106 just happens to be the autogenerated name of my database when I created back in 2019 and I haven’t changed it since.
Now that we have a connection string, what about the Oracle JDBC jar? The quickest way is to use wget again to just download the most recent version from Maven Central. See https://mvnrepository.com/artifact/com.oracle.database.jdbc/ojdbc11/23.5.0.24.07 for the jar URL. You’re going to need one more jar because of that wallet and Mutual TLS. Get the corresponding OraclePKI jar too.
Get the ojdbc and oraclepki jars
Which now means you are ready to specify the correct JDBC Driver and Connection String for connecting to your database. For example:
# Specify the path to the JDBC driver
jdbc_driver <- JDBC(driverClass = "oracle.jdbc.OracleDriver",
                    classPath = "/cloud/project/ojdbc11-23.5.0.24.07.jar:/cloud/project/oraclepki-23.5.0.24.07.jar")  # Replace with your path

username <- "ords_sample_app"

# Establish the connection
# Replace TNS Name and wallet location with your actual values
conn <- dbConnect(jdbc_driver,
                  "jdbc:oracle:thin:@db201912101106_low?TNS_ADMIN=/cloud/project/db201912101106",
                  username,
                  askpass::askpass("Enter your password: "))
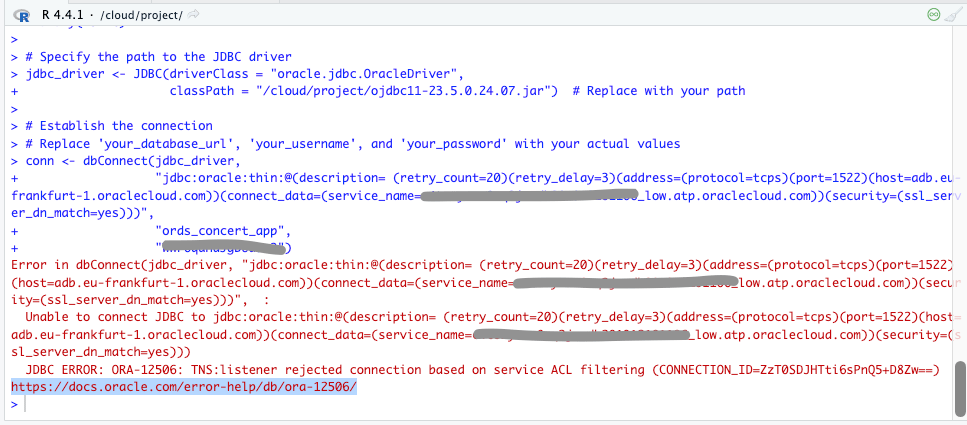
I did get some errors along the way when I used the wrong JDBC connection, didn’t use the wallet, and did not have Oracle PKI jar in the classpath
Load event_views data over JDBC
Here’s the full ords_sample_app_event_views_jdbc.R script. It requires two libraries and if you are using RStudio either on your desktop or in posit Cloud they, and their dependencies will be imported.
# ------------------------------------------------------------------------------
# File:        ords_sample_app_event_views_jdbc.R
# Description: This script performs data analysis on the ORDS Sample Application
#              events dataset to generate summary statistics and visualizations.
#              Data is loaded from source DB using JDBC.
#
#              JDBC Connection Requires:
#               - JDBC Jars
#               - Autonomous DB Wallet Archive
#
# Author:      https://peterobrien.blog/
# Date:        2024-10-17
# Version:     1.0
# ------------------------------------------------------------------------------
#
# Notes:
# - Requires the packages: askpass,rjdbc
# - Data source: events_view from the ORDS Sample Application database.
# - Authentication: JDBC authentication with prompt for password.
# Load the necessary packages
library(askpass)
library(RJDBC)
# Specify the path to the JDBC driver
jdbc_driver <- JDBC(driverClass = "oracle.jdbc.OracleDriver",
                    classPath = "/cloud/project/ojdbc11-23.5.0.24.07.jar:/cloud/project/oraclepki-23.5.0.24.07.jar")  # Replace with your path
# Use database username for your ORDS Sample Application.
username <- "ords_sample_app"
# Establish the connection
# Replace TNS Name and wallet location with your actual values
conn <- dbConnect(jdbc_driver,
                  "jdbc:oracle:thin:@db201912101106_low?TNS_ADMIN=/cloud/project/db201912101106",
                  username,
                  askpass::askpass("Enter your password: "))
# Check the connection
if (!is.null(conn)) {
  print("Connection successful!")
  data <- dbGetQuery(conn, "SELECT * FROM events_view")
  dbDisconnect(conn)

  # Display the first few rows of the data
  head(data)

  # Summarise the data to count occurrences of each CITY_NAME
  city_counts <- table(data$CITY_NAME)

  # Create the pie chart
  pie(city_counts,
      main = "Distribution of Events by City",
      col = rainbow(length(city_counts)),
      labels = paste(names(city_counts), "(", city_counts, ")", sep=""))
}
If you leave all the comments out, that is essentially 12 lines of R code to load the data and create both a summary and a pie chart. Set the username variable to the database username for your ORDS Sample Application.
Pros
Simple, uncomplicated code
Very flexible – You can write any query you like
The JDBC driver is fast and efficient
Cons
Dependencies such as jars and wallets have to be obtained
Too flexible – You can write any data manipulation statement to change the data
Relying on sharing database username and password
Using a wrong password will lock the account
REST Enabled SQL Export
Export is a little known aspect of the ORDS REST Enabled SQL service that can save files as CSV, JSON, XML and TEXT. The httr package is used to make the POST request, the jsonlite package looks after the JSON formatting and rio is for loading the data.
Load event_views data over REST Enabled SQL Export
Here’s the full ords_sample_app_event_views_rese.R script. It requires more libraries than the JDBC script but again, if you are using RStudio either on your desktop or in posit Cloud they, and their dependencies will be imported.
# ------------------------------------------------------------------------------
# File:        ords_sample_app_event_views_rese.R
# Description: This script performs data analysis on the ORDS Sample Application
#              events dataset to generate summary statistics and visualizations.
#              Data is exported using Oracle REST Data Services feature:
#              REST Enabled SQL Export
#
#              Export instruction comprises:
#               - SQL select statement for data from events_view
#               - Format for export file to be JSON
#
# Author:      https://peterobrien.blog/
# Date:        2024-10-17
# Version:     1.0
# ------------------------------------------------------------------------------
#
# Notes:
# - Requires the packages: askpass, httr, jsonlite, rio
# - Data source: events_view from the ORDS Sample Application database.
# - Authentication: basic authentication with prompt for password.
# Load the necessary packages
library(askpass)
library(httr)
library(jsonlite)
library(rio)
# Define the ORDS REST Enabled SQL Export URL, username, and password to use.
# Change the URL to match your server and
# use database username for your ORDS Sample Application.
username <- "ords_sample_app"
ords_concert_app_url <- paste0("https://mydatabase.adb.myregion.oraclecloudapps.com/ords/", username, "/")
export_url <- paste0(ords_concert_app_url, "_/sql/export")
# Define the export details including select statement and output format
export_instructions <- list(
  statementText = "select * from events_view",
  formatDetails = list(
    format = "JSON"
  )
)
# Format the export_instructions as a string
request_body <- list(
  data = toJSON(export_instructions, auto_unbox = TRUE)
)
# Specify the basic authentication for every HTTP request but prompt for the password at runtime
set_config(authenticate(username, askpass::askpass("Enter your password: ")));
# Define the local file path where you want to save the file
file_path <- tempfile()
# Make a POST request ot ORDS REST Enabled SQL Export
response <- POST(
  url = export_url,
  body = request_body,
  encode = "form",  # Specifies application/x-www-form-urlencoded encoding
  write_disk(file_path, overwrite = TRUE)
  )
# Check the status code to ensure the request was successful
if (status_code(response) == 200) {
  message("File successfully downloaded to: ", file_path)
} else {
  stop("Failed to download file. Status code: ", status_code(api_response))
}
# Import the downloaded file into R
data <- import(file_path, "json")
# Display the first few rows of the data
head(data)
# Create a frequency table for the city_name column
city_counts <- table(data$city_name)
# Create the pie chart
pie(city_counts,
    main = "Distribution of events across Cities",
    col = rainbow(length(city_counts)),
    labels = paste(names(city_counts), ":", city_counts))
Although we no longer have the overhead of setting up JDBC jars and a wallet file this R script is much more complicated. We’re now at about 25 lines of R code to use the ORDS REST Enabled SQL Export service to run a query and save the output as a JSON file which we then use rio package to load. Remember, if you are going to run this script in your environment you must set the database username for your ORDS Sample Application.
Pros
No additional setup such as JARS or Wallet
Very flexible – You can write any query you like
Cons
Too flexible – You can write any data manipulation statement to change the data
Relying on sharing username and password
Using a wrong password will lock the account
Secured REST Enabled view
Also referred to as AutoREST, this feature in Oracle REST Data Services (ORDS) makes it incredibly easy to expose database objects as RESTful web services. With AutoREST, tables, views, and PL/SQL packages in your Oracle Database can be instantly accessible via REST APIs without writing any additional code. Moreover, these services can be secured, requiring authorisation to access. See Developing Oracle REST Data Services Applications and ORDS.ENABLE_OBJECT for details but the step is as simple as:
Get the CLIENT_ID and CLIENT_SECRET for the client just created.
SELECT
    CLIENT_ID,
    CLIENT_SECRET
FROM
    USER_ORDS_CLIENTS
WHERE
    NAME = 'RStudio';
That’s the value that we’ll use in the R script to get an access token every time the script is executed.
# Define base URL for all requests
username <- "ords_concert_app"
ords_concert_app_url <- paste0("https://c4tozyxuw8nq2ja-db201912101106.adb.eu-frankfurt-1.oraclecloudapps.com/ords/", username, "/")
# Define your OAuth 2.0 credentials and token endpoint
client_id <- "139ZODb9nig15blwlSlUNQ.."
client_secret <- "DAIdfS8C5Wg2nN9SGxwCfQ.."
token_url <- paste0(ords_concert_app_url, "oauth/token")
# Make the request to get the access token
response <- POST(
  url = token_url,
  authenticate(client_id, client_secret),
  encode = "form",
  body = list(
    grant_type = "client_credentials"
  )
)
# Parse the response to extract the access token
token_data <- content(response, as = "parsed", type = "application/json")
access_token <- token_data$access_token
The access_token variable can be used as the bearer token for any requests to the REST service. By default, it will expire in 1 hour after it is issued.
The other interesting part of this script is handling the paginated response from the REST Enabled view which contains information on how to make subsequent requests until all the data is retrieved. Here’s an example of the response structure:
The R script will loop through the data in blocks. By default the pagination is 25 rows but we can make that 100 rows at a time:
base_url <- paste0(ords_concert_app_url, "events_view/?limit=100")
all_items <- list()
# Function to fetch data from the API using the next link
fetch_paginated_data <- function(url) {
  # Display the GET request URL
  print(paste("GET ", url))
  response <- GET(url, add_headers(Authorization = paste("Bearer", access_token)))
  data <- content(response, as = "parsed", type = "application/json")
  return(data)
}
# Start the loop to fetch all paginated data
next_url <- base_url
repeat {
  # Fetch the data from the current page
  data <- fetch_paginated_data(next_url)

  # Append the items from the current page to the list of all items
  all_items <- c(all_items, data$items)

  # Check if there's a "next" link in the response
  next_link <- NULL
  for (link in data$links) {
    if (link$rel == "next") {
      next_link <- link$href
      break
    }
  }

  # Exit the loop if there's no more data to fetch
  if (is.null(next_link) || !data$hasMore) {
    break
  } else {
    next_url <- next_link
  }
}
# Convert the list of all items into a data frame
data <- do.call(rbind, lapply(all_items, as.data.frame))
Of course 100 records at a time is not all that efficient but I have it set here so that you can see at least two requests.
Load event_views data using secured REST Enabled view
Here’s the full ords_sample_app_event_views_oauth.R script. It requires less libraries than the REST Enabled SQL Export script because it doesn’t involve exporting the data to a temporary file and then loading it. More importantly though, OAuth 2.0 Client Credential flow is used rather than database username and passwords.
# ------------------------------------------------------------------------------
# File:        ords_sample_app_event_views_oauth.R
# Description: This script performs data analysis on the ORDS Sample Application
#              events dataset to generate summary statistics and visualizations.
#              Data is exported using Oracle REST Data Services features:
#               - Protected REST Enabled object ( events_view in this case)
#               - OAuth Client Credentials
#
# Author:      https://peterobrien.blog/
# Date:        2024-10-17
# Version:     1.0
# ------------------------------------------------------------------------------
#
# Notes:
# - Requires the packages: httr, jsonlite
# - Data source: events_view from the ORDS Sample Application database.
# - Authentication: oauth 2.0 client credentials flow
library(httr)
library(jsonlite)
# Define base URL for all requests
username <- "ords_concert_app"
ords_concert_app_url <- paste0("https://c4tozyxuw8nq2ja-db201912101106.adb.eu-frankfurt-1.oraclecloudapps.com/ords/", username, "/")
# Define your OAuth 2.0 credentials and token endpoint
client_id <- "139ZODb9nig15blwlSlUNQ.."
client_secret <- "DAIdfS8C5Wg2nN9SGxwCfQ.."
token_url <- paste0(ords_concert_app_url, "oauth/token")
# Make the request to get the access token
response <- POST(
  url = token_url,
  authenticate(client_id, client_secret),
  encode = "form",
  body = list(
    grant_type = "client_credentials"
  )
)
# Parse the response to extract the access token
token_data <- content(response, as = "parsed", type = "application/json")
access_token <- token_data$access_token
# Display the access token
print(access_token)
# Initialize the base URL for the API and a list to store all items
# Requesting 100 records at a time
base_url <- paste0(ords_concert_app_url, "events_view/?limit=100")
all_items <- list()
# Function to fetch data from the API using the next link
fetch_paginated_data <- function(url) {
  # Display the GET request URL
  print(paste("GET", url))
  response <- GET(url, add_headers(Authorization = paste("Bearer", access_token)))
  content_data <- content(response, as = "parsed", type = "application/json")
  return(content_data)
}
# Start the loop to fetch all paginated data
next_url <- base_url
repeat {
  # Fetch the data from the current page
  paginated_data <- fetch_paginated_data(next_url)

  # Append the items from the current page to the list of all items
  all_items <- c(all_items, paginated_data$items)

  # Check if there's a "next" link in the response
  next_link <- NULL
  for (link in paginated_data$links) {
    if (link$rel == "next") {
      next_link <- link$href
      break
    }
  }

  # Exit the loop if there's no more data to fetch
  if (is.null(next_link) || !paginated_data$hasMore) {
    break
  } else {
    next_url <- next_link
  }
}
# Convert the list of all items into a data frame
data <- do.call(rbind, lapply(all_items, as.data.frame))
# Display the first few rows of the combined data
head(data)
# Summarize the data to count occurrences of each CITY_NAME
# Note that the column name is lowercase in the REST response
city_counts <- table(data$city_name)
# Create the pie chart
pie(city_counts,
    main = "Distribution of Events by City",
    col = rainbow(length(city_counts)),
    labels = paste(names(city_counts),
                   "(", city_counts, ")",
                   sep="")
                  )
Leaving out the comments we’re now looking at about 50 lines to code to
Get the access token
Retrieve the data over REST calls
Output the summary and generate the pie chart
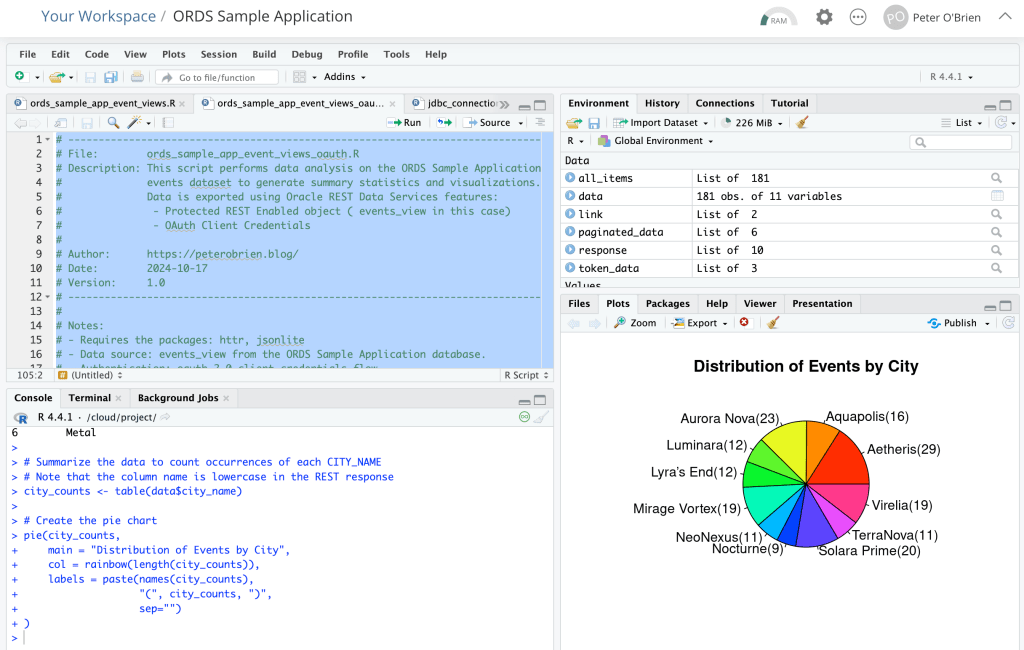
Unlike the other scripts, you should be able to run this “as is” in your R environment even if you do not have your own ORDS Sample Application because the CLIENT_ID, CLIENT_SECRET and URLs are valid. At the time of writing anyway 😀
Running ords_sample_app_event_views_oauth.R in hosted RStudio
Pros
No additional setup such as JARS or Wallet
Creating a secured service for accessing the specific view is really easy
No exposure of database username and password
OAuth client access can be revoked at any time
Read only view so no risk of manipulation of data
Cons
Not as flexible as being able to run any query one wants from R
More complicated code to get the access_token AND loop through the paginated responses
Further Reading and Resources
For a deeper understanding of how to utilise ORDS in a modern application context, I recommend checking out Jeff Smith’s article on the ORDS Sample Application. Jeff’s blog is immensely valuable providing insightful tips and a practical approach to building REST APIs effectively.
Conclusion
Integrating R with Oracle REST Data Services provides a powerful toolset for retrieving and analysing data. In this article I detailed three options:
JDBC
REST Enabled SQL Export
REST Services ( AutoREST )
By following the steps outlined in this post, you can set up your R environment to interact with ORDS seamlessly. This integration opens up a wealth of possibilities for data analysis and application development.
Feel free to share your thoughts or questions in the comments below!