Oracle REST Data Services (ORDS) relies on the Oracle Universal Connection Pool (UCP) to manage JDBC connections efficiently. In most cases, adjusting connection pool settings—particularly the Max Pool Size—is done through the ORDS configuration layer:
ords config set jdbc.MaxLimit <new value>
A restart then brings the local configuration change into effect. In a typical deployment with multiple ORDS instances behind a load balancer, rolling restarts make this easy and largely transparent.
However, not every environment is set up for easy restarts, and not every situation allows for them. Sometimes uptime requirements, performance testing, or emergency load conditions demand immediate tuning of connection pool behaviour—without recycling the ORDS process.
In this article, we walk through how Java’s JMX (Java Management Extensions) and Attach API can be used to inspect and update ORDS JDBC pool internals at runtime, allowing you to adjust the Max Pool Size dynamically while the instance continues to serve traffic.
Why Adjust UCP Pool Limits Without Restarting ORDS?
Although restarts are the normal path for configuration changes, several real-world scenarios benefit from runtime tuning:
1. Strict SLA Environments
Some deployments run a single ORDS instance—sometimes even in production, although that is never recommended. Restarting may violate uptime guarantees.
2. Sudden Load Spikes
Perhaps unexpected traffic arrives, and the pool is too small. Increasing Max Pool Size instantly alleviates pressure while you evaluate long-term settings.
3. Performance Benchmarking
When running repeatable load tests, restarts introduce variability. Adjusting pools in-place keeps the JVM “warm” and avoids cache resets.
4. Expensive ORDS Startup Contexts
In environments with complex authentication providers, proxies, or metadata hydration, ORDS startup can take longer than ideal. Avoiding that overhead is valuable.
5. Operational Diagnostics
Listing the actual in-memory pools is useful for debugging UCP behaviour, particularly when working with multiple pools created by various ORDS features.
These operational realities make the ability to adjust connection pools live a valuable addition to the ORDS administrator toolkit.
How It Works: JMX + the Java Attach API
Modern Java installations include the Attach API, which allows one JVM to attach to another running JVM, load a Java agent into it, and inspect its internal classes and state.
This makes runtime diagnostics possible without:
- restarting the process
- modifying classpaths
- recompiling anything
- requiring source code access
Once the agent is loaded, it uses JMX-style introspection and reflection to locate ORDS’s UCP pools, read their attributes, and optionally modify them.
What’s the problem?
There’s really nothing new here. JMX and the Oracle UCP JMX managed beans have been available and documented for years. The utilities for interacting and setting values through JMX such as JConsole, Java VisualVM and Java Mission Control all involve Graphical User Interfaces which means that they can not be used through a basic shell terminal or in a docker container.
That’s why I put together the UCPPoolManager.java source file. If you have Java 17 in place to run ORDS, then you have all you need to modify the Maximum Pool Size at runtime.
UCPPoolManager.java
The sample java source code for interacting with the Oracle UCP JMX beans for a specific pool is available at https://gist.githubusercontent.com/pobalopalous/2676390effd70b0c2c1183ff54ca95c0/raw/03d119d9e8f0d2d2c342d0b2d166dc29f9e23c57/UCPPoolManager.java
You can download that source code locally using curl
curl -O https://gist.githubusercontent.com/pobalopalous/2676390effd70b0c2c1183ff54ca95c0/raw/03d119d9e8f0d2d2c342d0b2d166dc29f9e23c57/UCPPoolManager.java
Listing and Updating ORDS JDBC Pools via JMX
The Java class that implements this behaviour is a small standalone utility. You run it directly with the Java interpreter:
java UCPPoolManager.java <PID> [<pool name>] [<new max pool size>]
Examples:
List all JDBC pools
java UCPPoolManager.java 91288
Show statistics for a specific pool
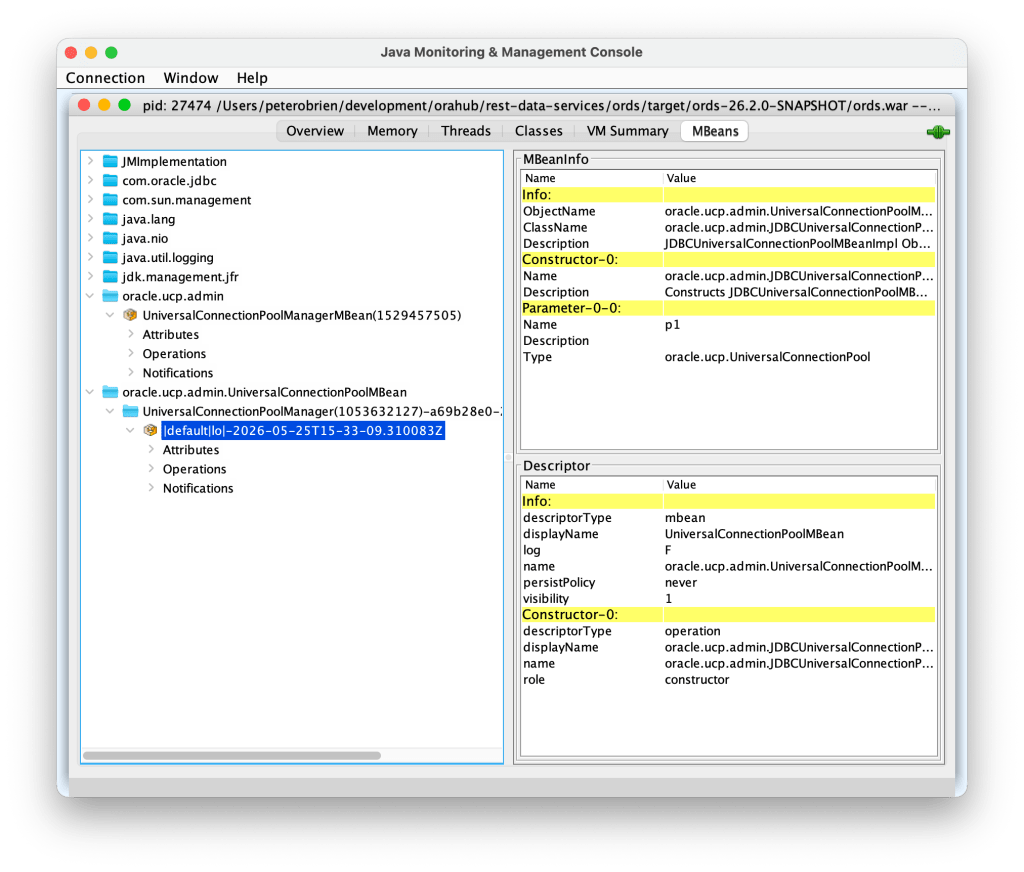
java UCPPoolManager.java 91288 "|default|lo|-2025-11-28T21-14-17.156256Z"
Get the PID for your ORDS instance
So where did I get 91288 as the Process ID for my ORDS instance? Simply by running the Java JPS command line tool and grep for the ords.war. Java JPS (Java Virtual Machine Process Status) is a command-line tool used to list all Java processes running on a system.
jps -ml | grep ords.war

91288 /opt/ords-downloads/ords-25.3.1.289.1312/ords.war serve
Increase the Max Pool Size to 200
java UCPPoolManager.java 91288 "|default|lo|-2025-11-28T21-14-17.156256Z" 200
If a new Max Pool Size is provided, the utility applies the change immediately, without affecting active sessions or request processing.
If no pool name is given, the utility lists all active pools—similar to the ords pool list command.
Diagram 1 — High-Level Flow: Attaching to ORDS at Runtime
+-------------+     Attach API      +-------------------+
|  Utility    | ------------------> |   ORDS JVM        |
|  Process    |                     | (Running Instance) |
+-------------+                     +-------------------+
        |                                    |
        | Load Agent                          |
        |------------------------------------>|
        |                                    |
        |      Agent Introspects UCP Pools   |
        |<------------------------------------|
        |                                    |
        |   Prints Stats / Applies Changes   |
        +------------------------------------+
Code Breakdown: How the JVM Introspection Works
The utility follows a four-stage process to inspect and modify UCP internals.
1. Attach to the Running ORDS JVM
The Attach API connects to the target JVM using its process ID. For that we have an inner class called AutoCloseableResources which will clean up the connection to the VM when it finishes:
    /**
     * Helper class to manage JMX connection resources with try-with-resources
     */
    private static class AutoCloseableResources implements AutoCloseable {
        private final VirtualMachine vm;
        private final JMXConnector connector;
        private final MBeanServerConnection mbsc;

        AutoCloseableResources(String pid) throws Exception {
            System.out.println("Connecting to JVM (PID: " + pid + ")...");

            this.vm = VirtualMachine.attach(pid);
This lets our code interact with what is running inside the ORDS JVM, giving access to every class already loaded. See com.sun.tools.attach.VirtualMachine java doc
2. Get a Managed Bean Server Connection
Once attached, the Java class checks if a Management Agent is already running and if not, starts it:
String connectorAddress = vm.getAgentProperties().getProperty("com.sun.management.jmxremote.localConnectorAddress");

if (connectorAddress == null) {
   // JMX agent not running, start it
   System.out.println("JMX agent not found, starting it...");
   connectorAddress = vm.startLocalManagementAgent();
}
This agent executes within the ORDS process, allowing it get a JMX connector factory and ultimately a MBeanServerConnection so that our code can:
- locate UCP pool classes
- introspect them safely
- invoke getter/setter methods
- modify configuration
JMXServiceURL url = new JMXServiceURL(connectorAddress);
this.connector = JMXConnectorFactory.connect(url);
this.mbsc = connector.getMBeanServerConnection();
Note that the agent does not persist beyond the lifecycle of the running JVM. We will use that MBeanServerConnection instance to locate UCP class instances and invoke methods on them.
3. Locate UCP Pools Using JMX Interface
ORDS registers UCP pools in internal static structures. The agent accesses them at runtime by using the UCP JMX interface. First we have to get the main managed bean:
private static ObjectName findManagerMBean(MBeanServerConnection mbsc) throws Exception {
   ObjectName pattern = new ObjectName(UCP_DOMAIN + ":*");
   Set<ObjectName> mbeans = mbsc.queryNames(pattern, null);

   for (ObjectName mbean : mbeans) {
       if (mbean.toString().contains(POOL_MANAGER_MBEAN)) {
            return mbean;
       }
   }
   throw new RuntimeException("UniversalConnectionPoolManagerMBean not found");
}
Because the agent runs inside the ORDS process, the correct UCP version is always present—no external libraries needed.
4. Optionally Modify the Max Pool Size
If the user specifies a new Max Limit, the tool calls the setter:
Method setMax = poolClass.getMethod("setMaxPoolSize", int.class);
setMax.invoke(pool, newValue);
UCP applies the change immediately.
No restart required.
No dropped sessions.
No disruption to traffic.
Diagram 2 — Inside JVM: How UCP Pools Are Adjusted
                    +---------------------------+
                    |   ORDS JVM (Target)       |
                    |---------------------------|
                    |  UCP Pool Registry        |
                    |    • pool A               |
                    |    • pool B               |
                    |    • pool C               |
                    |---------------------------|
                              ^
                              |
                      Reflection Lookup
                              |
                        +-----------+
                        |  Agent    |
                        |  Code     |
                        +-----------+
                              |
                     Getter/Setter Calls
                              |
                   +---------------------+
                   | MaxPoolSize Updated |
                   +---------------------+
Conclusion: Opening the Door to Live Pool Tuning
Note that this approach is not limited to ORDS but applies to any Java application using Oracle Universal Connection Pool. There’s nothing really ORDS specific in the utility class.
Being able to inspect and adjust Universal Connection Pools at runtime gives administrators new flexibility, particularly in constrained or high-availability environments. With the help of the Java Attach API and JMX-style introspection, you can safely:
- list current pool statistics
- examine their behaviour under load
- adjust Max Pool Size dynamically
- avoid restarts and prevent service disruption
This technique isn’t a replacement for proper ORDS configuration management, but it fills a valuable gap when immediate action is needed or when restarts are impractical.
Potential Next Steps
If you want to build on this approach, consider:
✔ Adding Support for Additional UCP Parameters
Such as:
- Borrow Timeout
- Initial Pool Size
- Abandoned Connection Timeout
All of these can be adjusted via reflection just as easily as MaxPoolSize.
✔ Implementing Auto-Scaling Policies
Dynamically grow or shrink pools based on:
- DB workload
- request latency
- CPU saturation
- wait times
This could move your ORDS topology a step closer to cloud-native elasticity. However, that’s a conversation to have with your DevOps team because they may already have tools and policies in place for auto-scaling.