ORDS Pool Usage Chart with APEX

ORDS provides insight to its database pool cache through the ORDS Instance API. This is extremely useful for monitoring the database connection usage on a particular ORDS instance. Such information could reveal how close ORDS gets to using up its available connections as a result of the requests coming in and their correspond SQL statements. That would indicate if more resources or optimisations are required.

The ORDS Instance API is intended for System Administrator use in the deployed infrastructure. Users with this role are extremely powerful. Therefore the credentials for such users are extremely sensitive and how they are used should be carefully considered.

This article introduces an example application which shows how APEX could be used to retrieve the Database Pool Cache information with ORDS System Administrator credentials secured. The number of available and borrowed connections for both the APEX_PUBLIC_USER and ORDS_PUBLIC_USER database accounts are retrieved every 10 minutes and a chart of the data displayed.

Showing a snapshot of pool usage every 10 minutes

Configure ORDS Instance API

Stating the obvious here, but to get the database pool cache information from ORDS, the Instance API has to be enabled first. The steps for doing so are already covered in the product documentation but I’m going to call it out as prerequisite for this exercise. Also, just to repeat the product documentation, using the credentials file ( also known as: File Based User Repository ) is not intended for production use.

Keep secrets secret

In my case I defined a user called sysadmin with the System Administrator role and whose credentials will be provided on every request. To keep the credentials separate from the APEX application I’ll define them in the workspace and state that these credentials can only be used for Instance API requests. That means the same credentials could not be used for other ORDS services such as the Oracle Home information and DBCA operations available through the Database API environment category of services.

Specify Web Credentials for sysadmin in Workspace Utilities

About that URL

At this point you’ve probably noticed the host.docker.internal portion of the URL. I’m using that because I’m running the database in a docker container hosted on the same machine that ORDS is running on. If I was to refer to localhost, that would be the docker container. The host.docker.internal identifies the machine hosting the container. Docker provides a number of other networking options here but this is the simplest for my setup.

In this case, ORDS standalone is running on port 8080 on that machine. We’ll use this URL again when defining a REST Data Source in our APEX application.

>java -jar ords.war standalone

2021-10-11T09:23:33.448Z INFO        HTTP and HTTP/2 cleartext listening on host: localhost port: 8080
2021-10-11T09:23:33.466Z INFO        Disabling document root because the specified folder does not exist: /scratch/ords-21.3.0.266.1100/config/ords/standalone/doc_root
2021-10-11T09:23:35.052Z INFO        Configuration properties for: |apex|pu|
database.api.enabled=true
db.connectionType=basic
db.hostname=localhost
db.port=1521
db.servicename=orclpdb1
feature.sdw=true
instance.api.enabled=true
restEnabledSql.active=true
db.password=******
db.username=ORDS_PUBLIC_USER

2021-10-11T09:23:35.053Z WARNING     *** jdbc.MaxLimit in configuration |apex|pu| is using a value of 10, this setting may not be sized adequately for a production environment ***
2021-10-11T09:23:35.054Z WARNING     *** jdbc.InitialLimit in configuration |apex|pu| is using a value of 3, this setting may not be sized adequately for a production environment ***
2021-10-11T09:23:36.053Z INFO        Configuration properties for: |apex||
database.api.enabled=true
db.connectionType=basic
db.hostname=localhost
db.port=1521
db.servicename=orclpdb1
misc.compress=
misc.defaultPage=apex
security.disableDefaultExclusionList=false
security.maxEntries=2000
security.requestValidationFunction=wwv_flow_epg_include_modules.authorize
security.validationFunctionType=plsql
db.password=******
db.username=APEX_PUBLIC_USER
resource.templates.enabled=true

2021-10-11T09:23:36.054Z WARNING     *** jdbc.MaxLimit in configuration |apex|| is using a value of 10, this setting may not be sized adequately for a production environment ***
2021-10-11T09:23:36.054Z WARNING     *** jdbc.InitialLimit in configuration |apex|| is using a value of 3, this setting may not be sized adequately for a production environment ***
2021-10-11T09:23:37.664Z INFO        Oracle REST Data Services initialized
Oracle REST Data Services version : 21.3.0.r2661100
Oracle REST Data Services server info: jetty/9.4.43.v20210629

Permit the request

At this stage it should be clear that we have a database running in a docker container and ORDS standalone running on the same machine which is hosting that container. ORDS has two pools configured to talk to the database at localhost:1521/orclpdb1.

In my case, I started an Oracle Enterprise Edition 19c database using the image from https://container-registry.oracle.com/ and installed APEX 21.1 to it.

If we were to go ahead and define the APEX REST Data Source at this stage we might encounter this error once we try to test it.

ORA-24247: network access denied by access control list (ACL)

Put simply, the APEX application does not have permission to make a request from the database to the host on port 8080. A network access control list must be defined. In my case I am running APEX 21.1 and therefore will grant access to the APEX_210100 database user. If you have a different version of APEX, you will have a different user in this scenario. To define the ACL and assign it run this script in the database…

DECLARE
  l_principal VARCHAR2(20) := 'APEX_210100';
BEGIN
  DBMS_NETWORK_ACL_ADMIN.create_acl (
    acl          => 'hosted_ords_acl.xml', 
    description  => 'An ACL for the hosted ORDS instance',
    principal    => l_principal,
    is_grant     => TRUE, 
    privilege    => 'connect',
    start_date   => SYSTIMESTAMP,
    end_date     => NULL);

  DBMS_NETWORK_ACL_ADMIN.assign_acl (
    acl         => 'hosted_ords_acl.xml',
    host        => 'host.docker.internal', 
    lower_port  => 8080,
    upper_port  => 8080); 

  COMMIT;
END;

APEX Application

For this example I created a simple database application with just a home page which requires authentication. This means that for someone to access the charts they must authenticate with APEX. At no point will they need the sysadmin credentials. The home page will display two charts showing data from a synchronisation table which is appended to every 10 minutes with the connection pool state at that point in time.

Create a simple APEX application

REST Data Source

In that application Shared Components define a REST Data Source which will automatically make a call every 10 minutes to add records to a table.

Select the REST Data Sources link in Shared Components/Data Sources

The REST Data Source type should be Simple HTTP because there’s no need for pagination or to perform any additional operations such as POST, PUT, or DELETE. Note that the Base URL is the same value as specified for the Web Credential earlier and that ORDS System Administrator web credential is selected in the Authentication section.

Define a Simple HTTP data source for host.docker.internal

Synchronisation must also be defined so that the REST call is made on a regular basis to append to a DATABASE_POOL_CACHE table. Going through the synchronisation setup wizard will result in this table being created.

Define the synchronisation frequency

The table name DATABASE_POOL_CACHE comes from the /database-pools-cache/ portion of the endpoint URL. You can choose to name it whatever suits you but you will be referring to this table later when constructing the charts.

CREATE TABLE  "DATABASE_POOL_CACHE" 
   (	"ID" VARCHAR2(4000), 
	"CREATED" TIMESTAMP (6) WITH TIME ZONE, 
	"VALIDITY" VARCHAR2(4000), 
	"BORROWEDCONNECTIONSCOUNT" NUMBER, 
	"AVAILABLECONNECTIONSCOUNT" NUMBER, 
	"APEX$SYNC_STEP_STATIC_ID" VARCHAR2(255), 
	"APEX$ROW_SYNC_TIMESTAMP" TIMESTAMP (6) WITH TIME ZONE
   )
/

Every ten minutes the APEX REST Data Source synchronisation job will run. It will identify any synchronisation activity that is required and start making the necessary web service requests.

It won’t take long before there are records like this in the synchronisation table

The ID column contains the pool identifier. This column, along with the BORROWEDCONNECTIONSCOUNT, AVAILABLECONNECTSIONCOUNT and APEX$ROW_SYNC_TIMESTAMP will be used to chart the connection pool usage over time.

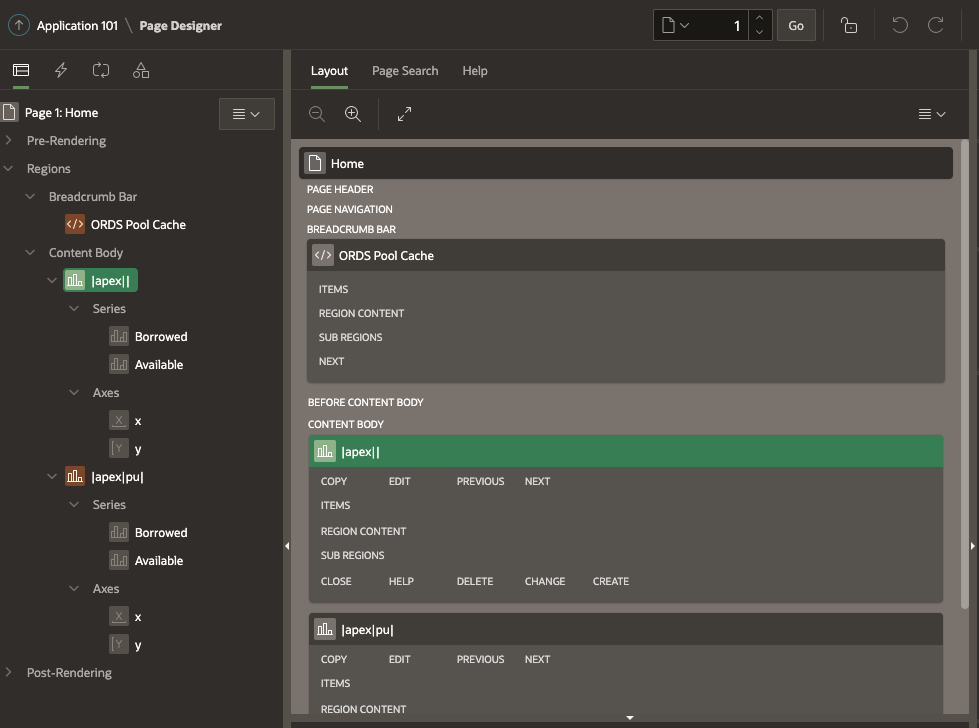
Application Home Page

Edit the home page and add a Chart instance onto the Content Body. You can first define a chart for |apex|| and then duplicate it for |apex|pu|. These represent the APEX_PUBLIC_USER and ORDS_PUBLIC_USER connection pools respectively.

For the |apex|| chart go to the Attributes section and set it as a Line chart with a 600 second automatic refresh.

Then define a Borrowed series which uses the BORROWEDCONNECTIONSCOUNT column on DATABASE_POOL_CACHE as the value to display. The Order By specifying the Row Sync Timestamp ensures that data is shown in the correct sequence.

Similarly, define a series called Available using AVAILABLECONNECTIONSCOUNT column. Note that the Where Clause restricts the records to just those applicable to the |apex||.

When duplicating this chart for |apex|pu| it is the Where Clause that must change.

The end result with two charts on the Content Body

Conclusion

You now have an APEX Application with a Home Page that is secured. Data from the DATABASE_POOL_CACHE table is shown in a chart for both pools. That data is obtained from the ORDS Instance API database pool cache endpoint. If additional pools are added to the ORDS instance the information for them will also appear in the table. However, they way this APEX application is configured it will not display any information about such new pools unless you specifically add a chart for it.

Here’s the key point though, no information about the sysadmin user credentials are exposed outside of the workspace.

Now try it out. Define an ORDS Based REST Service and use something like JMeter to call it multiple times concurrently over 20 or 30 minutes. You should see the number of borrowed connections go up and the number of available connections go down. Once the high number of requests ends the available connections increases but then drops down as the unused database connections are closed.

If going through those few APEX Application creation steps is too much you can just import the application using this ORDS_Database_Cache_APEX_App.sql script.

Ireland’s new Baywatch mashup

Due to a new initiative from the EPA you can keep up to-date on the water quality of Ireland’s major bays (hence the article title), beaches and rivers. Made possible by some hard work from the clever people at IBM’s Water Management Centre of Excellence, Splash provides a great way to research different beaches and decide where to visit based on a number of parameters — water quality, weather, and whether or not a lifeguard is on duty, and so on. You’ll note from the spelling of Centre that it is European based. In fact it’s current home is right here in Dublin.

The site is a clever mashup of EPA water quality data, which is provided by the local councils, some location data and weather reports from AccuWeather. There also appears to be a Twitter status check as well but I have not seen any data from this actually displayed on the site. The location data includes a description of the area and some images.

For the Oracle offices in Dublin, the nearest beach is Dollymount Strand. The Splash website provides the following description:

Dollymount provides tremendous respite from Dubliners from the vagaries of city living. It is along beach with sweeping views of the Dublin Mountains. This seaside area and wildlife reserve is located north of Dublin Harbour. The strand is connected to the shore by a late 19th century wooden bridge. Dollymount is on the seaward side of Bull Island, one of the most protected pieces of property in Ireland. Cars are allowed on a small section of this beach which is separated from the Blue Flag beach by wooden pilings.

I’m not sure how ‘respite from Dubliners’ is achieved. Anytime I’ve been on the beach, at least one Dubliner has been there. The images are also of great interest as the site provides a birds eye view that you can zoom in and out of as well as a photo of the location. No Dubliners, or people for that matter appear in the images, so perhaps that is the respite referred to.
One of the IBM blogs suggests that this form of mashup will be rolled out to other countries in the future. Personally, I think this is a great example of innovation within Ireland and I look forward to seeing more if it.

Getting requestor’s IP address through Oracle WSM

Oracle Web Services Manager (OWSM – some people pronounce it as ‘Awesome’) plays an important roll in Oracle’s contribution to SOA governance. Put simply, it brings better control and visibility over how, when and by whom, web services are invoked. OWSM, which is a key product in the Oracle SOA Suite, was voted one of the best security solutions by SYS-CON Media, the world’s leading i-technology media and events company in it’s 2007 SOAWorld Readers’ Choice Awards.

Apart from the predefined policies, OWSM provides an extensibility point to define a custom policy step that can be executed as part of the request or response pipeline. There is an Oracle by Example (OBE) tutorial available that provides details for creating a custom step. The custom step authenticates the user against a fixed set of username/password credentials configured in the policy step pipeline.

You can go one step further and check IP address of the requesting client by accessing the HttpServletRequest in the MessageContext in the execute operation of your custom step code.

import com.cfluent.pipelineengine.container.MessageContext;

((HttpServletRequest) ((
MessageContext) messageContext).getProperty(“javax.servlet.request”)).getRemoteHost()

Remember that if there are proxies or NAT address translations between the requester and the provider you won’t know the real source IP. Clearly this only works for HTTP based requests. However, a similar approach could be used for JMS.

It is worth mentioning Vikas Jain’s Web Services Security blog which is a treasure trove of useful information on OWSM.

Running web service clients without a web service

One of the challenges with large scale Enterprise Application development is dealing with the dependencies between teams and parts of the system being developed. Despite Agile software development methodologies a waterfall style of producing artifacts can occur. For example, the UI can not be completed because the web services are not built and the web services are not built because the data model is not complete. The data model is not complete because there are outstanding questions that the customer hasn’t answered.

In an ideal world we would all be able to agree the integration interfaces up front and then farm out the development effort so that the UI and Server Side teams can get coding straight away. One way to make this happen is for the UI team to define the WSDL interfaces for the services they plan to invoke. It is good practice for the ‘caller’ to define the interface where possible.

The UI team could also go ahead and provide their own simple implementation. Included in this article is some code for a servlet that accepts a SOAP Envelope request and returns a SOAP Envelope response. It uses the element name in the SOAP Body to look up an XML file with the same name in the classpath and then returns the contents. A client can define a WSDL, set the URL for the Servlet as the SOAP address and provide a ‘canned’ response XML file for each operation. There is also an Enterprise Service Bus (ESB) approach that is outlined as an alternative at the end of the article.

Simple SOAP Servlet
The servlet uses the JAXP libraries…


DocumentBuilderFactory builderFactory
= DocumentBuilderFactory.newInstance();
DocumentBuilder builder = null;

public void init() throws ServletException {
try {
this.builderFactory.setNamespaceAware(true);
this.builder = this.builderFactory.newDocumentBuilder();
} catch (ParserConfigurationException e) {
throw new ServletException("Error initialising servlet", e);
}
}

A mechanism to get the SOAP Body from the request is needed. This method is part of that. It is inelegant as getElementsByTagName() just did not work during testing. Probably due to some configuration issue in my environment or codebase. Since the SOAP Envelope might contain a Header element, the Body element may be the second element.


private Element getSOAPBodyElement(Element requestSOAPEnvelope) {
Element firstChild = (Element) requestSOAPEnvelope.getFirstChild();
if (firstChild.getLocalName().equalsIgnoreCase("body")) {
return firstChild;
}
Element secondChild = (Element) firstChild.getNextSibling();
if (secondChild.getLocalName().equalsIgnoreCase("body")) {
return secondChild;
}
return null;
}

The following method is where the real work is done. Most of the effort is spent on making sure that the request is a SOAP Envelope.


private QName getRequestPayLoadQualifiedName(HttpServletRequest request)
throws ServletException, IOException
{
try
{
Document requestXML = this.builder.parse(request.getInputStream());
Element requestSOAPEnvelope = requestXML.getDocumentElement();
if (!requestSOAPEnvelope.getLocalName().equalsIgnoreCase("envelope"))
{
throw new ServletException(
"Unable to parse request. Are you sure it is a SOAP Envelope?"
);
}

Element requestSOAPBody = this.getSOAPBodyElement(requestSOAPEnvelope);
if (requestSOAPBody == null) {
throw new ServletException(
"Unable to parse request. Body element not found. Are you sure it is a SOAP Envelope?"
);
}

Element requestPayload = (Element) requestSOAPBody.getFirstChild();
QName name = new QName(
requestPayload.getNamespaceURI(),
requestPayload.getLocalName());
return name;
} catch (SAXException e) {
throw new ServletException("Unable to parse request. Are you sure it is a SOAP Envelope?", e);
}
}

And finally the doPost method which looks up the file and writes the contents to the response stream. Note that due to the use of getResourceAsStream, the XML file is expected to be in the classpath in the same package as the servlet. Also, the response content must be set to text/xml for a SOAP response.


public void doPost(HttpServletRequest request,
HttpServletResponse response)
throws IOException, ServletException
{
QName requestPayLoadQualifiedName =
this.getRequestPayLoadQualifiedName(request);
InputStream responseXML = this.getClass()
.getResourceAsStream(
requestPayLoadQualifiedName.getLocalPart() + ".xml");

if (responseXML == null) {
throw new ServletException("Unable to find "
+ requestPayLoadQualifiedName.getLocalPart()
+ ".xml in the classpath.");
}
response.setContentType("text/xml");
int respInt = responseXML.read();
while (respInt != -1) {
response.getOutputStream().write(respInt);
respInt = responseXML.read();
}
}

An example of where this could be used is with a Flex front end where the SWF file is host in a web app. The WAR file could be organised as follows:
/MyApplication.SWF (the Flex front end)
/MyApplication.html (wrapper html which embeds the SWF file)
/MyService.wsdl (WSDL defining the interface for the web service. Has servlet address as endpoint)
/WEB-INF/web.xml (registers the SimpleSOAP class as a servlet)
/WEB-INF/classes/SimpleSOAP.class (the servlet)
/WEB-INF/classes/myOperation.xml (the canned response for a call to ‘myOperation’)

The UI development team can now orchestrate their screens, making web service calls to web services that haven’t been implemented yet. Once they are implemented, the soap address in the WSDL can change. The above servlet could be further worked on with some XPATH expresssions to map certain combination of parameters to responses. One could make it really sophisticated to follow a sequence like a demonstration script. However, putting all that together takes the pressure of the server side team in delivering the real implementation, doesn’t it?

Simple ESB Solution
Another approach would be to use the Enterprise Service Bus and have routing rules to read responses from files. The ESB approach would also allow for more content based routing allowing for different responses to be given depending on parameters passed at runtime. If the development environment is going to involve an Enterprise Service Bus, then the above servlet approach is best limited to individual developers environment or for simple automated component testing of the UI.

JAX-WS Handlers

Web service handlers are not a new concept. One obvious issue with developing a web service is catering for common behaviour. If each operation requires the same set of services, such as security or logging, how do you provide those services? A web service handler is the solution for both common client-side as well as server-side behaviour. Handlers allow you to process SOAP messages before and after the message is sent through the network.

Web service handlers are a part of the JAX-RPC specification, and the JAX-WS specification caters for the same concept, but in a slightly different way. There are some handler examples on the net but most just deal with logging the request and response. This article will introduce something a bit more complicated, putting a Software As A Service handler on the Dice web service. For an overview of JAX-WS handler infrastructure, as well as the difference between SOAPHandler and LogicalHandler see the excellent Handlers Introduction on java.net.

In this Dice SAAS example JDeveloper 11g Technology Preview 2 is used. It supports JAX-WS and has an embedded OC4J server for running the web service. To get started, download the Dice project, which is ready to go with the annotated web service code and add it to your JDev workspace. Details about the Dice web service and how it is constructed can be found in a previous article.


The first thing to do is test that the web service works in your environment. To do this launch the Test Web Service utility by right clicking on the Dice web service in the Application Navigator.

This will start the embedded OC4J server, deploy the web service and launch the HTTP Analyzer with the WSDL for the Dice web service loaded. In the SOAP Structure panel enter a number of sides for the Die and press the Send Request button. Of course you can choose to add more Die by clicking on the + symbol beside the die: Array, or editing the request in the HTTP Content panel.

After pressing the Send Request button you should see the response showing each Die and their value after rolling.

Once you have that working you can move on to writing a handler class and configure the web service to use it. In this example, the SOAP handler class will use resource injection (i.e. @Resource annotation and environment entry elements) for initialisation parameters rather than using the init-params element in the deployment descriptor. This is a little emphasised difference between JAX-RPC and JAX-WS.

There is one more download to get for this example, the handler class and the handler chain descriptor which refers to it. A handler chain defines a set of handlers that should be used for the web service. The web service implementation will have an annotation stating where the handler chain descriptor file is. Extract these two files to the project. To use them add the following to the Dice.java, just after the @WebService annotation:

@HandlerChain(file = “DiceService-HandlerChain.xml”)

Note that you will need to import javax.jws.HandlerChain.

The SaaSServerHandler class in this case checks that the calling client is allowed to invoke the web service by looking in the SOAP header for a ‘key’ element with a namespace of urn:soastation:saas. It will also check that the value matches a ‘ValidKeyValue’ environment entry in the web app deployment descriptor. You could further modify the handler to only allow a single Die element in the SOAP envelope if no valid key is provided. That is, a client with the key can use multiple Die while a client without, such as a guest or demonstration client can only use one. Alternatively you could keep track of registered keys and usage. The software as a service options are endless.

Back to the example, looking at the SaaSServerHandler the handleMessage method checks if the message is inbound (request coming in) or outbound (response going out). If the handler was being used for a web service client the outbound message would be the request being sent and the inbound message would be the response beng received. In our example we are interested in the inbound message because we are expecting a particular element. Note that the handler class has a instance variable called saasKeyValue which is set be the ‘ValidKeyValue’ environment entry. To set this, edit the web.xml and add the following:


eValidKeyValue
java.lang.String
soastation

Test the web service as before. You should get the following fault:

javax.xml.ws.WebServiceException: Invalid service key in SOAP Header. Expecting {urn:soastation:saas}key

Now test it again, but add the required element to the SOAP header. To do this edit the request in the HTTP Content tab. The request should look like this:


soastation


The corresponding result should be the same as when you originally tested the web service before adding the handler. If so, you have successfully implemented the soap handler.

This article discussed how to implement a server side JAX-WS SOAP Handler using the second technology preview of JDeveloper. It has provided code examples of how the handler concept work, including externalising properties in the environment entry elements. Also mentioned were ideas for further development such as reducing the capabilities for ‘guest’ clients. There really is a lot one can do with web service handlers.