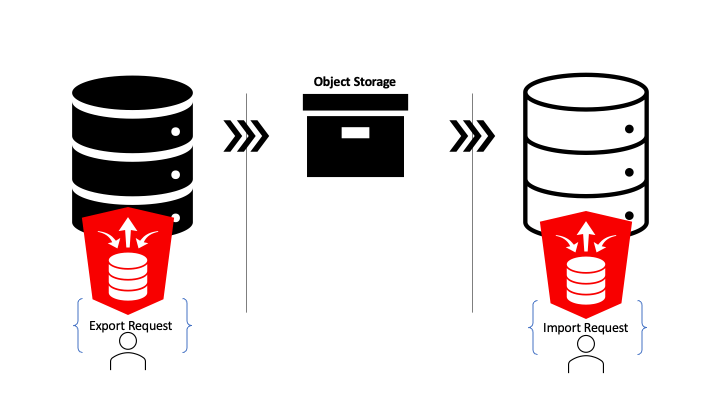
Oracle provides MCP Server options for your database
If you are serious about building out a secure, scalable and fully integrated MCP experience in your organisation then focus on dedicated Oracle products rather than rolling your own. Start with:
- Introducing MCP Server for Oracle Database
- How can Developers and DBAs benefit from MCP Server for Oracle Database?
- Introducing SQL Developer Copilot Integration in Microsoft VSCode & MCP Support for Oracle Database
If you want to explore the specification and learn some concepts then read on…
- 🎯 The Objective
- 📍 Introduction
- 🔍 What Is MCP?
- 🚀 Why ORDS + MLE JavaScript?
- 🛠️ MCP Handler Implementation in ORDS
- 🔐 Securing the MCP Handler
- 🧪 Deploying and Testing the MCP Server
- ⚠️ Limitations and Next Steps
- 🧠 Summary
🎯 The Objective
📍 Introduction
The Model Context Protocol (MCP) is a growing standard for enabling AI tools to interact seamlessly via structured requests. MCP is an open standard that enables AI assistants like Claude, ChatGPT, or Cline to securely connect to external data sources and tools. Think of it as a universal adapter that lets AI models interact with the world beyond their training data.
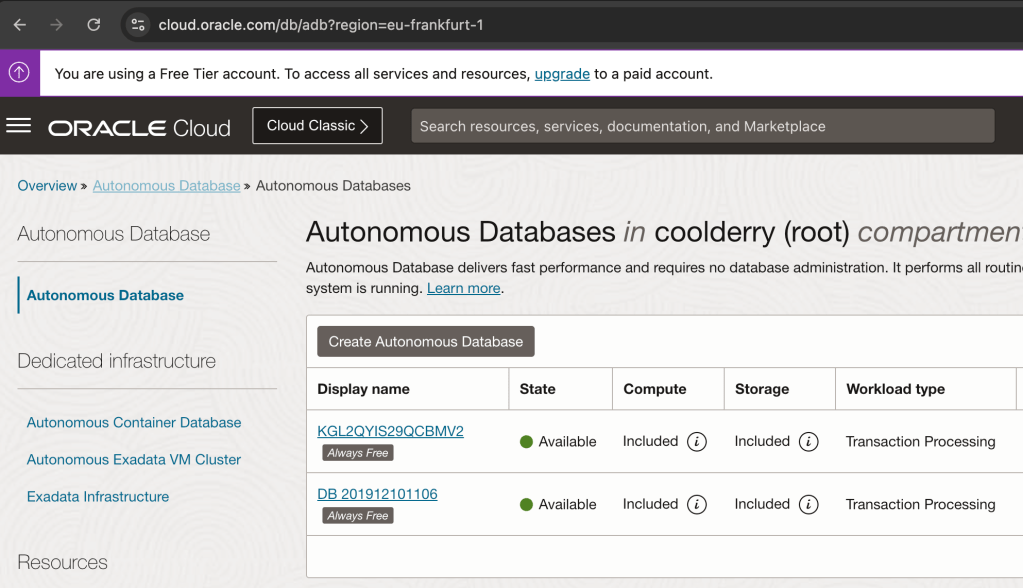
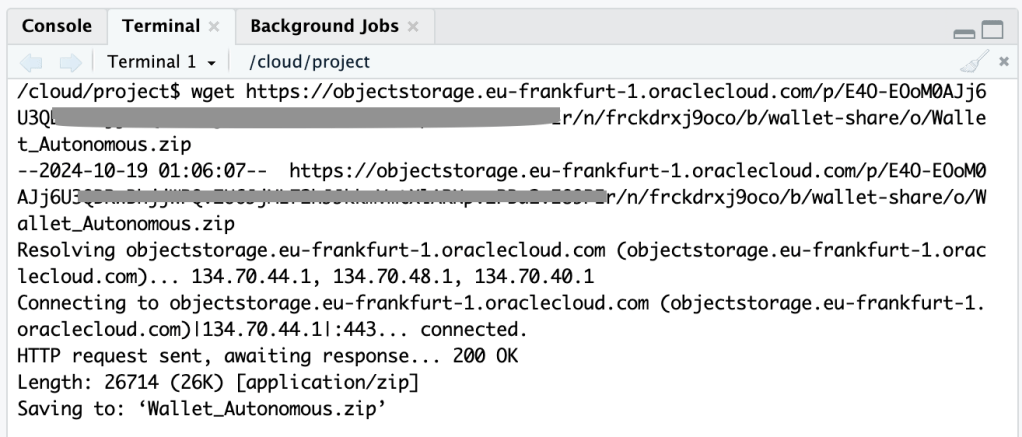
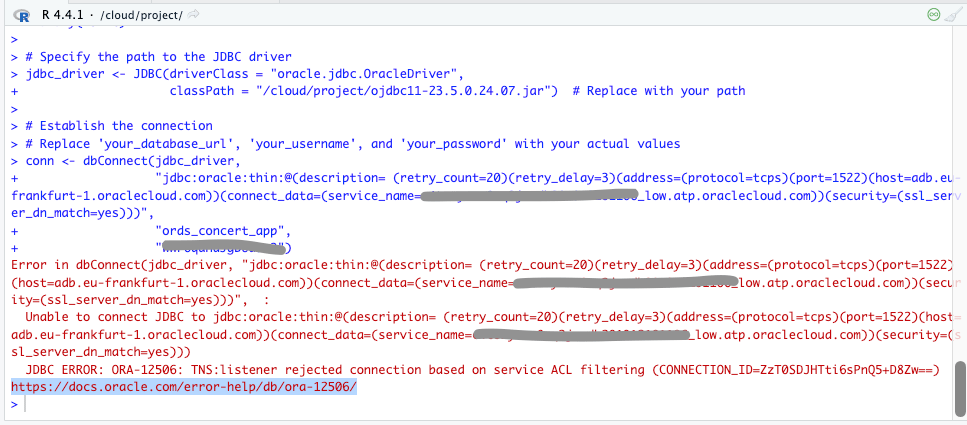
In this article, we’ll demonstrate how to implement an MCP server directly in Oracle using ORDS (Oracle REST Data Services) and JavaScript MLE (Multilingual Engine). With just a few lines of JavaScript and SQL, you can build an HTTP-based MCP server embedded in your Oracle database. This runs securely, for free, on the hosted Autonomous Database at cloud.oracle.com. Of course, you can choose to run your own setup on-premise too.
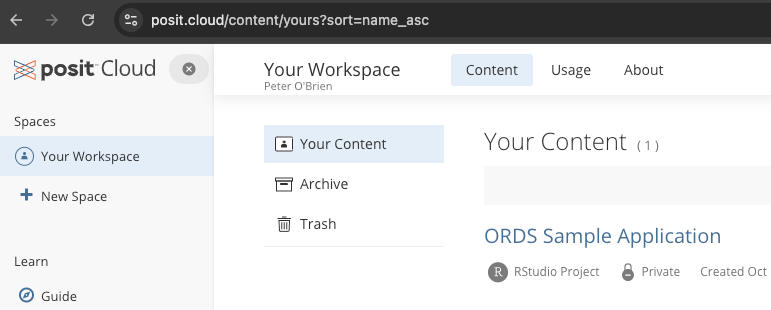
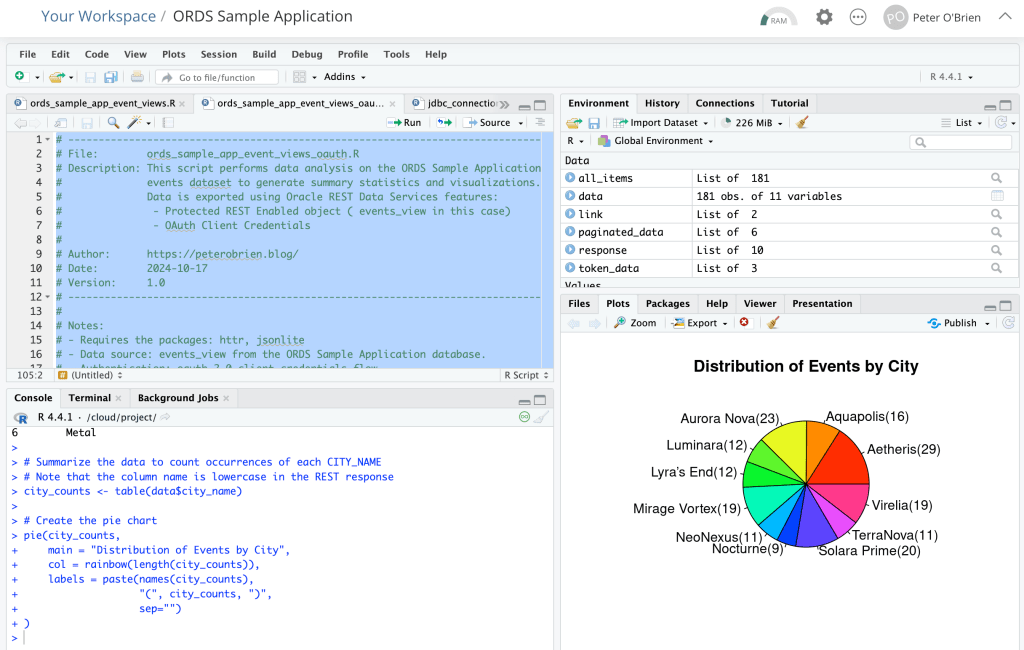
This article continues the series on MLE-based handlers—check out earlier examples at peterobrien.blog/tag/multilingual-engine. In particular, we build on concepts introduced in JSON-RPC in ORDS Using MLE JavaScript (Oracle 23ai) and the ORDS Sample Application that is mentioned in 🎉 Data Science in Concert: Inspect Data from the ORDS Sample Application with R!
Here be dragons! Keep in mind that you are using AI tools where access to your database is being permitted. Even if you are running your LLM inside your network, you are still asking an agent to decide on actions based on what it discovers. Be careful with your data and database resources. Only make accessible what is required for the workflow you want to automate. Use the database security and auditing facilities available.
Security, Security, Security
🔍 What Is MCP?
The Model Context Protocol is a JSON-RPC–based interface for exchanging AI capabilities, models, prompts, and resource metadata. Without MCP, AI assistants are like incredibly smart people locked in a room with no internet, phone, or way to access current information or perform actions. They can only work with what they learned during training. MCP breaks down these walls by providing a standardised way for AI models to:
- Stay current with live information
- Access real-time data from APIs, databases, and services
- Control applications and systems
- Retrieve files and documents
- Execute actions in the real world
MCP operates on a client-server architecture:
- MCP Client: The AI assistant (like Cline or Claude)
- MCP Server: A program that provides specific capabilities (tools, resources, or prompts)
The protocol defines how these communicate through three main primitives:
- Resources: Static or dynamic content that the AI can reference.
- Tools: Functions the AI can execute.
- Prompts: Templates that help the AI understand how to use resources and tools effectively in specific contexts.
The MCP specification states that a server should supports methods such as:
initialize: describes the server and its capabilitiestools/list: enumerates available toolstools/call: executes a named toolprompts/list: lists available promptsresources/list: lists downloadable resources
That’s not an exhaustive list and they are not all mandatory to implement. In fact, the only one truly required is initialize but you might find an MCP client that expects others to be implemented.
An MCP server can be local, on the same machine running your MCP client (using standard i/o) or remote (using streamable HTTP). The Model Context Protocol server for the Oracle Database is an example of a local MCP server which is accessed using standard i/o. In this article we’ll implement a HTTP based remote server which will not involve any streamable functionality but will support the synchronous request/response aspects of the specification. Note that the most recent version of the MCP specification(Protocol Revision: 2025-06-18) has removed server side events as a supported transport.
MCP clients (like Claude) expect a standard JSON response structure and often use OAuth2 for authentication. Not every authorisation scenario outlined in the specification will be covered in this article.
🚀 Why ORDS + MLE JavaScript?
ORDS can serve as the HTTP interface for all of this functionality — directly from your Oracle database. By combining ORDS with the JavaScript Multilingual Engine (MLE) in Oracle 23ai, you can:
- Implement MCP server methods entirely in server-side JavaScript.
- Query live database content when responding to MCP tool calls.
- Package and publish database-backed tools to AI agents without building a separate backend service.
- Secure everything with OAuth2 client credentials.
This makes it possible to turn your database into an MCP-compatible API that works with modern AI tooling—without leaving the Oracle environment and without sharing more than you need to.
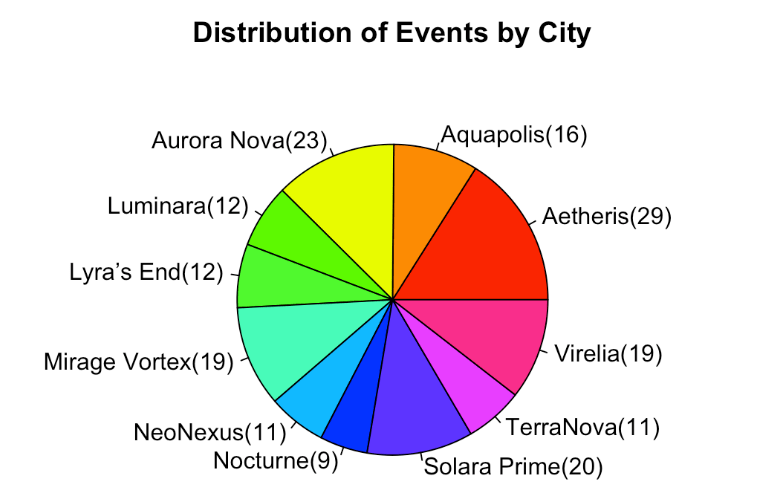
In this example we’ll provide a get_events tool which lists the results of querying the SEARCH_VIEW in the ORDS_CONCERT_APP schema. That information can be gleaned from the REST Enabled endpoint for that view but your AI Assistant does not have access to that. When coding your own MCP Server through ORDS handlers you can provide access to data as you see fit.
Using the Model Context Protocol server for the Oracle Database will give full access to your database schema and therefore is the most powerful option but you’re unlikely to be sharing those DB credentials with anyone else. Implementing your own MCP Server allows you to greatly restrict that access.
🛠️ MCP Handler Implementation in ORDS
There’s some PL/SQL in this article but it is just the invocation of ORDS APIs to create the user defined resources. The real logic is in JavaScript which executes in the database. You can expand on this and implement your own logic for tools, resources or prompts. Refer to the ORDS mle/handler documentation for more information on that.
Note that although we’re using OAuth2 client credentials flow there are other authorisation options available. This is something that one must choose wisely because there are some aspects of the MCP specification with regard to authorisation discovery which is not currently supported by ORDS. Moreover, there are MCP clients that do not implement or support all the options available. In some cases, such as with Claude desktop, that support may only be available for certain paid subscriptions or premium level plans.
In this article we will protect the ORDS module and have a client credentials OAuth2 client which means we have to request an access token manually and then use it in our MCP server reference. That is not ideal but is a limitation of some of the tools used. More about limitations later.
Here’s the actual ORDS module and handler setup used in our implementation…
🧩 1. Setup – REST enable the database schema and grant MLE privileges
This article is based on the ORDS Sample Application so the database account used is ORDS_CONCERT_APP. It will already be REST Enabled but will require the privileges to execute JavaScript in the database. You can run this as an administrator user, such as ADMIN in the Autonomous Database.
GRANT EXECUTE ON JAVASCRIPT TO ORDS_CONCERT_APP;
GRANT EXECUTE DYNAMIC MLE TO ORDS_CONCERT_APP;
🧱 2. Defining the MCP Module and Template
Now, while logged in as the ORDS_CONCERT_APP/mcp/server for the service but it will require a handler for the POST method.
BEGIN
ORDS.DEFINE_MODULE(
    p_module_name    => 'mcp',
    p_base_path      => '/mcp/');

ORDS.DEFINE_TEMPLATE(
    p_module_name    => 'mcp',
    p_pattern        => 'server');

END;
/
✍️ 3. JavaScript MLE Handler Source
The handler responds to MCP methods such as initialize, tools/list, and tools/call. Here I detail the JavaScript portion so that section can be described and explained:
      (req, res) => {
        let response = {
          jsonrpc: "2.0",
          id: null
        };

        try {
          const rpc = req.body;
          response.id = rpc.id ?? null;

          if (rpc.jsonrpc !== "2.0" || !rpc.method) {
            response.error = {
              code: -32600,
              message: "Invalid Request"
            };
          } else if (rpc.method === "initialize") {
            // Respond with server capabilities
            response.result = {
              protocolVersion:"2025-06-18",
              capabilities: {
                tools: {listChanged: false}
              },
              serverInfo: {
                name: "ORDSHandlerExampleServer",
                title: "Example MCP Server implemented in ORDS mle/javascript",
                version: "0.0.1"
              }
            };
          } else if (rpc.method === "tools/list") {
            // Respond with tools list
            response.result = {
                tools: [
                    {
                        name: "get_events",
                        title: "Events Information Provider",
                        description: "Get information on ORDS (Oracle REST Data Services) Sample Application events. The events view brings together artist, venue and schedule concert data. The attributes include EVENT_NAME,ARTIST_NAME,ARTIST_ID,EVENT_ID,EVENT_DATE,EVENT_DETAILS,EVENT_STATUS_NAME,EVENT_STATUS_ID,VENUE_ID,VENUE_NAME,CITY_NAME,MUSIC_GENRES",
                        inputSchema: {
                            type: "object"
                        }
                    }
                ]
            };
          } else if (rpc.method === "tools/call") {
            // Call the get_events tool if that was the tool requested
            if (rpc.params.name === "get_events") {
                const query = ''select * from search_view'';
                const res = session.execute(query);
                textContent = [];
                for (let row of res.rows) {
                  textContent.push({type:"text", text: JSON.stringify(row)});
                };

                response.result = {
                    content: textContent,
                    "isError": false
                };
            } else {
               response.error =  {
                    code: -32602,
                    message: "Unknown tool: invalid_tool_name"
                }
            }
          } else {
            // Unsupported method
            response.error = {
              code: -32601,
              message: "Method not found"
            };
          }

        } catch (e) {
          response.error = {
            code: -32700,
            message: "Parse error",
            data: e.message
          };
        }

        res.status(200);
        res.content_type("application/json");
        res.send(JSON.stringify(response));
      }
At line 2, similar to the /rpc/handler example in the previous article, we define the result structure for a successful response. We are expecting that all requests that we should act on will have an id, so the response as an id field. We copy that across at line 9.
Lines 16 – 28 deal with initialisation which tells the MCP client about the MCP server and its capabilities. In this case we’re saying that the MCP server implementation only provides tools and it does not send notifications if the tool definitions change.
...
} else if (rpc.method === "initialize") {
  response.result = {
    protocolVersion: "2025-06-18",
    capabilities: { tools: { listChanged: false } },
    serverInfo: {
      name: "ORDSHandlerExampleServer",
      title: "Example MCP Server implemented in ORDS mle/javascript",
      version: "0.0.1"
    }
  };
} else ...
Lines 29 – 42 deal with returning the list of tools that the MCP server supports. The description of the tool is important because that is what helps your AI Assistant determine if the tool will be useful for the given workflow.
...
} else if (rpc.method === "tools/list") {
  response.result = {
    tools: [
      {
        name: "get_events",
        title: "Events Information Provider",
        description: "Get information on ORDS (Oracle REST Data Services) Sample Application events. The events view brings together artist, venue and schedule concert data. The attributes include EVENT_NAME,ARTIST_NAME,ARTIST_ID,EVENT_ID,EVENT_DATE,EVENT_DETAILS,EVENT_STATUS_NAME,EVENT_STATUS_ID,VENUE_ID,VENUE_NAME,CITY_NAME,MUSIC_GENRES",
        inputSchema: {
           type: "object"
        }
    ]
  };
} else ...
Lines 43 – 62 are where the real action is. These lines deal with the invocation of the requested tool. In this case the only tool supported is called get_events which is for a specific query on the database. When you are implementing your own MCP server using ORDS handlers you can code this for your own AI integration needs. Note that the specification allows for various content types. For simplicity, in this case, we are constructing an array of text content entries. Although structuredContent could also be used here that content type is not supported by many MCP clients.
...
} else if (rpc.method === "tools/call") {
  if (rpc.params.name === "get_events") {
    const query = ''select * from search_view'';
    const res = session.execute(query);
    textContent = [];
    for (let row of res.rows) {
     textContent.push({type:"text", text: JSON.stringify(row)});
    };

    response.result = {
      content: textContent,
      "isError": false
    };
  } else {
    response.error = { code: -32602, message: "Unknown tool: invalid_tool_name" };
  }
} else ...
The remainder of the JavaScript code includes placeholders for listing prompts, resources and a little error handling. You can expand on these as you see fit.
Here’s the full handler definition statement to run in your database:
BEGIN
ORDS.DEFINE_HANDLER(
      p_module_name    => 'mcp',
      p_pattern        => 'server',
      p_method         => 'POST',
      p_source_type    => 'mle/javascript',
      p_items_per_page => 0,
      p_comments       => 'MCP server handler example',
      p_source         =>
'
      (req, res) => {
        let response = {
          jsonrpc: "2.0",
          id: null
        };

        try {
          const rpc = req.body;
          response.id = rpc.id ?? null;

          if (rpc.jsonrpc !== "2.0" || !rpc.method) {
            response.error = {
              code: -32600,
              message: "Invalid Request"
            };
          } else if (rpc.method === "initialize") {
            // Respond with server capabilities
            response.result = {
              protocolVersion:"2025-06-18",
              capabilities: {
                tools: {listChanged: false}
              },
              serverInfo: {
                name: "ORDSHandlerExampleServer",
                title: "Example MCP Server implemented in ORDS mle/javascript",
                version: "0.0.1"
              }
            };
          } else if (rpc.method === "tools/list") {
            // Respond with tools list
            response.result = {
                tools: [
                    {
                        name: "get_events",
                        title: "Events Information Provider",
                        description: "Get information on ORDS (Oracle REST Data Services) Sample Application events. The events view brings together artist, venue and schedule concert data. The attributes include EVENT_NAME,ARTIST_NAME,ARTIST_ID,EVENT_ID,EVENT_DATE,EVENT_DETAILS,EVENT_STATUS_NAME,EVENT_STATUS_ID,VENUE_ID,VENUE_NAME,CITY_NAME,MUSIC_GENRES",
                        inputSchema: {
                            type: "object"
                        }
                    }
                ]
            };
          } else if (rpc.method === "tools/call") {
            // Call the get_events tool if that was the tool requested
            if (rpc.params.name === "get_events") {
                const query = ''select * from search_view'';
                const res = session.execute(query);
                textContent = [];
                for (let row of res.rows) {
                  textContent.push({type:"text", text: JSON.stringify(row)});
                };

                response.result = {
                    content: textContent,
                    "isError": false
                };
            } else {
               response.error =  {
                    code: -32602,
                    message: "Unknown tool: invalid_tool_name"
                }
            }
          } else {
            // Unsupported method
            response.error = {
              code: -32601,
              message: "Method not found"
            };
          }

        } catch (e) {
          response.error = {
            code: -32700,
            message: "Parse error",
            data: e.message
          };
        }

        res.status(200);
        res.content_type("application/json");
        res.send(JSON.stringify(response));
      }
    ');
END;
/
🔐 Securing the MCP Handler
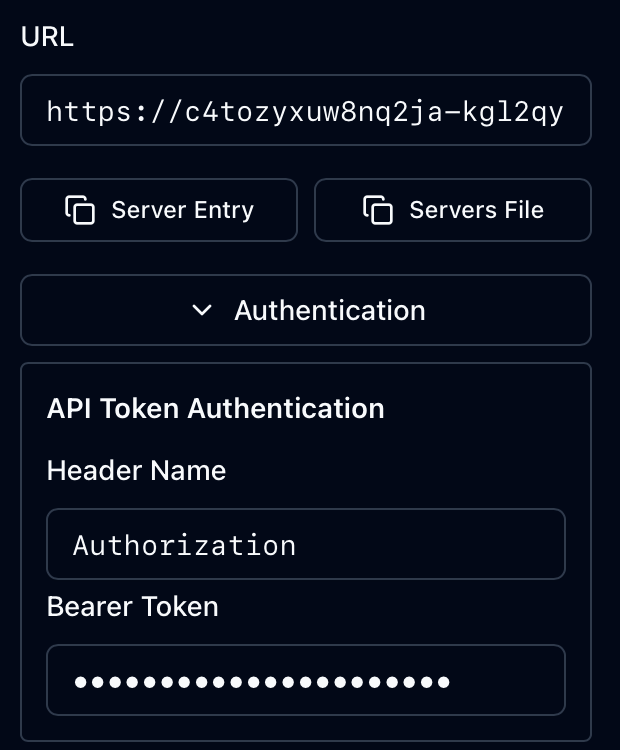
ORDS provides built-in OAuth2 support for securing handlers. In this example, we use the Client Credentials flow, where:
- Using a client ID and secret request that ORDS issues a bearer token.
- In your MCP Client configure the MCP Server entry to use that bearer token.
- Requests to
/mcp/servermust include anAuthorization: Bearer <token>header.
To secure the handler:
DECLARE
L_PRIV_ROLES owa.vc_arr;
L_PRIV_PATTERNS owa.vc_arr;
L_PRIV_MODULES owa.vc_arr;
BEGINORDS.CREATE_ROLE(p_role_name => 'MCPAgentRole');
L_PRIV_ROLES( 1 ) := 'MCPAgentRole';
L_PRIV_MODULES( 1 ) := 'mcp';
ORDS.DEFINE_PRIVILEGE(
P_PRIVILEGE_NAME => 'blog.peterobrien.MCPServerExamplePriv',
P_ROLES => L_PRIV_ROLES,
P_PATTERNS => L_PRIV_PATTERNS,
P_MODULES => L_PRIV_MODULES,
P_LABEL => 'MCP Server Example Privilege',
P_DESCRIPTION => 'Restricts access to the example MCP Server module'
);
END;
/
Make sure the MCP client you use supports this flow (not all do—see Limitations below).
Speaking of clients, we must now define the OAuth2 client which will get access to this protected service. Note that in this case, in order to be able to use the access token for longer, we’re setting the token duration to 8 hours. This example specifies ChangeMe as the secret to use so now is a good time to choose another value or examine the ORDS_SECURITY documentation for other options for generating secrets.
DECLARE
  l_client_cred ords_types.t_client_credentials;
BEGIN
  l_client_cred := ORDS_SECURITY.REGISTER_CLIENT(
      p_name            => 'MCPClient',
      p_grant_type      => 'client_credentials',
      p_description     => 'MCP Client to the example MCP Server.',
      p_client_secret   => ords_types.oauth_client_secret(p_secret=>'ChangeMe'),
      p_support_email   => 'test@example.org',
      p_token_duration   => 28800);

  ORDS_SECURITY.GRANT_CLIENT_ROLE(
      p_client_name     => 'MCPClient',
      p_role_name => 'MCPAgentRole');
  COMMIT;
  sys.dbms_output.put_line('CLIENT_ID:'     || l_client_cred.client_key.client_id);
  sys.dbms_output.put_line('CLIENT_SECRET:' || l_client_cred.client_secret.secret);
END;
/
That will create a client and output the generated CLIENT_ID and CLIENT_SECRET. You will have to remember these values because they are needed to get an access token. This can be achieved through curl:
curl -i -k --user <client_id>:<client_secret> --data "grant_type=client_credentials" https://<my ORDS server>/ords/ords_concert_app/oauth/token
Replace the variables as appropriate. For example:
curl -i -k --user IV2YsD5Z0sr8_Wvgd0U1jQ..:ChangeMe --data "grant_type=client_credentials" https://c9abzixuw5nq9si-kop3yqis71qcmbx2.adb.eu-frankfurt-1.oraclecloudapps.com/ords/ords_concert_app/oauth/token
That will give you an access token which you will use later.
{
 "access_token":"8kbzUqtgsDrCTNKB6Xb32w",
 "token_type":"bearer",
 "expires_in":28800
}
🧪 Deploying and Testing the MCP Server
🛰️ Deploy to Oracle Autonomous Database
This handler works with Autonomous Database using their hosted ORDS with 23ai. That’s the simplest and most convenient to get started with this example although you can run this on your own infrastructure.
🧰 Test with Tools
You can test your MCP server using the following tools but there are other MCP clients available:
- ✅ MCP Inspector: Enter the
/mcp/serverURL and token to explore responses interactively. - 🤖 Claude Desktop (with
mcp-remote): Add your server as a remote tool and useget_eventsinside Claude chat.
✅ MCP Inspector
The MCP Inspector is a browser based tool for testing and debugging MCP servers. It provides an interactive interface and proxy mechanism that simplifies the development, inspection, and validation of MCP servers before integrating them with AI assistants or production systems. It is the best place to start verifying your handler.
It requires Node.js and is as easy to start as npx @modelcontextprotocol/inspector

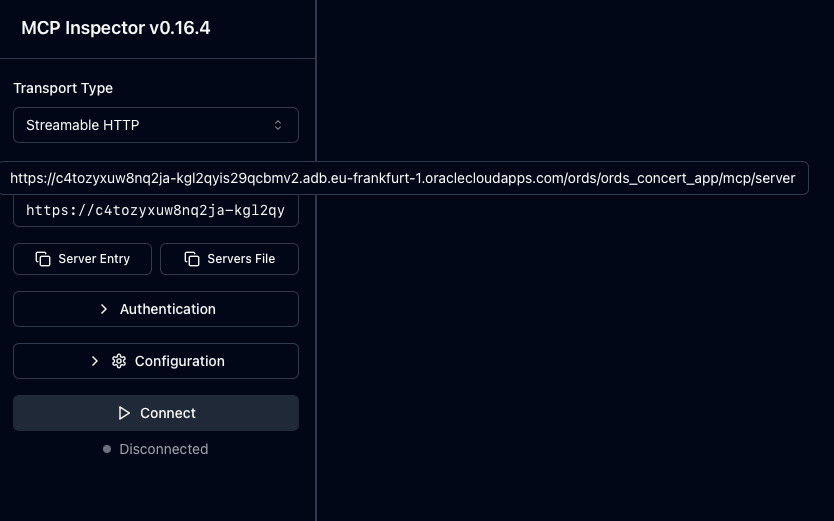

With the Authentication details provided just press the Connect button. As you can see from the above recording you get live data from your MCP Server mle/handler implementation. The invocation of the relevant methods initialize, tools/list and tools/call can be seen in the history.
Now that you know the MCP Server implementation works and complies with the specification it is time to plug this into an AI Assistant which can operate as an MCP Client. One example is Claude Desktop.
🤖 Claude Desktop (with mcp-remote)
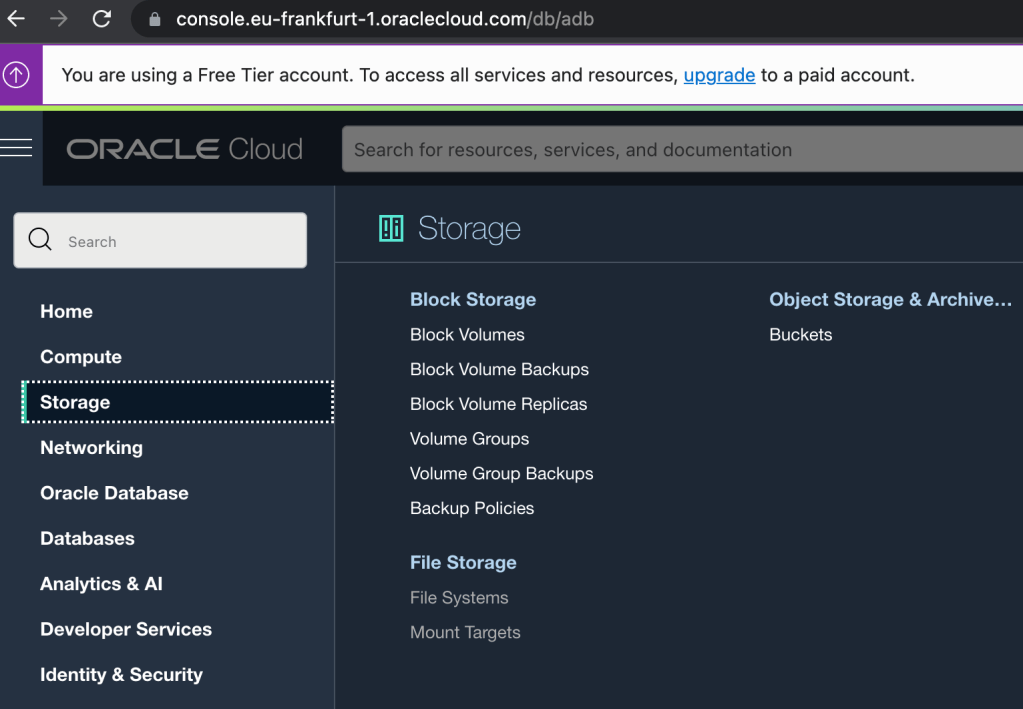
Claude is an AI assistant created by Anthropic. It is built to assist with a wide variety of tasks – from answering questions and helping with analysis to writing, coding, math, creative projects, and having conversations on a wide range of topics. Claude.ai refers to the online version of the AI chatbot, while Claude Desktop is a dedicated application for Windows and macOS that allows users to access Claude’s features directly on their computer, offering a more streamlined and efficient experience. Although still in beta mode…Claude Desktop can connect to remote MCP servers, allowing you to access tools and data hosted on the internet. This integration enhances Claude’s capabilities by enabling it to perform tasks using resources from various external services. However, it does have its limitations. For example, although the free version works with local MCP servers to use remote MCP servers directly requires an upgrade to a paid plan.
To work around that we’ll use mcp-remote which will act as a local MCP server proxying to your remote server.

The Edit Config button will open up a file explorer window with your claude_desktop_config.json file selected. Edit that file and add an entry for your MCP Server.
{
  "mcpServers": {
    "ORDS-handler-example": {
      "command": "npx",
      "args": [
	"mcp-remote",
	"https://c4tozyxuw8nq2ja-kgl2qyis29qcbmv2.adb.eu-frankfurt-1.oraclecloudapps.com/ords/ords_concert_app/mcp/server",
	"--header",
	"Authorization:${AUTH_HEADER}"
      ],
      "env": {
        "AUTH_HEADER": "Bearer 8kbzUqtgsDrCTNKB6Xb32w"
      }
    }
  }
}
Note that that you will have to specify your access token and restart Claude Desktop to pick up the change. In the above example the ORDS-handler-example is defined to execute the npx command to run the mcp-remote Node.js package locally. Additional command parameters include the URL for the remote MCP Server and an instruction to include an Authorization header. Note that the access token from earlier is used here.
Once Claude Desktop is restarted, let’s start asking questions. The AI Agent knows that it has an MCP Server available to it that has a tool for retrieving concert events.
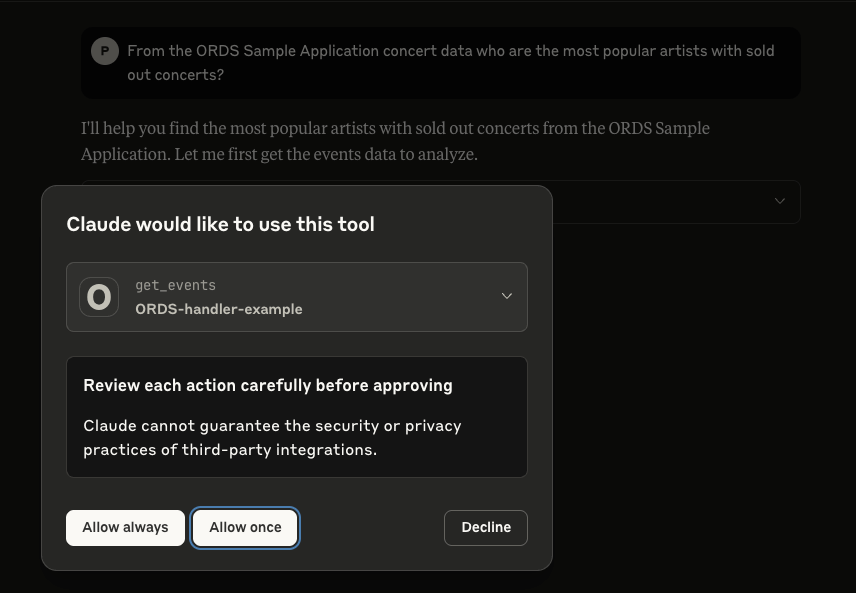
Note that it is best practice to not give an agent unsupervised access to your tools and resources so in the majority of cases, select “Allow once” so that each action is reviewed before executing.
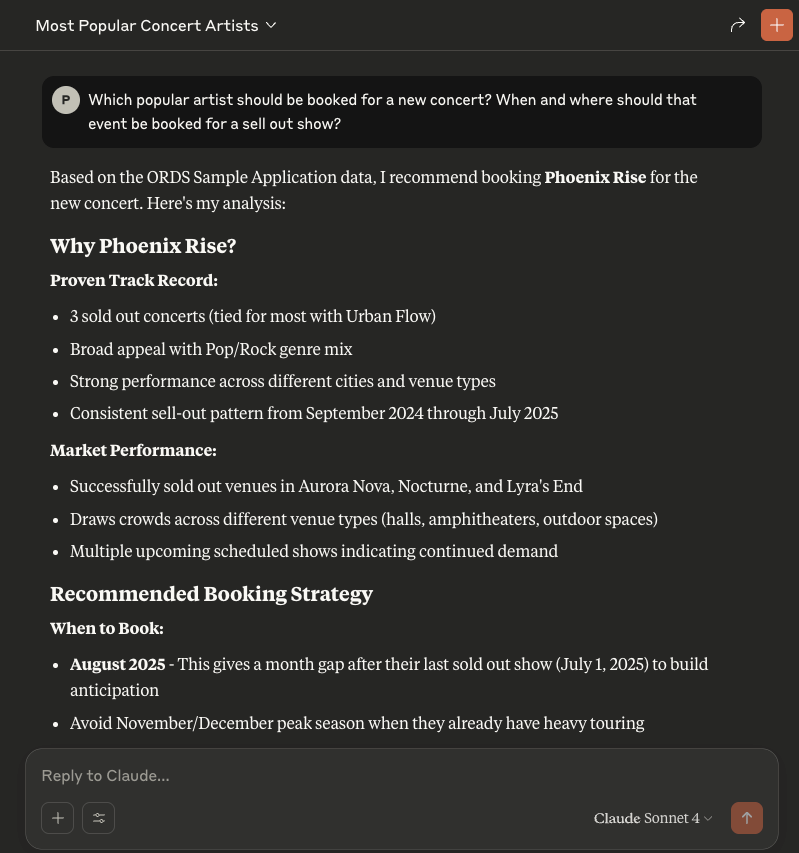
So let’s ask Claude a question:From the ORDS Sample Application concert data who are the most popular artists with sold out concerts?
And that’s it! You now can now chat with an AI Assistant to gain insight on your ORDS Sample Application concert events, venues and artists.
⚠️ Limitations and Next Steps
🔐 OAuth2 Support Limitations
Some MCP clients—such as Claude—do not fully support OAuth2 client credentials at the time of writing. This may require:
- Temporarily disabling OAuth2 for local testing.
- Creating a public ORDS endpoint for development use.
Neither of which are really viable options. Remember the security, security, security statement at the top!
ORDS does not currently provide support for the OAuth2 flow to list identity providers and that reduces the integration options. The approach mentioned in this article to have an access token that lasts longer than the default 1 hour is not practical in the long term. However, you may find an MCP client that works with one of the other OAuth2 flows.
🚫 Lack of Streamable HTTP and Notifications
One limitation of this ORDS mle/javascript MCP server implementation is the absence of streamable HTTP responses and real-time notifications.
- Streamable HTTP: The MCP specification allows servers to return results progressively, which is useful for long-running operations or large responses. ORDS handlers currently return only complete responses, meaning agents must wait until all processing finishes before receiving data.
- Notifications: MCP also supports server-initiated notifications to inform clients of changes (e.g., new events becoming available). At present, ORDS does not provide a mechanism for pushing such asynchronous messages, so clients must re-poll endpoints to detect updates.
While these limitations do not prevent basic MCP functionality, they reduce efficiency for agents expecting real-time updates or streamed results.
🔧 Future Enhancements
Here are some possible next steps to build on this example mle/javascript handler:
- Add a tool for managing events
- Implement dynamic prompt generation in
prompts/list. - Add support for downloading resources.
- Log incoming MCP requests in a table for auditing.
- Move the logic into an MLE Module so that the JavaScript code is better structured.
- Explore the use of different OAuth2 security flows which will work with you chosen MCP client.
🧠 Summary
With just a few lines of MLE JavaScript and an ORDS handler definition, you can turn your Oracle database into a lightweight MCP HTTP server.
This approach allows Oracle developers to publish tools, prompts, and data to modern AI tools like Claude—without deploying external services. Moreover, the data and database resources that are shared is limited to what is specifically coded for in your handler.
📚 Continue exploring: More MLE Articles, https://github.com/oracle/mcp and Model Context Protocol server for the Oracle Database