When dealing with SQL data, format and structure is crucial. Raw data isn’t always the most readable or useful format, especially when you need to expose it through an API. This is where Oracle REST Data Services (ORDS) comes in handy. It provides a secure and convenient JSON representation of the SQL query results in a JSON format by default. In this article, we’ll walk through using ORDS JavaScript handlers with the Mustache template engine to format an XML response from SQL query results. What we cover here is based on the previous article Multilingual Engine (MLE) for JavaScript Handlers. That article introduced an ORDS Module called demo_mle_javascript and in this article we will add to it.
The high level flow
Introducing the key components
Oracle REST Data Services (ORDS)
Oracle REST Data Services (ORDS) is a powerful tool that allows you to expose database functionalities as RESTful services. It simplifies the process of creating APIs for your Oracle database, making it easier to integrate with other systems and applications.
Mustache Template Engine
Mustache is a logic-less template engine that helps you format data into any desired format. Its simplicity and flexibility make it a great choice for rendering text in a wide variety of formats: HTML, JSON, XML, etc. Mustache uses templates to define the structure of the output, which can then be populated with data.
Oracle 23ai Database and the Multilangual Engine
With Oracle Database Multilingual Engine (MLE), developers have the option to run JavaScript code through dynamic execution or with persistent MLE modules stored directly in the database.
Bringing all together
Just as with the previous article which showcased Multilingual Engine (MLE) for JavaScript Handlers in ORDS we will use the 23ai database available at Oracle Autonomous Database. There we have a /ords/hr/demojs/employee/:id GET handler which has a JavaScript implementation for running a SELECT query to get an employee record for a employee_id provided in the URI.
In this article we’ll implement in JavaScript a GET handler to return all employee records but in an XML format. It will be very similar to the previous handler but reuse a JavaScript library so there’s actually less code. The additional step is that the JavaScript Mustache template engine will be imported into an MLE Module and then referred to by our JavaScript source in our ORDS JavaScript handler to transform the JSON representation of a query result set into an XML document returned by the service.
Defining the Mustache MLE Module
Mustache JavaScript
To use Mustache in ORDS JavaScript handler, you need to define it as an MLE module so that it can be imported by the dynamic MLE JavaScript in the handler source. The simplest way to get this done is include it from a content delivery network like jsDelivr. Here’s the URL for Mustache version 4.2.0: https://cdn.jsdelivr.net/npm/mustache@4.2.0/mustache.mjs.
The availability of JavaScript components like this supports self-contained and reusable code, key to developing successful software projects. We will use this library unmodified. However, due to a difference in architecture, module imports behave slightly differently in the Oracle Database when compared to other development environments. For example, JavaScript source code used with Node.js is stored in a specific directory structure on disk. MLE modules are stored together with the database, rather than in a file system, so must be referenced in a different manner. Let’s get that Mustache MLE module defined
Creating the MLE Module in Autonomous Database
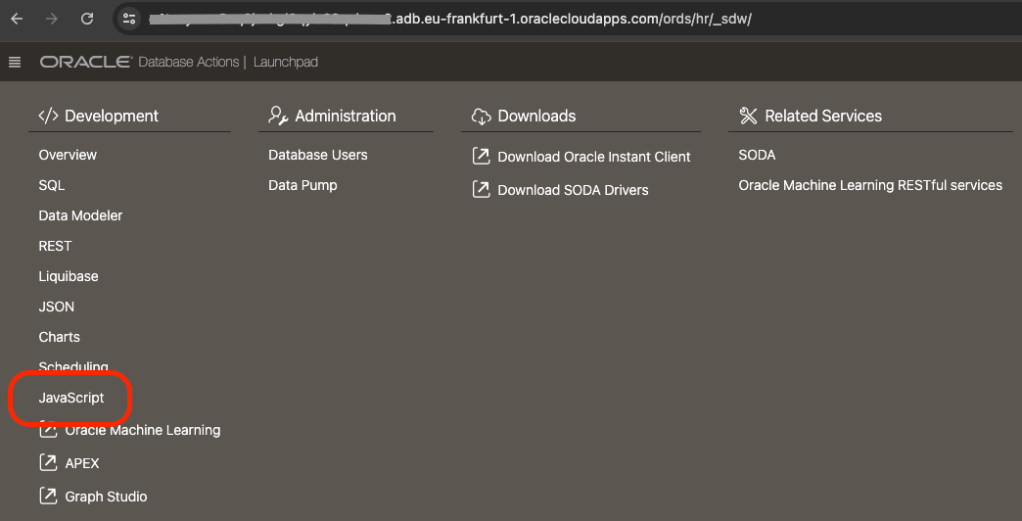
The simplest way to define a module, from an external source, in an 23ai Autonomous Database is to use ORDS Database Actions. Note that one must be using a 23ai database, otherwise the menu option in Database Actions does not appear. So, first step, login to Database Actions ( AKA SQL Developer Web ) https://my-autonomous-database.oraclecloudapps.com/ords/sql-developer and choose the Development->JavaScript menu option…
The Development->JavaScript section provides a handy UI for managing MLE Modules
If this is your first time defining an MLE Module the JavaScript area in Database Actions will look like this
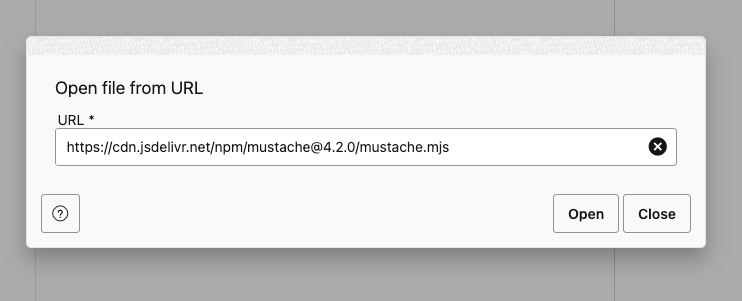
In the MLE Editor there is a globe icon with an arrow pointing downwards. This is the Open from URL button. Press that, enter the URL https://cdn.jsdelivr.net/npm/mustache@4.2.0/mustache.mjs and press the Open button to load the text.
You should then see the source in the MLE Module editor. Enter MUSTACHE as the name ( leave the Environment info blank ) and press the Save icon to create the MLE Module.
Save the MLE Module source and call it MUSTACHE
The last part of that source, at line 764, the JavaScript exports a mustache object and that is what we will refer to in our own JavaScript: export default mustache;
Now, to use that MLE Module it must be included in an MLE Environment. Amongst other things, MLE environments are used for name resolution of JavaScript module imports. For this example we will define an MLE Environment called LIBRARY_ENV where we specify a namespace for modules we want to reuse.
Let’s switch to an SQL Worksheet environment for the rest of this article. Run this to create that environment…
With that in place, we’re now ready to create our JavaScript handler.
Developing the ORDS REST Service
Now, define a JavaScript handler that will query all records from HR.EMPLOYEES table and format the SQL results into an XML response using Mustache. The service will be part of the existing demo_mle_javascript module and available at employees/ so we will define a template and a handler:
Not much to explain about the above. We’re defining a pattern for a URI to add to an existing ORDS REST Service module and will have one or more handlers defined.
The parameters to the DEFINE_HANDLER procedure are more interesting so let’s take a look at them:
p_module_name    => 'demo_mle_javascript',
This states which module the handler belongs to.

p_pattern        => 'employees/',
This states which template in that module the handler belongs to.

p_method         => 'GET',
Handlers are define for a specific HTTP method. This handler will be for GET requests.

p_source_type    => 'mle/javascript',
Handler source can be of various types. Some simple such as a basic select query and some more complex such as pl/sql block. This handler's source is dynamic MLE JavaScript.

p_mle_env_name   => 'LIBRARY_ENV',
When dynamic MLE JavaScript imports a module it must state the MLE Environment where that module's namespace is defined. This is important for this handler's source and MUST be specified.
The p_source parameter content is more complex and deserves it’s own explanation. At a high level the steps are:
Define a query and execute it, storing the reference to the results in a variable called res
Import the Mustache MLE module and refer to it as mustache. Note that import is asynchronous so we wait for it to complete.
Defines a Mustache template for the XML structure. The curly bracket syntax is Mustache specific. Refer to Mustache documentation for more information.
Formats the data using Mustache and save that as a variable called output. Note that we reference the default object because that is what was in the export definition in the imported mustache.mjs
Sends the formatted XML as the HTTP response.
Remember that, as per ORDS REST JavaScript Handler developer guide documentation that the defined JavaScript code must be inside an anonymous function that receives the following two parameters: ORDS request object and ORDS response object. In the p_source parameter for this handler those two parameters are called req and resp respectively.
(req, resp) => {
    // define the query
    const query = 'select * from employees order by employee_id';
    // execute it
    const res = session.execute(query);
    // import the mustache JavaScript library
    const mustache = await import('mustache');

    // define the template
    var template = '<employees>{{#rows}} <employee id="{{EMPLOYEE_ID}}" first_name="{{FIRST_NAME}}" last_name="{{LAST_NAME}}" salary="{{SALARY}}"/>{{/rows}}</employees>';

    // format the data from the result set
    var output = mustache.default.render(template, res);

    // send the formatter XML as the HTTP response
    resp.content_type('application/xml');
    resp.status(200);
    resp.send(output);
}
Testing and Debugging
Testing the Endpoint
To test your new RESTful service, use tools like Postman or curl. Here’s an example using curl:
curl -X GET https://cust-23aidb.adb.eu-frankfurt-1.oraclecloudapps.com/ords/hr/demojs/employees/
Obviously your server hostname will be different. Also, you don’t have to be using the HR schema or have your ORDS REST Service module base path as demojs. So your URL could be way different but if you’ve gotten this far, you’ve already figured that out.
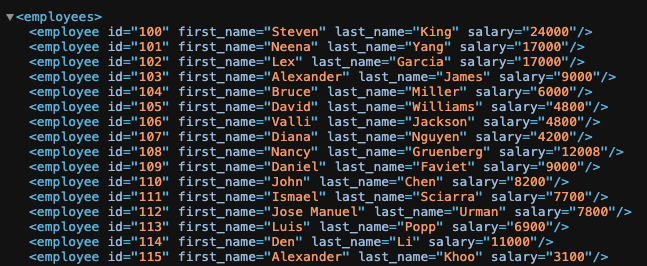
You should see an XML response formatted according to your Mustache template.
Debugging Common Issues
JavaScript Errors: Check for syntax errors or issues with the JavaScript handler.
SQL Query Problems: Ensure your SQL query is correct and returns the expected results.
Template Errors: Verify the Mustache template syntax and placeholders.
Conclusion
In this article, we’ve shown how to use Mustache and ORDS JavaScript handlers to transform SQL query results into beautifully formatted XML. By following these steps, you can enhance the presentation of your data and make it more accessible and readable.
ORDS now supports user-defined REST Resource Handlers powered by the Oracle Database Multilingual Engine (MLE) for JavaScript—the ORDS.DEFINE_HANDLER procedure now includes a new ‘mle/javascript’ p_source_type for MLE JavaScript modules stored directly in the Oracle database.
The Multilingual Engine (MLE) was a significant innovation introduced in Oracle Database 21 for providing In-Database JavaScript and now is a key feature of Oracle Database 23ai. In Data Magic: Oracle HR REST Service with Faker.js Sample Data I provided an example ORDS REST Services PL/SQL block handler which interacted with an MLE JavaScript module and an MLE Call Specification to generate sample data for the HR Employees table.
The new handler type mle/javascript in ORDS 24.1.1 now makes it possible to code business logic in JavaScript and make that available over HTTP(S). With Oracle Database 23ai and ORDS 24.1.1 available on cloud.oracle.com for free it is even easier to explore the capabilities of JavaScript-as-a-Service with ORDS.
Get a Database 23ai autonomous database at cloud.oracle.com
The goal for this article to walk you through defining a GET handler which uses JavaScript to run a select query based on a parameter passed and then return some JSON data. We’ll use the HR sample schema and the EMPLOYEES table in particular.
Permissions
Not every database user will have the database privileges to execute dynamic JavaScript in the database so we must first get those permissions in place.
GRANT EXECUTE ON JAVASCRIPT TO HR;
GRANT EXECUTE DYNAMIC MLE TO HR;
The above will have to be executed by a sufficiently privileged user. With the Autonomous Database at cloud.oracle.com that could be the ADMIN user.
Define the service
Assuming the HR schema is already REST Enabled simply connect to the database as that user and run the following…
We’ll take a look at that handler definition in detail a little later but for now, let’s try it out. Send a GET request to /ords/hr/demojs/employees/102 and you will see the results of the query executed:
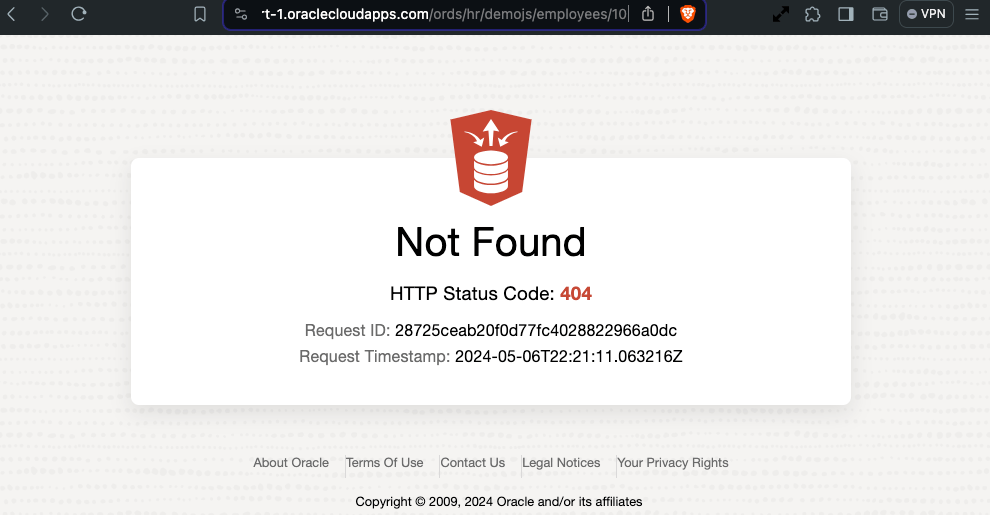
Specify an employee identifier that does not exist and you should get a HTTP 404 response.
Using the mle/javascript handler on Autonomous Database to indicate a record was not found
Handler in detail
The first thing to point out is the new handler source type: mle/javascript.
p_source_type => 'mle/javascript',
Note that this source type is not only applicable to the DEFINE_HANDLER procedure but also the DEFINE_SERVICE procedure too.
The source is a dynamic definition of JavaScript function which is passed a HTTP Request object and a HTTP Response object. In the source we can specify what variable names will be used for those two objects. It is fairly common to refer to them as req and resp but any names will do. In our case, we’ll stick to the convention.
(req, resp) => {
  ... JavaScript goes here ! ...
}
In-Database JavaScript references
The database session for the request can be referred through the variable session and functions can be invoked, such as running a query. In this snippet we define a query which takes a bind variable and provide a value from the HTTP Request URI when executing that query.
const query = 'select employee_id, first_name, salary from employees where employee_id = :1';
const res = session.execute(query, [req.uri_parameters.id]);
Recall that the id was defined as a parameter in the template definition. The res reference now contains the result set metadata and rows reference for the executed query.
Evaluate the query results and set the HTTP Response
Check the result set to see if there are any rows. If there are, construct a JSON object to return in the HTTP Response. Otherwise, just set the HTTP status code to 404.
Note that for ease of readability I have removed the escaping single quotes from any string references.
Further reading
There are a lot of concepts that have been quickly skimmed over. ORDS initially introduced a limited JavaScript-as-a-Service product offering with javascript module plugins which required GraalVM. With MLE the JavaScript execution can be performed in the database so a GraalVM runtime environment is not required but more significantly, any REST Enabled database user can define their JavaScript business logic and make it available as a REST service.
Two important MLE related documents to discover more about what you can do with MLE are:
Through REST Enabling packages, procedures and functions, or supporting custom pl/sql handlers, ORDS makes it easy to access business logic associated with your data. Now you have another string to your bow: mle/javascript.
Very quickly, we’ll go from a uploading a Salary.csv dataset to rendering a chart of Job Titles for the highest education level and permitting RESTful queries on data…
Example chart generated on a sharable URL
Query the CSV data through ORDS RESTful interface
Salary Data
Let’s start with a CSV dataset. For this exercise we’ll use a public domain Salary by Job Title and Country from kaggle.com. The download is a ZIP archive with two files. In this case it is just the Salary.csv which will be used.
This dataset provides a comprehensive collection of salary information from various industries and regions across the globe.
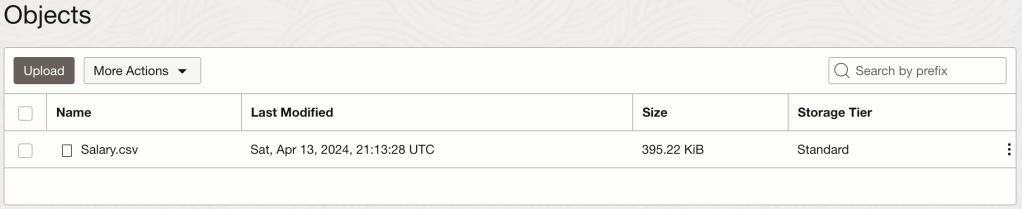
Oracle Object Storage Buckets will be used for storing the Salary.csv
I’m not going into all the details of downloading the archive file, unzipping it, creating a bucket, and uploading the Salary.csv but needless to say, those are important steps to get you this stage…
Dataset is uploaded to my ‘example-bucket’
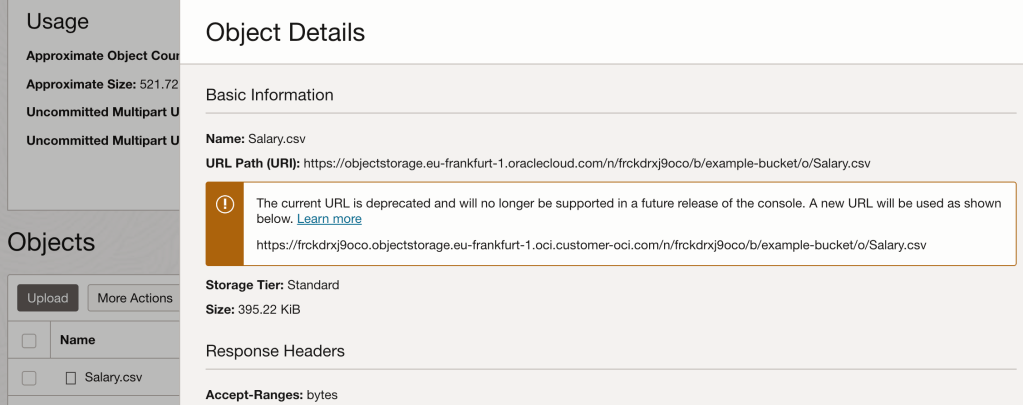
Note that the file has a URL for accessing and downloading it but that URL is not publicly accessible.
The file can be accessed at this URL, but not publicly
External Table
In the database, the DBMS_CLOUD package can create a table which has it’s data loaded from the CSV file. To get access to object storage from the database we require a credential object through DBMS_CLOUD.CREATE_CREDENTIAL. Details on achieving that are already covered in Ulrike’s Oracle Object Storage Access for all Oracle Databases with DBMS_CLOUD article and my previous article Data move mojo with ORDS 21.3.0. In fact, I’m going to reuse that DATAPUMP_CRED_NAME credential. That’s just out of convenience for me. You be you and do your own thing.
To create the SALARY table we must specify a column list with data types and sizes. That requires figuring out, based on the data and also the description on kaggle.com, what data types makes sense. Some columns are obviously numeric, but it is not always clear how big or small those columns should be.
begin
    DBMS_CLOUD.CREATE_EXTERNAL_TABLE(table_name=>'SALARY',
                   credential_name => 'DATAPUMP_CRED_NAME',
                   file_uri_list => 'https://frckdrxj9oco.objectstorage.eu-frankfurt-1.oci.customer-oci.com/n/frckdrxj9oco/b/example-bucket/o/Salary.csv',
                   format => json_object('type' VALUE 'CSV', 'skipheaders' VALUE '1'),
                   column_list =>'Age NUMBER(4,1),
                                  Gender varchar2(6),
                                  Education_Level NUMBER(1),
                                  Job_Title varchar2(100),
                                  Experience NUMBER(4,1),
                                  Salary NUMBER(9,2),
                                  Country varchar2(200),
                                  Race varchar2(100),
                                  Senior NUMBER(1)'
                            );
end;
/
Note that the file_uri_list parameter came directly from the object details panel in Object Storage.
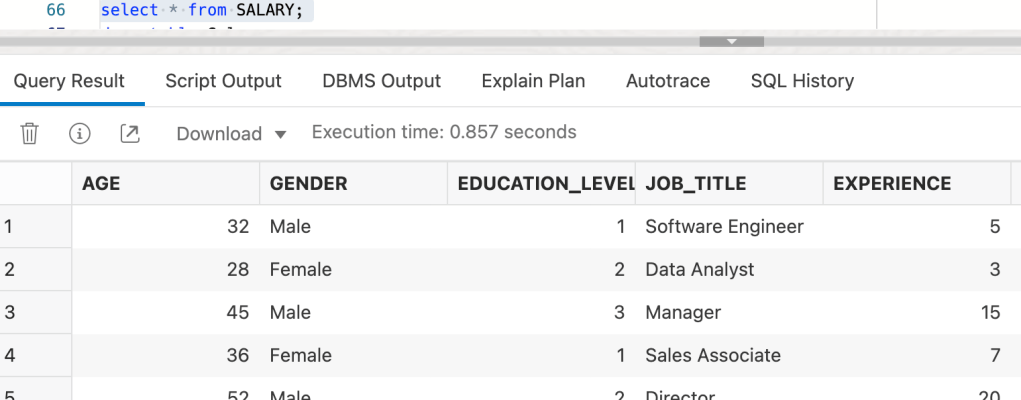
Unless there’s a syntax error, creating the table will always work. You’ll only find out about problems when you run a select query. That’s when the DB attempts to read the file.
If you have done this right…select * from salary returns data from the Salary.csv file.
Chart
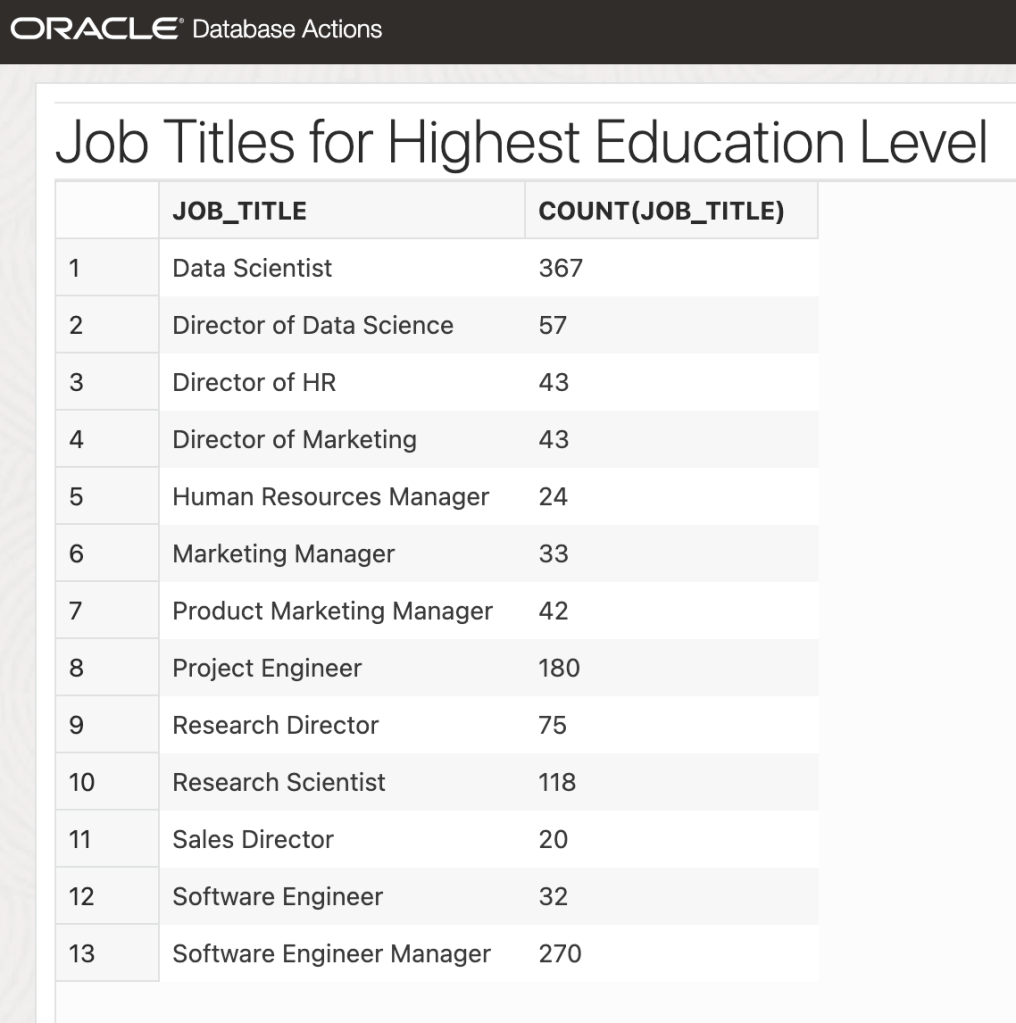
ORDS Database Actions has a charts and dashboard feature that we’re going to use now. Charts enable you to create charts from the database. The chart is constructed using the input SQL command. Dashboards enable you to group charts together to create reports. Let’s define a bar chart showing the number of job titles for the highest education level. So that the chart is not too busy I’m limiting the chart to only show job titles that have more than 10 occurrences.
Defining a bar chart for job titles
For simplicity my chart definition says that it is unprotected, so it is publicly available and anyone can see it with the URL. That’s ok with this scenario because the data is in the public domain anyway but please consider the protection on your charts and dashboards.
That URL can be shared and it will render in the browser like this…
Note that the data can be viewed as a chart, or as a table.
Although the chart and its data is available to anyone with the URL, the data is just the data for the chart.
No direct access to the original Salary.csv data, just aggregation from a specific query
For many folks the only way they can create a chart based on a CSV file and share it is through using a spreadsheet and sharing that, which means sharing the underlying data. In this case the data is not shared, just the chart. So far so cool. Now let’s look at sharing that data and allowing clients to query it.
AutoREST
This will be a short section. It is as simple as:
EXEC ORDS.ENABLE_OBJECT(p_object => 'SALARY');
That’s it. The SALARY table is now accessible through a REST service at /ords/<my schema>/salary/. Moreover, the Filter Object query parameter provides a powerful search mechanism through the Salary.csv file. For example, let’s find people in the data set with more than 30 years experience: q={"experience":{"$gt":30}}
Records in the CSV can be search with relational operators!
You can’t do that so easily in a text editor 😁
See Filter Objects in the ORDS Developer Guide for more information. Of course this RESTful URL can be protected to require a authorisation for accessing it too while the chart is left unprotected.
Note that with standard REST Enabled tables you can perform DELETE, GET, POST and PUT methods but with external tables, the only functional method is GET. All others will get a HTTP 555 response with this message: ORA-30657: operation not supported on external organized table.
Conclusion
If you have followed the above steps you have opened up new ways of accessing, sharing and interrogating data in a CSV file.
To reiterate, when using an external table the data comes from files in the Cloud or from files in a directory. The data does not get loaded or copied into a table in the database. Drop in a new Salary.csv file with different data and it is immediately picked up on the next query.
The combination of Object Storage, Autonomous Database and Oracle REST Data Services provide some interesting options for doing more with CSV files. It has its limits though. To be realistic, large volumes of data and complex queries would require actually loading copies of the data into the database. For that one should consider Autonomous Database Data Studio to load the data. You can still use ORDS as above to share the data as charts or expose a RESTful interface to the data.
Welcome to the third instalment of my series on using Oracle REST Data Services (ORDS), NGINX, Docker, SSL and Autonomous Database! In this article, I will show you how to quickly get started using ORDS and Docker. Together we will walk through the basics of building the Docker image, storing configuration in a Docker volume, running multiple ORDS instances and balancing the load using NGINX. With the help of this guide, you will be able to have a load balanced Customer Managed ORDS with Autonomous Database up and running in no time. To recap on the previous articles:
Load Balancing ORDS with NGINX introduced the concept of load balancing and the most basic of configurations to get started with NGINX running in docker. That was entirely using HTTP as the transport protocol.
HTTPS Load Balance: NGINX & ORDS took that a step further by using a self signed certificate so that the traffic between client and server was over the more secure HTTPS protocol. That was with ORDS instances running on port 8080 and 8090.
Autonomous Database – hosted and managed for free
Autonomous Database
In this article the ORDS instances will be running in Docker and sharing a configuration for an Autonomous Database hosted on Oracle Cloud Infrastructure Free Tier resources. The prerequisite for this article is an understanding of Installing and Configuring Customer Managed ORDS on Autonomous Database. The database has ORDS and APEX already installed. However, the credentials for ORDS Runtime user and PLSQL Gateway user are not known so the ords install adb command instruction will be used to create and configure additional users in the database to be used by our new ORDS instances.
Oracle Content Delivery Network
In the previous article we had the APEX images in the global/doc_root directory. It is much easier to not have to configure an ORDS instance to serve those static files and to use the Oracle Content Deliver Network instead. One should note that by default, the APEX installation in the Autonomous Database does not use the Oracle CDN for the APEX static resources. So if you have not done so already, use Oracle CDN for the APEX images. The URL to use will depend on the version of APEX in use. At the time of writing, that is APEX 22.2.0. Once you have made this change the next APEX upgrade will keep the IMAGE_PREFIX parameter in synch. See https://support.oracle.com/epmos/faces/DocumentDisplay?id=2817084.1 and https://blogs.oracle.com/apex/post/running-customer-managed-ords-on-autonomous-database-heres-how-to-get-ready-for-apex-211-upgrade for more information on using Oracle CDN with APEX
As shown in the previous article it is already straight forward to use ORDS from the command line to configure and run in standalone mode. In doing so, you are satisfying the most fundamental requirement for ORDS by providing a supported Java Runtime Environment for it to run in. Running ORDS in Docker takes care of that dependancy and provides a consistent structure. For your convenience, I have defined a Dockerfile to create an image with the latest version of ORDS built in. It does require the JDK 17 image from Oracle Container Registry jdk repository. To use images from the Oracle Container Registry you must first sign in using your Oracle Account to accept the license agreement for the Oracle image. Once you have accepted the licence, follow the installation instructions on the page to login and pull the jdk:17 image:
That will pull into your local Docker repository the most recent Oracle JDK 17 build.
Dockerfile for ORDS Entrypoint
The configuration is quite simple. A couple of folders are exposed for providing configuration and library extensions. That configuration directory is essential but in the majority of cases, customers do not have custom extensions so the lib/ext folder will not be used in this article. Similarly, although the Dockerfile specifies that both port 8080 and port 8443 should be exposed, we will only be using port 8080 for HTTP traffic in this article. It is NGINX that will be terminating the HTTPS traffic before routing upstream to our ORDS instances.
The Dockerfile we’ll use to create the ORDS image is available at ORDS_Latest_Dockerfile. Contents listed below.
#
# Defines a docker image, based on the Oracle JDK image, to run Oracle REST Data Services. During the image building
# process the most recent version of ORDS will be automatically downloaded and extracted.
#
# Volumes for configuration and lib/ext are defined.
#
# docker run -p 8080:8080 -v ords-adb-config:/opt/ords-config/ -v ords-lib-ext:/opt/ords/latest/lib/ext ords-latest/oraclejdk
#
# See https://peterobrien.blog/ for more information and examples.
#
FROM container-registry.oracle.com/java/jdk:17
MAINTAINER Peter O'Brien
ENV LATEST=/opt/ords-latest/
ENV CONFIG=/opt/ords-config/
WORKDIR $LATEST
ADD https://download.oracle.com/otn_software/java/ords/ords-latest.zip $LATEST
RUN jar xf ords-latest.zip; rm ords-latest.zip; chmod +x bin/ords
VOLUME $LATEST/lib/ext/ $CONFIG
EXPOSE 8080
EXPOSE 8443
WORKDIR $CONFIG
ENTRYPOINT ["/opt/ords-latest/bin/ords"]
CMD ["serve"]
To use the above Dockerfile and build an image locally called ords-latest/oraclejdk use the following command
> docker build --tag ords-latest/oraclejdk \
https://gist.githubusercontent.com/pobalopalous/fc6ab4ee777f6b7f32a400e920df682d/raw/ORDS_Latest_Dockerfile

Downloading build context from remote url: https://gist.githubusercontent.com/pobalopalous/fc6ab4ee777f6b7f32a400e920df682d/raw/ORDS_Latest_Dockerfile [===============Downloading build context from remote url: https://gist.githubusercontent.com/pobalopalous/fc6ab4ee777f6b7f32a400e920df682d/raw/ORDS_Latest_Dockerfile [==================================================>]     878B/878B
Downloading build context from remote url: https://gist.githubusercontent.com/pobalopalous/fc6ab4ee777f6b7f32a400e920df682d/raw/ORDS_Latest_Dockerfile [==================================================>]     878B/878B
Sending build context to Docker daemon   2.56kB
Step 1/13 : FROM container-registry.oracle.com/java/jdk:17
 ---> 4945318567e9
Step 2/13 : MAINTAINER Peter O'Brien
 ---> Using cache
 ---> 1bb5b3ea1d92
Step 3/13 : ENV LATEST=/opt/ords-latest/
 ---> Using cache
 ---> 4798e9cbc8d1
Step 4/13 : ENV CONFIG=/opt/ords-config/
 ---> Using cache
 ---> a1f6e0bf441c
Step 5/13 : WORKDIR $LATEST
 ---> Using cache
 ---> 1b961db4ee2d
Step 6/13 : ADD https://download.oracle.com/otn_software/java/ords/ords-latest.zip $LATEST
Downloading [==================================================>]  94.62MB/94.62MB
 ---> Using cache
 ---> f6d009ada2f1
Step 7/13 : RUN jar xf ords-latest.zip; rm ords-latest.zip; chmod +x bin/ords
 ---> Using cache
 ---> f6d20c737486
Step 8/13 : VOLUME $LATEST/lib/ext/ $CONFIG
 ---> Using cache
 ---> fde34609973e
Step 9/13 : EXPOSE 8080
 ---> Using cache
 ---> 77933cb86baa
Step 10/13 : EXPOSE 8443
 ---> Using cache
 ---> 094fc3d8332b
Step 11/13 : WORKDIR $CONFIG
 ---> Using cache
 ---> 2d1b41e2c6f0
Step 12/13 : ENTRYPOINT ["/opt/ords-latest/bin/ords"]
 ---> Using cache
 ---> 9974ac45526d
Step 13/13 : CMD ["serve"]
 ---> Using cache
 ---> 4cbe74b80bb5
Successfully built 4cbe74b80bb5
Successfully tagged ords-latest/oraclejdk:latest
You now have an image in your local Docker repository ready to run. Note that the base image is an Oracle JDK 17 one. You can of course change that to something else. At the time of writing, only Oracle JDK 11 and 17 are supported Java Runtime Environments for ORDS.
Docker volume for ORDS configuration
Now it’s time to start putting the ORDS configuration together. In the previous article I outlined a configuration folder structure which was defined on the host computer file system. We are deviating from that in two ways. First, as outlined above, we will not have any APEX images in the global/doc_root directory because we are using the Oracle CDN with APEX in the hosted Autonomous Database. Second, we’re using a Docker volume, rather than the local filesystem, to store all the configuration.
Docker volumes are an ideal way to persist data generated by and used by Docker containers. They provide several benefits, such as:
Data isolation: Docker volumes are independent of the underlying filesystem, which ensures that the data persists even if the container is moved to a different host.
Easy deployment: Docker volumes can be shared across multiple containers and hosts, making it easy to deploy applications in different environments.
Data security: Docker volumes are stored outside the container, so they are not affected by any changes within the container. This ensures that your data remains secure and consistent.
Performance: Docker volumes are stored on the host system, which can be faster than using shared storage. This can improve the performance of your containers.
The first configuration item for a Customer Managed ORDS on Autonomous Database is the wallet and getting that wallet zip file into the Docker volume involves a few steps that may not be intuitive if you are not familiar with Docker volumes. You see, to copy a file into a Docker volume, one must do that through a running container, but before we have a running container, we must first create the volume.
Let’s assume you have downloaded your Autonomous Database wallet zip file to your ~/Downloads directory. For example: ~/Downloads/Wallet_DB202301101106.zip. We’re going to put it in the ords-adb-config volume as /opt/ords-config/Wallet_Autonomous.zip but first we must start a container to use it.
Note that we’re not mapping to any ports and once we’re finished with this container it will be removed. Let’s copy that wallet zip file. We know the name of the container is ords-latest because that’s the name we gave in the docker run command. Your wallet file name will be different but we’re going to copy it to /opt/ords-config/Wallet_Autonomous.zip to keep things simple for subsequent commands. If you are going to have multiple pools, you will have to have distinct filenames.
That ords-latest container is no longer required. It only came into existence to allow you to copy the zip file. When you stop the container it should be removed automatically.
> docker stop ords-latest
Configuration for Customer Managed ORDS
The wallet zip file is a good start but now it’s time to run through the Customer Managed ORDS with Autonomous Database install step which will create additional users in the database and store the necessary pool settings in the ords-adb-config Docker volume. We’re going to use the non-interactive silent installation so will have to provide the passwords for the existing ADMIN user, and the two users to create. Referring back to the ORDS documentation, the ords install adb command is…
Let’s create that file with the passwords to use. We can delete it once the ords install adb command completes. Create the adbs_passwords.txt file with three passwords on each line:
<PASSWORD FOR admin-user>
<PASSWORD FOR db-user>
<PASSWORD FOR gateway-user>
In my case the adbs_passwords.txt file looks like this:
With my passwords file I can pass all these details in one command as I run it in Docker. Note that the entire command line also specifies -i which instructs the docker engine to use standard input ( STDIN ) for the container.
ORDS: Release 22.4 Production on Mon Mar 06 09:52:30 2023
Copyright (c) 2010, 2023, Oracle.
Configuration: /opt/ords-config/
Oracle REST Data Services - Non-Interactive Customer Managed ORDS for Autonomous Database Connecting to Autonomous database user: ADMIN TNS Service: db202301101106_low Retrieving information Checking Autonomous database user: ORDS_PLSQL_GATEWAY2 TNS Service: db202301101106_low The setting named: db.wallet.zip.path was set to: /opt/ords-config/Wallet_Autonomous.zip in configuration: default The setting named: db.wallet.zip.service was set to: db202301101106_low in configuration: default The setting named: db.username was set to: ORDS_PUBLIC_USER2 in configuration: default The setting named: db.password was set to: ****** in configuration: default The setting named: plsql.gateway.mode was set to: proxied in configuration: default The setting named: feature.sdw was set to: true in configuration: default The global setting named: database.api.enabled was set to: true The setting named: restEnabledSql.active was set to: true in configuration: default The setting named: security.requestValidationFunction was set to: ords_util.authorize_plsql_gateway in configuration: default 2023-03-06T09:52:38.256Z INFO Connecting to Autonomous database user: ADMIN TNS Service: db202301101106_low ------------------------------------------------------------ Date : 06 Mar 2023 09:52:38 Release : Oracle REST Data Services 22.4.4.r0411526
Database : Oracle Database 19c Enterprise Edition DB Version : 19.18.0.1.0 ------------------------------------------------------------ Container Name: C4TOSECRETNQ2JA_DB202301101106 ------------------------------------------------------------
[*** script: ords_runtime_user.sql]
PL/SQL procedure successfully completed.
2023-03-06T09:52:42.532Z INFO ... Verifying Autonomous Database runtime user [*** script: ords_gateway_user.sql]
PL/SQL procedure successfully completed.
2023-03-06T09:52:43.674Z INFO ... Verifying Autonomous Database gateway user 2023-03-06T09:52:43.675Z INFO Completed configuring for Customer Managed Oracle REST Data Services version 22.4.4.r0411526. Elapsed time: 00:00:05.407
[*** Info: Completed configuring for Customer Managed Oracle REST Data Services version 22.4.4.r0411526. Elapsed time: 00:00:05.407 ] 2023-03-06T09:52:43.720Z INFO To run in standalone mode, use the ords serve command: 2023-03-06T09:52:43.723Z INFO ords --config /opt/ords-config serve 2023-03-06T09:52:43.723Z INFO Visit the ORDS Documentation to access tutorials, developer guides and more to help you get started with the new ORDS Command Line Interface (http://oracle.com/rest).
Note that because the Docker entrypoint for the image that we built earlier was specified as /opt/ords-latest/bin/ords which means we can run the ords command line with any supported commands and arguments.
Don’t forget to rmadbs_passwords.txt. You do not need it anymore.
In summary, we’ve just told ORDS to use the wallet zip file and the ADMIN credentials to connect to the hosted service, create some users and persist configuration details on the ords-adb-config volume. The docker container exits because the command is complete. You can see the ORDS configuration by running the ords config list command.
> docker run -v ords-adb-config:/opt/ords-config/ \
             ords-latest/oraclejdk config list

ORDS: Release 22.4 Production on Mon Mar 06 19:07:27 2023

Copyright (c) 2010, 2023, Oracle.

Configuration:
  /opt/ords-config/

Database pool: default

Setting                              Value                                    Source
----------------------------------   --------------------------------------   -----------
database.api.enabled                 true                                     Global
db.password                          ******                                   Pool Wallet
db.username                          ORDS_PUBLIC_USER2                        Pool
db.wallet.zip.path                   /opt/ords-config/Wallet_Autonomous.zip   Pool
db.wallet.zip.service                db202301101106_low                       Pool
feature.sdw                          true                                     Pool
plsql.gateway.mode                   proxied                                  Pool
restEnabledSql.active                true                                     Pool
security.requestValidationFunction   ords_util.authorize_plsql_gateway        Pool
No doubt you will remember this from the previous article about HTTPS and NGINX with ORDS. There’s one more configuration setting to address. That’s to tell ORDS what header key / value pair to use to trust that the request was received by a load balancer over HTTPS even though ORDS is receiving traffic over HTTP.
docker run -v ords-adb-config:/opt/ords-config/ \
  ords-latest/oraclejdk \
  config set security.httpsHeaderCheck "X-Forwarded-Proto: https"
At this point we have a Docker volume ords-adb-config which has all the configuration settings necessary to run one or more Customer Managed ORDS with Autonomous Database instances as we see fit.
Start it up!
From the previous article you have a NGINX configuration that you have running in Docker to talk to two ORDS instances listening on port 8080 and 8090. Now let’s replace those ORDS instances with ones running in Docker with the above ords-adb-config Docker volume. You can leave the NGINX container running but if you have not done so already, shutdown those ORDS instances.
Up until now, we have not specified a container name when running ORDS in Docker. For convenience, we’ll refer to the container listening on port 8080 as ords-latest-8080 and the other one as ords-latest-8090.
To check that they are up and running have a look at the process list.
> docker ps
CONTAINER ID   IMAGE                   COMMAND                  CREATED        STATUS        PORTS                                                                      NAMES
2c11ababaf1b   ords-latest/oraclejdk   "/opt/ords-latest/bi…"   4 hours ago    Up 4 hours    8443/tcp, 0.0.0.0:8090->8080/tcp, :::8090->8080/tcp                        ords-latest-8090
7fd8c821be64   nginx                   "/docker-entrypoint.…"   6 hours ago    Up 6 hours    0.0.0.0:80->80/tcp, :::80->80/tcp, 0.0.0.0:443->443/tcp, :::443->443/tcp   optimistic_kilby
9e0d8ec541bc   30e6e561dc7d            "/opt/ords-latest/bi…"   6 hours ago    Up 6 hours    0.0.0.0:8080->8080/tcp, :::8080->8080/tcp                                  ords-latest-8080
Also use the docker logs command to keep track of the activity and status. We’ve given specific names for the two ORDS containers so we can refer to them directly,
> docker logs -f ords-latest-8080

ORDS: Release 22.4 Production on Mon Mar 06 13:48:57 2023

Copyright (c) 2010, 2023, Oracle.

Configuration:
  /opt/ords-config/

2023-03-06T13:48:58.335Z INFO        HTTP and HTTP/2 cleartext listening on host: 0.0.0.0 port: 8080
2023-03-06T13:48:58.389Z INFO        Disabling document root because the specified folder does not exist: /opt/ords-config/global/doc_root
2023-03-06T13:49:07.009Z INFO        Configuration properties for: |default|lo|
...
Mapped local pools from /opt/ords-config/databases:
  /ords/                              => default                        => VALID


2023-03-06T13:49:14.790Z INFO        Oracle REST Data Services initialized
Oracle REST Data Services version : 22.4.4.r0411526
Oracle REST Data Services server info: jetty/10.0.12
Oracle REST Data Services java info: Java HotSpot(TM) 64-Bit Server VM 17.0.6+9-LTS-190
> docker logs -f ords-latest-8090

ORDS: Release 22.4 Production on Mon Mar 06 13:56:22 2023

Copyright (c) 2010, 2023, Oracle.

Configuration:
  /opt/ords-config/

2023-03-06T13:56:23.011Z INFO        HTTP and HTTP/2 cleartext listening on host: 0.0.0.0 port: 8080
2023-03-06T13:56:23.066Z INFO        Disabling document root because the specified folder does not exist: /opt/ords-config/global/doc_root
2023-03-06T13:56:32.683Z INFO        Configuration properties for: |default|lo|
...
Mapped local pools from /opt/ords-config/databases:
  /ords/                              => default                        => VALID


2023-03-06T13:56:32.683Z INFO        Oracle REST Data Services initialized
Oracle REST Data Services version : 22.4.4.r0411526
Oracle REST Data Services server info: jetty/10.0.12
Oracle REST Data Services java info: Java HotSpot(TM) 64-Bit Server VM 17.0.6+9-LTS-190
As a reminder, to check the logs for the NGINX container you’ll have to specify the container name that was allocated at runtime. In my case it is optimistic_kilby.
> docker logs -f optimistic_kilby
/docker-entrypoint.sh: /docker-entrypoint.d/ is not empty, will attempt to perform configuration
/docker-entrypoint.sh: Looking for shell scripts in /docker-entrypoint.d/
/docker-entrypoint.sh: Launching /docker-entrypoint.d/10-listen-on-ipv6-by-default.sh
10-listen-on-ipv6-by-default.sh: info: Getting the checksum of /etc/nginx/conf.d/default.conf
10-listen-on-ipv6-by-default.sh: info: Enabled listen on IPv6 in /etc/nginx/conf.d/default.conf
/docker-entrypoint.sh: Launching /docker-entrypoint.d/20-envsubst-on-templates.sh
/docker-entrypoint.sh: Launching /docker-entrypoint.d/30-tune-worker-processes.sh
/docker-entrypoint.sh: Configuration complete; ready for start up
 to: 192.168.5.2:8080 {GET / HTTP/1.1} upstream_response_time 0.155 request_time 0.155
172.17.0.1 - - [06/Mar/2023:13:52:58 +0000] "GET /ords/ HTTP/1.1" 301 169 "-" "Mozilla/5.0 (Macintosh; Intel Mac OS X 10_15_7) AppleWebKit/537.36 (KHTML, like Gecko) Chrome/110.0.0.0 Safari/537.36"
 to: 192.168.5.2:8090 {GET /ords/ HTTP/1.1} upstream_response_time 2.356 request_time 2.356
 to: 192.168.5.2:8080 {GET /ords/f?p=4550:1:117375695883225::::: HTTP/1.1} upstream_response_time 2.101 request_time 2.101
 to: 192.168.5.2:8090 {GET / HTTP/1.1} upstream_response_time 0.006 request_time 0.006
172.17.0.1 - - [06/Mar/2023:13:53:03 +0000] "GET /ords/ HTTP/1.1" 301 169 "-" "Mozilla/5.0 (Macintosh; Intel Mac OS X 10_15_7) AppleWebKit/537.36 (KHTML, like Gecko) Chrome/110.0.0.0 Safari/537.36"
 to: 192.168.5.2:8080 {GET /ords/ HTTP/1.1} upstream_response_time 2.045 request_time 2.045
From the NGINX logs you can see that traffic is being alternated between the ORDS instance listening on port 8080 and 8090.
As before, the request goes over HTTPS through NGINX and routed upstream to an ORDS instance.
You can stop a container and restart it to confirm the failover works as before.
Conclusion
Building on the previous articles you now have both NGINX and ORDS running in Docker and using an Autonomous Database. This is still effectively a development / proof of concept environment because the DNS entry and SSL certificate are not properly setup to operate seamlessly. The nginx.conf is hardcoded with two upstream ORDS instances to use and the containers are using two specific ports on the host machine. In the next article we’ll look at using docker compose so that we have more flexibility around this.
Using the Dockerfile from this article you have created an ORDS image which can be used to run ORDS commands and update your configuration in ords-adbs-config. As an additional exercise you can look into increasing pool size (jdbc.MaxLimit) and doing a rolling restart of the two ORDS docker containers to pick up that configuration change.
Are you looking for an effective way to monitor the performance of your Oracle REST Data Services deployments? ORDS provides a RESTful interface for Oracle databases. It allows you to access and manipulate data stored in Oracle databases in a secure and efficient manner. That efficiency depends on a multitude of factors. There is a reason you will not find any documented guidance on sizing of JVM memory, garbage collection, or UCP pool size. The appropriate settings are unique to the real world scenarios that the product will be used in. The optimum settings will be different from customer to customer, workload to workload. For most customers the defaults will probably be just fine. As their workload increases, with more concurrent clients, spinning up an additional ORDS instance in their cluster is generally the only change in the deployment topology. Slow response times are generally due to inefficient queries rather than not allocating heap space or the number of CPUs available.
What if you want to delve into the usage of computing resources when ORDS is running? Oracle Application Process Monitoring (Oracle APM) can help you get the job done. It is an enterprise-grade monitoring solution designed to help you identify, analyse, and troubleshoot performance issues in your applications. When you use ORDS with Oracle APM, you can monitor the performance of your deployment in real-time, allowing you to make informed decisions about where and when to make performance tuning changes to the topology. Oracle APM is available as part of the Oracle Cloud Observability and Management Platform. Many of the services and resources require an upgrade to a paid OCI account but the focus here will be on what can be achieved with the Oracle APM services using OCI Free Tier.
Use the preconfigured Application Server dashboard to determine if resource limits are being hit
Overview
In this article we will go over the steps for setting up Oracle APM and using the Oracle APM Java Agent with ORDS 22.4.0 deployed on an Apache Tomcat 9.0.56 server. Oracle APM supports various deployment topologies including Apache Tomcat, Oracle WebLogic Server and in OCI comes with a preconfigured Application Server dashboard.
Although the Oracle APM services are hosted in Oracle Cloud the Oracle APM Java Agent can be used anywhere. In this scenario Oracle APM is used from the OCI Frankfurt region but the Apache Tomcat server running ORDS 22.4.0 is running on-premise. The process for deploying ORDS on Tomcat is already well documented so this article will focus on the Oracle APM aspects.
The steps outlined below are based on Provision and Deploy APM Java Agents on Application Servers but do not follow it to the letter. For further details and more in depth explanation of the process you should refer to that documentation.
Oracle APM is a service in OCI Observability & Management
Create your APM Domain
The APM Domain specifies the Data Upload Endpoint and keys for the APM Java Agent to use at runtime.
The APM Domain is the key resource for using Oracle APM. The domain contains important configuration information about what data is stored and for how long. Follow these steps to create a Free Tier domain. Note that with Free Tier there are limits in place. In the above screenshot you can see that an APM Domain called ORDS has been created. You can use whatever name is suitable for your environment.
Take note of the Data Upload Endpoint and the Private Data Key. You’ll need them when provisioning the APM Java Agent instance which will be used with the Apache Tomcat server later.
Provision the agent
Provisioning the agent is the process of defining the specific properties for a Java Agent instance to be used with a specific Java application at runtime. In this case the Java application is Apache Tomcat which will have an ORDS web application deployed to it. If there were more than one Apache Tomcat server then a Java Agent would have to be provisioned for each. The provisioning process creates a directory containing jars, configuration log directories which will be used at runtime.
In this case the directory will be ~/work/ora_apm but you can use a directory that makes sense for you. The Oracle APM documentation does suggest using a directory where your application server is installed. For example the $CATALINA_HOME for your Apache Tomcat server but in this case a separate directory is used just to keep the APM configuration separate from the Tomcat configuration.
Before we do that, the Java Agent installer must first be downloaded.
Find the download link in the Administration section.
Once downloaded run the installer to provision the Java Agent. Here the server name is specified as ords_1 but that’s just to identify which Java Application is pushing the metrics to Oracle APM. It could be whatever value makes sense for your environment.
That creates a ApmAgentInstall.log file and oracle-apm-agent directory in ~/work/ora_apm. Your provisioned Java Agent, including jar files and configuration details, is in the oracle-apm-agent directory.
Start Apache Tomcat
Now that you have a Java Agent it can be specified when starting Apache Tomcat. In this environment the Apache Tomcat installation is at ~/work/apache/tomcat/9.0.56/. The Oracle APM documented steps for deploying to Apache Tomcat does outline steps for modifying the catalina.sh script. That’s the best thing to do so that the Java Agent is applied every time Tomcat starts. However, in this case the JAVA_OPTS environment variable will be used. When specifying the javaagent parameter the full directory path must be used.
export JAVA_OPTS="-javaagent:~/work/ora_apm/oracle-apm-agent/bootstrap/ApmAgent.jar"
~/work/apache/tomcat/9.0.56/bin/catalina.sh start

Using CATALINA_BASE:   /Users/peobrie/work/apache/tomcat/9.0.56
Using CATALINA_HOME:   /Users/peobrie/work/apache/tomcat/9.0.56
Using CATALINA_TMPDIR: /Users/peobrie/work/apache/tomcat/9.0.56/temp
Using JRE_HOME:        /Library/Java/JavaVirtualMachines/jdk-11.0.13.jdk/Contents/Home
Using CLASSPATH:       /Users/peobrie/work/apache/tomcat/9.0.56/bin/bootstrap.jar:/Users/peobrie/work/apache/tomcat/9.0.56/bin/tomcat-juli.jar
Using CATALINA_OPTS:
Tomcat started.
Apache Tomcat log shows Oracle APM and ORDs startup output
Monitor performance
Once Tomcat is up and running, you can begin monitoring application performance. This can be done using the APM console, or by setting up custom dashboards and alerts. The later features only available if you have upgraded to a paid OCI account. Time to review what metric information has been sent to Oracle APM data upload endpoint for your domain.
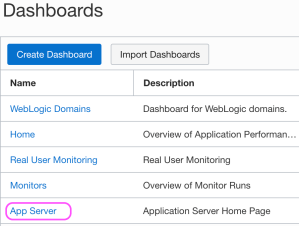
Navigate to the Dashboards page
Choose the Application Server Dashboard
The Oracle-defined dashboards are listed on the Dashboards page. When a dashboard is initially selected one must specify the following details:
Select the compartment in which your APM domain resides. Note that if a compartment is selected on the Dashboards page, then it’s displayed by default.
Select the APM domain that contains the systems being monitored by Application Performance Monitoring.
Select the resource that you want to monitor. For example, in the App Server dashboard, select an application server in the App Server drop-down list.
Select the time period for which you want data to be populated in the dashboard.
The App Server dropdown values will correspond to the Apache Tomcat server that the Oracle APM Java Agent is being used with. After you specify the details, the dashboards are populated with data and provide a quick insight into the health and performance of your application and enable you to identify the area that requires your attention.
The Oracle-defined dashboards, including the default Home dashboard will include information on metrics and APM resources which are not available in the Free Tier account. In this article we focus on the App Server dashboard.
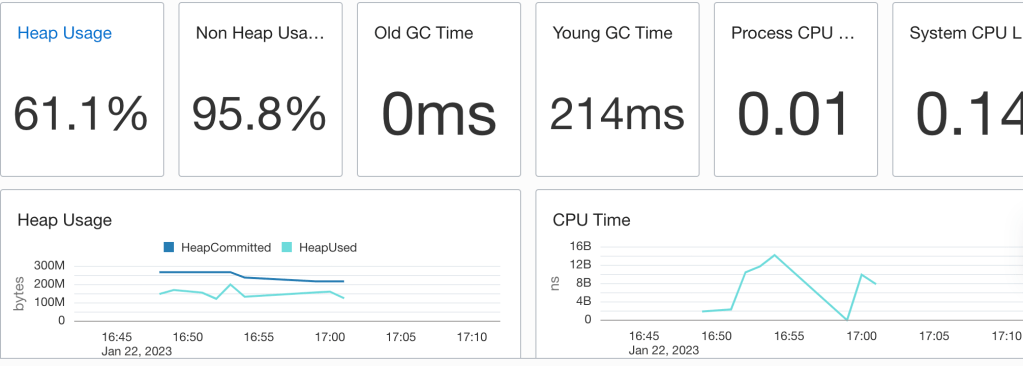
The App Server dashboard is the Home page for your application servers and enables you to analyse the resources used by your application servers and understand resource constraints and requirements. For instance, you can monitor this dashboard to analyse the heap and CPU usage of your application server.
No performance issues highlighted
In the above example heap used does get close to the heap committed so there may be some tuning to apply. One could apply some Java Performance Tuning options there to optimise for throughput, faster response times or just memory footprint. Note that the CPU load is quite low which suggests that there’s no need for additional ORDS instances.
But wait, there’s more
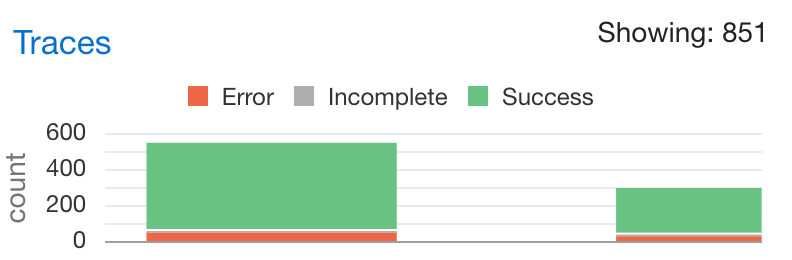
Not only do you have information on the resource usage of the Java application but there’s also tracing information on the requests received by ORDS. Moreover, that has a breakdown on time spend executing SQL queries and that can be really useful when optimising services. For example, running a SELECT on a table which is REST Enabled could take longer than necessary if there are a lot of columns. In some cases, a custom query to just return the data needed, using indexed columns, may the correct solution. This information is in the Oracle APM Trace Explorer. The restriction of the OCI Free Tier is that one can only have 1000 traces an hour so not all metrics for all requests are persisted.
Explore the trace data for requestsTracing data on the AutoREST service for EMPLOYEES table
The options for tracing services will be explored in a later article. Those on the Free Tier will benefit from reviewing them but will only have a small snapshot of the metrics and diagnostics data.
Conclusion
In this brief overview, you have seen the configuration and use of Oracle APM with ORDS ( and it could be any web application for that matter ) deployed on Apache Tomcat. Even in the Free Tier, with the hosted Oracle APM services provide a great performance insight option for anyone on a budget.
April 2024 Update !
Standalone mode was not mentioned in this article due to a Java Agent / Classloader issue. ORDS 24.1.0 no longer has this issue.
Use ORDS 24.1.0 or a later version.