Oracle REST Data Services (ORDS) provides web services for an Oracle Database and allows for access to the database over the web. In a recent YouTube video I showed how to use ORDS in the new Oracle Developer DB Virtual Machine and briefly mentioned how to find the running ORDS process. Let’s go into that in more detail. In this article, we will discuss how to check if ORDS is running in a standalone ORDS deployments as well as deployments on Apache Tomcat and Oracle WebLogic Server.
On a unix based system, the simplest way to check if ORDS is running is to use the jps command. This command will list all Java process that are currently running on the system. It is important to note that in order for jps to work, the JDK must be installed and the PATH environment variable must be set correctly. The jps command accepts a number of options and the most useful in this case are
-m to display the arguments passed to the main method
-l to display the full path name to the ords.war location. Pass that through a grep for ords to find the ords specific java process.
If ORDS is running in standalone mode, you should see a process with ords.war in the path. If this process is listed, then ORDS is running. Note that due to the -v option you also see the Java option oracle.dbtools.cmdline.home used. That should be the folder that the ords.war is found in and should also be the distribution directory. In the above example, the distribution directory is /home/oracle/ords/ and the ORDS command used to start ORDS was actually /home/oracle/ords/bin/ords --config /home/oracle/ords_config serve --secure --port 443
Another approach is to use the ps command. This command will list all processes currently running on the system. To check if ORDS is running, use the command ps -ef | grep ords.war. If you see a process with ords.war as the command, then ORDS is running.
You’ll also see similar information as with the jps command but also the java executable used at start up too. Note that access to run ps is not always guaranteed and it main not be available for the user you are logged in as.
One note about the command line arguments one can see for the running Java processes. It can be seen by other users. This is one of the reasons that ORDS does not accept a password as a command line option. That password would be visible to anyone able to list the running processes. Either through jps or ps.
Checking ORDS on Apache Tomcat
If it’s enabled, use the Tomcat manager web application, or at the very least the catalina log files, to confirm that ORDS web application is deployed and started. If not, then jps on the command line is the next logical choice.
When ORDS is deployed on Apache Tomcat, you can use the jps command to check if the server is running and get further information about where the ords.war might be deployed. Run jps -mlv as before but this time grep for the catalina package.
The above indicates that catalina.base is /usr/local/tomcat and most people use the automatic web application deployment by placing the ords.war in the $CATALINA_BASE/webapps/ directory.
That directory listing shows the ords.war file and that it has been exploded by Tomcat into the ords directory. It’s not a guarantee that ORDS was deployed successfully, one would have to check the Tomcat logs, but it is a good indicator.
Checking ORDS on Oracle WebLogic Server
If it’s enabled, use the WebLogic console or WLST to confirm that ORDS web application is deployed and started.
Similar to Apache Tomcat, the Oracle WebLogic Server is a Java application so yet again, it is the jps utility that is the starting point to get information on the server(s) running and their configuration.
The output indicates that the weblogic.home is /u01/oracle/wlserver/server. Unlike with Tomcat, one is not going to find a straight forward web application deployment directory under the weblogic.home. There’s a little more digging required to check if a server is configured to deploy ORDS and we’ll use the weblogic.Name parameter ( AdminServer in this case) to when digging deeper. The weblogic.home just indicates where the server java application is being executed from. The server runtime configuration is being picked up separately. In the majority of installations that will be in a related user_projects/domains directory found two levels up. For the above WLS instance that would be /u01/oracle/user_projects/domains/.
That directory may have the configuration for multiple domains but quite often there is just one: base_domain. From there you can get a little more information on how the server identified by the above weblogic.Name. The domain configuration is persisted in /u01/oracle/user_projects/domains/base_domain/config/config.xml and you can see there is an app-deployment configuration targetting the AdminServer.
If you see this app-deployment configuration in place it is not a complete guarantee that ORDS successfully deployed when the server started but it is a good indication.
What about Windows systems?
The syntax for path separates might be different but the same jps utility options apply and the relative file locations will also be the same for standalone, Tomcat and WebLogic.
Conclusion
In summary, the jps utility, also known as the Java Virtual Machine Process Status Tool, that comes with your Java SE distribution is your friend. Just from the command line, it can guide you in discovering more about the ORDS instance running on your machine irrespective of deployment mode.
The recently announced Oracle Developer DB Virtual Machine comes with ORDS 23.1.0 and the new Oracle 23c Database Free. In this video I walk through starting the virtual machine, restarting ORDS to use HTTPS, accessing ORDS from the host machine as well as stopping and restarting the virtual machine. The new “converged database” has a number of new features that ORDS works with. One that is not widely known is the Property Graph and it is demonstrated in this video.
This article provides a step-by-step guide to setting up an Oracle REST Data Services (ORDS) plugin using Maven. It covers the installation of two ORDS jars into the local Maven repository, the creation of the project structure, the configuration of the plugin, and the building and deployment of the plugin. This guide will help developers get started quickly with ORDS plugin development where Maven is already used in their software development infrastructure.
ORDS provides a plugin framework which makes it possible to extend the functionality and introduce custom behaviour. Creating a plugin can be a daunting task, especially if you’re not familiar with ORDS or the underlying technologies. Fortunately, there are some great examples out there to get you started, including the ORDS YAML plugin example. However, the plugin example projects are Ant-based, so if you’re looking to use Maven for your plugin project, you’ll need to take a few extra steps.
These steps have Maven as a prerequisite and it is assumed your familiarity with Maven is the reason you’re here, reading this article. If you need more information on Maven then start with What is Maven?
Step 1: Install ORDS Jars Into the Local Maven Repository
An ORDS plugin has a dependency on two jars that are distributed with ORDS. The ords-plugin-api jar provides all the interfaces, annotations and base classes described in the ORDS Java API which are the building blocks for your plugin implementation. The ords-plugin-apt jar provides the annotation processing support required when building your plugin. These two jar files can be found in the examples/plugins/lib/ directory of ORDS distribution.
First, you’ll need to install the two ORDS jars into your local Maven repository. To install the jars, you’ll need to use the command line. Navigate to the directory where the ORDS was extracted to, and then run the following two commands:
That will put two artefacts in your local maven repository both as version 22.4.4. That is the version of ORDS that this article refers to but you can change the version number to be reflect the version of ORDS you are using.
Step 2: Set Up the Project Structure
This guide is based on the ORDS YAML plugin example and will use the source PluginYaml.java from that article. The plugin can modify the application/json response which would normally be returned by ORDS and that response in text/yaml format instead.
For simplicity we’ll use maven-archetype-quickstart as outlined in Maven in 5 Minutes to create the project structure. The focus here is on creating an example, so that term makes sense as the group identifier. You should use your existing Maven artefact nomenclature for identifiers. In the directory where you typically have your Maven projects run the following command:
You should now have an ords-yaml-plugin directory which looks like this:
ords-yaml-plugin
|-- pom.xml
`-- src
    |-- main
    |   `-- java
    |       `-- example
    |           `-- App.java
    `-- test
        `-- java
            `-- example
                `-- AppTest.java
The generated App.java and AppTest.java files can be removed or ignored. They serve no purpose but to provide placeholders in the source directory. Change directory into ords-yaml-plugin and verify the project builds.
> cd ords-yaml-plugin
> mvn clean package
[INFO] Scanning for projects...
[INFO]
[INFO] -------------< example:ords-yaml-plugin >-------------
[INFO] Building ords-yaml-plugin 1.0-SNAPSHOT
[INFO] -----------------------[ jar ]------------------------
...
[INFO] ------------------------------------------------------
[INFO] BUILD SUCCESS
[INFO] ------------------------------------------------------
[INFO] Total time:  2.755 s
[INFO] Finished at: 2023-03-27T23:39:42+01:00
[INFO] ------------------------------------------------------
Once that completes you should see target/ords-yaml-plugin-1.0-SNAPSHOT.jar file has been produced. Let’s make it interesting by adding the PluginYaml.java to the project.
Step 3: Create Configuration Files and Source
To compile the ORDS plugin there are classpath dependencies that must be met. Modify the ords-yaml-plug project pom.xml and put these dependencies just after the <dependencies> element at line #21.
Most of those dependencies will be satisfied by the artefacts already available in the central Maven repository and you have addressed the remaining two dependencies by putting the ORDS plugin api and apt jars in your local repository earlier.
Download the source for the plugin class into the source package directory created when the Maven project was created.
That PluginYaml.java example was written for an earlier version of ORDS which used the javax.inject library. ORDS 22.4.4 uses the jakarta.inject library. So edit the java source and replace the import statement at line #15
import javax.inject.Inject;
with
import jakarta.inject.Inject;
With that minor change in place you are now ready for the next step: build and deploy the plugin.
Step 4: Build and Deploy the Plugin
It’s as simple as running this on the command line:
> mvn clean package
[INFO] Scanning for projects...
[INFO]
[INFO] ----------------------< example:ords-yaml-plugin >----------------------
[INFO] Building ords-yaml-plugin 1.0-SNAPSHOT
[INFO] --------------------------------[ jar ]---------------------------------
[INFO]
[INFO] --- maven-clean-plugin:3.1.0:clean (default-clean) @ ords-yaml-plugin ---
[INFO] Deleting /development/github/ords-yaml-plugin/target
[INFO]
[INFO] --- maven-resources-plugin:3.0.2:resources (default-resources) @ ords-yaml-plugin ---
[INFO] Using 'UTF-8' encoding to copy filtered resources.
[INFO] skip non existing resourceDirectory /development/github/ords-yaml-plugin/src/main/resources
[INFO]
[INFO] --- maven-compiler-plugin:3.8.0:compile (default-compile) @ ords-yaml-plugin ---
[INFO] Changes detected - recompiling the module!
[INFO] Compiling 2 source files to /development/github/ords-yaml-plugin/target/classes
[INFO]
[INFO] --- maven-resources-plugin:3.0.2:testResources (default-testResources) @ ords-yaml-plugin ---
[INFO] Using 'UTF-8' encoding to copy filtered resources.
[INFO] skip non existing resourceDirectory /development/github/ords-yaml-plugin/src/test/resources
[INFO]
[INFO] --- maven-compiler-plugin:3.8.0:testCompile (default-testCompile) @ ords-yaml-plugin ---
[INFO] Changes detected - recompiling the module!
[INFO] Compiling 1 source file to /development/github/ords-yaml-plugin/target/test-classes
[INFO]
[INFO] --- maven-surefire-plugin:2.22.1:test (default-test) @ ords-yaml-plugin ---
[INFO]
[INFO] -------------------------------------------------------
[INFO]  T E S T S
[INFO] -------------------------------------------------------
[INFO] Running example.AppTest
[INFO] Tests run: 1, Failures: 0, Errors: 0, Skipped: 0, Time elapsed: 0.041 s - in example.AppTest
[INFO]
[INFO] Results:
[INFO]
[INFO] Tests run: 1, Failures: 0, Errors: 0, Skipped: 0
[INFO]
[INFO]
[INFO] --- maven-jar-plugin:3.0.2:jar (default-jar) @ ords-yaml-plugin ---
[INFO] Building jar: /development/github/ords-yaml-plugin/target/ords-yaml-plugin-1.0-SNAPSHOT.jar
[INFO] ------------------------------------------------------------------------
[INFO] BUILD SUCCESS
[INFO] ------------------------------------------------------------------------
[INFO] Total time:  4.580 s
[INFO] Finished at: 2023-03-28T00:34:29+01:00
[INFO] ------------------------------------------------------------------------
Now your target/ords-yaml-plugin-1.0-SNAPSHOT.jar file really does have the capability of doing something interesting but it must be put in the lib/ext/ directory of your ORDS installation directory first. Many of the runtime dependencies will be met by the jars distributed with ORDS. However, this particular plugin requires certain YAML related jars to also be in the runtime classpath: snakeyaml and jackson-dataformat-yaml. These jars will also have to be copied to the lib/ext/ directory.
The jackson-dataformat-yaml artefact will be in your local Maven repository because it was pulled in for this ords-yaml-plugin project and that can just be copied over. However, for snakeyaml you may have to download that file.
Let’s assume the directory that ORDS was extracted to can be referred to by the environment variable $ORDS_HOME.
To download the snakeyaml jar so that it is included in the ORDS runtime classpath run this command:
Unless you want to change the versions of these jars used, you only need to do this once. Every time you build a new ords-yaml-plugin jar you will have to copy it to the ORDS library extension directory. To copy the jar file you built, run this command while in your ords-yaml-plugin project directory:
Now just start ORDS in standalone mode with a configuration directory setup to use your preferred database.
> $ORDS_HOME/bin/ords --config /path/to/config serve
ORDS: Release 22.4 Production on Tue Mar 28 00:14:06 2023

Copyright (c) 2010, 2023, Oracle.

Configuration:
  /path/to/config/

2023-03-28T00:14:06.522Z INFO        HTTP and HTTP/2 cleartext listening on host: 0.0.0.0 port: 8080
...
2023-03-28T00:14:23.618Z INFO

Mapped local pools from /path/to/config/databases:
  /ords/                              => default                        => VALID


2023-03-28T00:14:23.662Z INFO        Oracle REST Data Services initialized
Oracle REST Data Services version : 22.4.4.r0411526
Oracle REST Data Services server info: jetty/10.0.12
Oracle REST Data Services java info: Java HotSpot(TM) 64-Bit Server VM 11.0.13+10-LTS-370
ORDS started up without issue so you plugin is effectively deployed and ready to work.
Step 5: Verify the Plugin
It’s time to confirm that the PluginYaml class does in fact transform the application/json response to text/yaml when the client requests that format. Send a request to ORDS that would normally return application/json but indicate that text/yaml is preferred. In my database I have the HR schema, and it’s EMPLOYEES table, REST Enabled and accessible at http://localhost:8080/ords/hr/employees/. The plugin is looking for Accepts header in the request to see if it should transform the response.
By following the steps in this article you have used Maven to compile and package an ORDS plugin. There were a few once of steps to get dependencies addressed but you now have a Maven project structure for developing more extensions to the existing ORDS behaviour.
If you’re looking to build an ORDS plugin, Apache Maven is a great choice because it provides a uniform build system and there is a huge range of Integrated Development Environments and Source Control Systems that work with Maven. Give it a try today and see how it can help you take your development efforts to the next level.
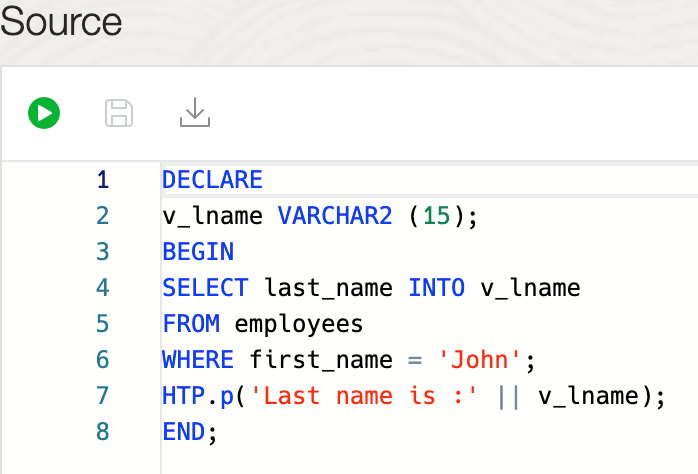
Using Oracle REST Data Services (ORDS) to create web services with query or PL/SQL back-end services can be a powerful way to access and manipulate data stored in an Oracle database. However, it is important to be aware that when defining the service handler source code, there is always the possibility of encountering an error at runtime which can be difficult to debug and resolve. This article explains how to use ChatGPT to suggest an explanation for the error reported at runtime.
ORDS is used to create, manage, and run RESTful web services. Developers can write their own REST APIs by simply providing the SQL or PL/SQL behind the endpoints. This is the module/template/handler paradigm mentioned in Developing Oracle REST Data Services Applications. It is always a possibility that when developing a service a mistake is made, or something changes in the system which breaks a service that was previously working. Diagnosing the problem, and then fixing it, is not always straight forward.
A PL/SQL handler source that works fine when there’s only one employee called John
When an error occurs while executing the query or PL/SQL block and it appears to be due to the handler source then ORDS will return a HTTP 555 User Defined Resource Error response. This indicates that an error occurred, but it was not due to problems connecting to the database, or with authorisation, and therefore a problem with executing the handler source in the database. In other words, it is an issue that the developer of the handler should be able to address. However, there may not be any more information than that and a developer would have to understand the ORA error codes and error message mentioned by the database.
debug.printDebugToScreen – Global setting Specifies whether to display error messages on the browser. Supported values: true | false (default)
Having debug.printDebugToScreen enabled in the environment can provide more context but resolving the issue still requires familiarity with what the database is complaining about.
The error page indicates the problem with the handler source but cannot provide clear information on how to fix it.
Ask a chatbot
A chatbot is a computer program that is designed to simulate conversation with human users through written or spoken messages. Chatbots are typically used in customer service, online helpdesks, and other online services to provide answers to common questions and help customers find the information they need. In this case the goal is to ask a chatbot for a suggested solution to the user defined resource error. More specifically, when displaying the error message to also display the answer to the question How can I fix this user defined resource error I encountered in Oracle REST Data Services? It’s not so much a back and forth conversation, but the first answer can be quite useful.
Why ChatGPT?
The chatbot used in this article is ChatGPT, specifically: gpt-3.5-turbo, but in theory one can integrate with any AI model sufficiently broad enough that can handle conversations around SQL and PL/SQL development. ChatGPT is a natural language processing (NLP) model developed by OpenAI that uses deep learning to generate human-like responses to a given input. The model is quite accurate and can generate realistic responses that mimic how a human would converse. To over simplify it, based on the huge amount of conversations it has seen before, the model predicts what’s the next word to output when generating text. ChatGPT is not perfect and could in fact return a vague or inaccurate answer but in the majority of cases, the answer is helpful.
ORDS allows users to customise the appearance of error pages that are displayed when an error occurs. Custom error pages can be defined to include text, graphics, and HTML elements that can be used to provide helpful information to users when an error occurs. In the majority of cases where ORDS customers configure custom error pages it is generally to have specific branding in place and perhaps additional links for their own project description, documentation and support.
How the error page is rendered
The error page in ORDS is a moustache template file which is used to generate a HTML response based on a few parameters. It is worthwhile getting an understanding of the moustache syntax. However, the simplest explanation of its use in this case is that certain portions of the static HTML template file are replaced with parameters at runtime. These parameters have specific names:
statusCode – The HTTP status code to display. Custom error pages filenames also correspond to status code but more about that later.
statusMessage – The text that corresponds to the statusCode.
reasons – A HTML block of List Items ( <li>...</li> ) with text descriptions of one or more reasons for the error reported.
unauthorized – A HTML block with a link to the sign-in page if the error is an authentication or authorisation error.
debug – A HTML block for displaying the debug.printDebugToScreen output.
Not all of the above parameters are set at runtime but for HTTP 555 User Defined Resource Error the statusCode, statusMessage and reasons are. As mentioned above, the reasons parameter is a HTML block which will look like this:
<li>
  <span style="font-size: 1.1em;">
The request could not be processed because an error occurred whilst attempting to evaluate the SQL statement associated with this resource. Please check the SQL statement is correctly formed and executes without error. SQL Error Code: 1422, Error Message: ORA-01422: exact fetch returns more than requested number of rows
ORA-06512: at line 4
  </span>
</li>
In the ORDS distribution one can review the error.html template file that is used by default. It can be found in the ords-http-${build.number}.jar and I have used it as the basis for my custom error page for 555 status codes 555.html. That’s why it looks like the standard ORDS error page, but with one new text area.
Custom error page for status 555 – User Defined Resource Error
At a high level the additional changes to the out of the box error.html is a javascript function called getExplanation() which is called when the error page is loaded by the browser. This function calls an openai.com endpoint for chat completion. To get a further understanding of the model, the parameters in the request payload and the format of the response it is best to start with the above OpenAI documentation. It is sufficient to know that the getExplanation() javascript function in the custom error page starts a conversation with the model as a user, specifying that the model can lean slightly in the deterministic direction. That’s what the temperature parameter is for.
var content = 'How can I fix this user defined resource error I encountered in Oracle REST Data Services? ' + reasonsSingleLine.trim() + '.';
var params = `{ "model": "gpt-3.5-turbo", "messages":
                [{"role": "user",
                  "content": "${content}"}
                ],
                "temperature": 0.7 }`;
The javascript invokes https://api.openai.com/v1/chat/completions endpoint with a question based on the reasons text and displays the response in a textarea element called explanation. Before making that call, the reasons text is restructured to be a single line string and the HTML elements are removed. This makes it easier for ChatGPT to parse the content of the message. You can walk through the code in your own time.
Download 555.html and save it in a directory that ORDS will have access to at runtime. Let’s say it is /path/to/error/pages/folder/ because that’s the example used in the ORDS documentation. Remember that OpenAI API key that was created earlier? Edit the 555.html file and find this section at line #133..
var openapi_key = '<!-- PUT YOUR OPENAI.COM API KEY HERE -->';
Replace the HTML comment portion with your OpenAI API key. Note that this key will be accessible to anyone who accesses your ORDS REST Services and gets a HTTP 555 response. It is possible that someone may use your key for their own API calls to OpenAI. Therefore it may be necessary to change the keys on a regular basis or perhaps only use this approach for the development and internal production environments but not for an environment accessible from the internet.
Configure the custom error pages location
When the error.externalPath configuration setting has a value ORDS uses that to find a customer error page template file based on the status code of the response. If there is no corresponding status code HTML file then the default error page is used. Before starting up the ORDS instance set the error.externalPath configuration setting to the directory that the 555.html customer error page is.
ords --config /path/to/conf config set error.externalPath /path/to/error/pages/folder/
With the custom error page in place for 555 status codes we can revisit our example ORDS REST service endpoint that has an error at runtime and see a slightly different error page.
When the error page loads it sends a request to OpenAI
The request to the OpenAI endpoint occurs when the page is loaded by the browser. There is a noticeable delay with getting a response back. For three requests the response time recorded by the browser for https://api.openai.com/v1/chat/completions were ( in seconds ) : 15, 8, 10. That’s a huge variation in elapsed time and anything more than a few seconds can seem like an eternity when sitting at a computer. It’s still faster than the length of time it takes to copy and past the message into your preferred search engine and trawl through the pages for an helpful explanation and actionable suggestions.
Helpful explanations
The ChatGPT model provides an explanation of the runtime error and suggested steps on how to fix it.
Of course this is a dynamic conversation with a model which works through a plethora of options and permutations so the next time it is asked for suggestions on how to fix the problem there could be a different answer.
Even for the same error message input, the response from ChatGPT is not always the same.
For more deterministic output consider reducing the temperature parameter in the javascript but having a variety of suggestions could in fact be more helpful when trying to solve a problem.
Conclusion
The use of ChatGPT to produce explanations and suggested fixes for user defined resource errors is a useful aid for developers creating ORDS REST Services. It is an easy-to-use and efficient solution for automatically diagnosing and resolving errors. Even working with a small error description, through the use of natural language processing, ChatGPT can quickly respond with actionable suggestions. This has the potential to allow developers to quickly identify and resolve errors, saving time and resources.
Potential next steps for your own custom error page might be to improve the formatting / branding of the page, develop something similar for other HTTP status codes, change the model or temperature parameters to experiment with the results.
Why spend time searching for answers on stackoverflow when you can get them automatically? Try an AI chatbot in your custom error page today to make diagnosis a breeze – you won’t look back!
Post Publishing Edits:
March 20th 2023 - Added text on the elapsed time for getting a response from the OpenAI endpoint.
Welcome to the third instalment of my series on using Oracle REST Data Services (ORDS), NGINX, Docker, SSL and Autonomous Database! In this article, I will show you how to quickly get started using ORDS and Docker. Together we will walk through the basics of building the Docker image, storing configuration in a Docker volume, running multiple ORDS instances and balancing the load using NGINX. With the help of this guide, you will be able to have a load balanced Customer Managed ORDS with Autonomous Database up and running in no time. To recap on the previous articles:
Load Balancing ORDS with NGINX introduced the concept of load balancing and the most basic of configurations to get started with NGINX running in docker. That was entirely using HTTP as the transport protocol.
HTTPS Load Balance: NGINX & ORDS took that a step further by using a self signed certificate so that the traffic between client and server was over the more secure HTTPS protocol. That was with ORDS instances running on port 8080 and 8090.
Autonomous Database – hosted and managed for free
Autonomous Database
In this article the ORDS instances will be running in Docker and sharing a configuration for an Autonomous Database hosted on Oracle Cloud Infrastructure Free Tier resources. The prerequisite for this article is an understanding of Installing and Configuring Customer Managed ORDS on Autonomous Database. The database has ORDS and APEX already installed. However, the credentials for ORDS Runtime user and PLSQL Gateway user are not known so the ords install adb command instruction will be used to create and configure additional users in the database to be used by our new ORDS instances.
Oracle Content Delivery Network
In the previous article we had the APEX images in the global/doc_root directory. It is much easier to not have to configure an ORDS instance to serve those static files and to use the Oracle Content Deliver Network instead. One should note that by default, the APEX installation in the Autonomous Database does not use the Oracle CDN for the APEX static resources. So if you have not done so already, use Oracle CDN for the APEX images. The URL to use will depend on the version of APEX in use. At the time of writing, that is APEX 22.2.0. Once you have made this change the next APEX upgrade will keep the IMAGE_PREFIX parameter in synch. See https://support.oracle.com/epmos/faces/DocumentDisplay?id=2817084.1 and https://blogs.oracle.com/apex/post/running-customer-managed-ords-on-autonomous-database-heres-how-to-get-ready-for-apex-211-upgrade for more information on using Oracle CDN with APEX
As shown in the previous article it is already straight forward to use ORDS from the command line to configure and run in standalone mode. In doing so, you are satisfying the most fundamental requirement for ORDS by providing a supported Java Runtime Environment for it to run in. Running ORDS in Docker takes care of that dependancy and provides a consistent structure. For your convenience, I have defined a Dockerfile to create an image with the latest version of ORDS built in. It does require the JDK 17 image from Oracle Container Registry jdk repository. To use images from the Oracle Container Registry you must first sign in using your Oracle Account to accept the license agreement for the Oracle image. Once you have accepted the licence, follow the installation instructions on the page to login and pull the jdk:17 image:
That will pull into your local Docker repository the most recent Oracle JDK 17 build.
Dockerfile for ORDS Entrypoint
The configuration is quite simple. A couple of folders are exposed for providing configuration and library extensions. That configuration directory is essential but in the majority of cases, customers do not have custom extensions so the lib/ext folder will not be used in this article. Similarly, although the Dockerfile specifies that both port 8080 and port 8443 should be exposed, we will only be using port 8080 for HTTP traffic in this article. It is NGINX that will be terminating the HTTPS traffic before routing upstream to our ORDS instances.
The Dockerfile we’ll use to create the ORDS image is available at ORDS_Latest_Dockerfile. Contents listed below.
#
# Defines a docker image, based on the Oracle JDK image, to run Oracle REST Data Services. During the image building
# process the most recent version of ORDS will be automatically downloaded and extracted.
#
# Volumes for configuration and lib/ext are defined.
#
# docker run -p 8080:8080 -v ords-adb-config:/opt/ords-config/ -v ords-lib-ext:/opt/ords/latest/lib/ext ords-latest/oraclejdk
#
# See https://peterobrien.blog/ for more information and examples.
#
FROM container-registry.oracle.com/java/jdk:17
MAINTAINER Peter O'Brien
ENV LATEST=/opt/ords-latest/
ENV CONFIG=/opt/ords-config/
WORKDIR $LATEST
ADD https://download.oracle.com/otn_software/java/ords/ords-latest.zip $LATEST
RUN jar xf ords-latest.zip; rm ords-latest.zip; chmod +x bin/ords
VOLUME $LATEST/lib/ext/ $CONFIG
EXPOSE 8080
EXPOSE 8443
WORKDIR $CONFIG
ENTRYPOINT ["/opt/ords-latest/bin/ords"]
CMD ["serve"]
To use the above Dockerfile and build an image locally called ords-latest/oraclejdk use the following command
> docker build --tag ords-latest/oraclejdk \
https://gist.githubusercontent.com/pobalopalous/fc6ab4ee777f6b7f32a400e920df682d/raw/ORDS_Latest_Dockerfile

Downloading build context from remote url: https://gist.githubusercontent.com/pobalopalous/fc6ab4ee777f6b7f32a400e920df682d/raw/ORDS_Latest_Dockerfile [===============Downloading build context from remote url: https://gist.githubusercontent.com/pobalopalous/fc6ab4ee777f6b7f32a400e920df682d/raw/ORDS_Latest_Dockerfile [==================================================>]     878B/878B
Downloading build context from remote url: https://gist.githubusercontent.com/pobalopalous/fc6ab4ee777f6b7f32a400e920df682d/raw/ORDS_Latest_Dockerfile [==================================================>]     878B/878B
Sending build context to Docker daemon   2.56kB
Step 1/13 : FROM container-registry.oracle.com/java/jdk:17
 ---> 4945318567e9
Step 2/13 : MAINTAINER Peter O'Brien
 ---> Using cache
 ---> 1bb5b3ea1d92
Step 3/13 : ENV LATEST=/opt/ords-latest/
 ---> Using cache
 ---> 4798e9cbc8d1
Step 4/13 : ENV CONFIG=/opt/ords-config/
 ---> Using cache
 ---> a1f6e0bf441c
Step 5/13 : WORKDIR $LATEST
 ---> Using cache
 ---> 1b961db4ee2d
Step 6/13 : ADD https://download.oracle.com/otn_software/java/ords/ords-latest.zip $LATEST
Downloading [==================================================>]  94.62MB/94.62MB
 ---> Using cache
 ---> f6d009ada2f1
Step 7/13 : RUN jar xf ords-latest.zip; rm ords-latest.zip; chmod +x bin/ords
 ---> Using cache
 ---> f6d20c737486
Step 8/13 : VOLUME $LATEST/lib/ext/ $CONFIG
 ---> Using cache
 ---> fde34609973e
Step 9/13 : EXPOSE 8080
 ---> Using cache
 ---> 77933cb86baa
Step 10/13 : EXPOSE 8443
 ---> Using cache
 ---> 094fc3d8332b
Step 11/13 : WORKDIR $CONFIG
 ---> Using cache
 ---> 2d1b41e2c6f0
Step 12/13 : ENTRYPOINT ["/opt/ords-latest/bin/ords"]
 ---> Using cache
 ---> 9974ac45526d
Step 13/13 : CMD ["serve"]
 ---> Using cache
 ---> 4cbe74b80bb5
Successfully built 4cbe74b80bb5
Successfully tagged ords-latest/oraclejdk:latest
You now have an image in your local Docker repository ready to run. Note that the base image is an Oracle JDK 17 one. You can of course change that to something else. At the time of writing, only Oracle JDK 11 and 17 are supported Java Runtime Environments for ORDS.
Docker volume for ORDS configuration
Now it’s time to start putting the ORDS configuration together. In the previous article I outlined a configuration folder structure which was defined on the host computer file system. We are deviating from that in two ways. First, as outlined above, we will not have any APEX images in the global/doc_root directory because we are using the Oracle CDN with APEX in the hosted Autonomous Database. Second, we’re using a Docker volume, rather than the local filesystem, to store all the configuration.
Docker volumes are an ideal way to persist data generated by and used by Docker containers. They provide several benefits, such as:
Data isolation: Docker volumes are independent of the underlying filesystem, which ensures that the data persists even if the container is moved to a different host.
Easy deployment: Docker volumes can be shared across multiple containers and hosts, making it easy to deploy applications in different environments.
Data security: Docker volumes are stored outside the container, so they are not affected by any changes within the container. This ensures that your data remains secure and consistent.
Performance: Docker volumes are stored on the host system, which can be faster than using shared storage. This can improve the performance of your containers.
The first configuration item for a Customer Managed ORDS on Autonomous Database is the wallet and getting that wallet zip file into the Docker volume involves a few steps that may not be intuitive if you are not familiar with Docker volumes. You see, to copy a file into a Docker volume, one must do that through a running container, but before we have a running container, we must first create the volume.
Let’s assume you have downloaded your Autonomous Database wallet zip file to your ~/Downloads directory. For example: ~/Downloads/Wallet_DB202301101106.zip. We’re going to put it in the ords-adb-config volume as /opt/ords-config/Wallet_Autonomous.zip but first we must start a container to use it.
Note that we’re not mapping to any ports and once we’re finished with this container it will be removed. Let’s copy that wallet zip file. We know the name of the container is ords-latest because that’s the name we gave in the docker run command. Your wallet file name will be different but we’re going to copy it to /opt/ords-config/Wallet_Autonomous.zip to keep things simple for subsequent commands. If you are going to have multiple pools, you will have to have distinct filenames.
That ords-latest container is no longer required. It only came into existence to allow you to copy the zip file. When you stop the container it should be removed automatically.
> docker stop ords-latest
Configuration for Customer Managed ORDS
The wallet zip file is a good start but now it’s time to run through the Customer Managed ORDS with Autonomous Database install step which will create additional users in the database and store the necessary pool settings in the ords-adb-config Docker volume. We’re going to use the non-interactive silent installation so will have to provide the passwords for the existing ADMIN user, and the two users to create. Referring back to the ORDS documentation, the ords install adb command is…
Let’s create that file with the passwords to use. We can delete it once the ords install adb command completes. Create the adbs_passwords.txt file with three passwords on each line:
<PASSWORD FOR admin-user>
<PASSWORD FOR db-user>
<PASSWORD FOR gateway-user>
In my case the adbs_passwords.txt file looks like this:
With my passwords file I can pass all these details in one command as I run it in Docker. Note that the entire command line also specifies -i which instructs the docker engine to use standard input ( STDIN ) for the container.
ORDS: Release 22.4 Production on Mon Mar 06 09:52:30 2023
Copyright (c) 2010, 2023, Oracle.
Configuration: /opt/ords-config/
Oracle REST Data Services - Non-Interactive Customer Managed ORDS for Autonomous Database Connecting to Autonomous database user: ADMIN TNS Service: db202301101106_low Retrieving information Checking Autonomous database user: ORDS_PLSQL_GATEWAY2 TNS Service: db202301101106_low The setting named: db.wallet.zip.path was set to: /opt/ords-config/Wallet_Autonomous.zip in configuration: default The setting named: db.wallet.zip.service was set to: db202301101106_low in configuration: default The setting named: db.username was set to: ORDS_PUBLIC_USER2 in configuration: default The setting named: db.password was set to: ****** in configuration: default The setting named: plsql.gateway.mode was set to: proxied in configuration: default The setting named: feature.sdw was set to: true in configuration: default The global setting named: database.api.enabled was set to: true The setting named: restEnabledSql.active was set to: true in configuration: default The setting named: security.requestValidationFunction was set to: ords_util.authorize_plsql_gateway in configuration: default 2023-03-06T09:52:38.256Z INFO Connecting to Autonomous database user: ADMIN TNS Service: db202301101106_low ------------------------------------------------------------ Date : 06 Mar 2023 09:52:38 Release : Oracle REST Data Services 22.4.4.r0411526
Database : Oracle Database 19c Enterprise Edition DB Version : 19.18.0.1.0 ------------------------------------------------------------ Container Name: C4TOSECRETNQ2JA_DB202301101106 ------------------------------------------------------------
[*** script: ords_runtime_user.sql]
PL/SQL procedure successfully completed.
2023-03-06T09:52:42.532Z INFO ... Verifying Autonomous Database runtime user [*** script: ords_gateway_user.sql]
PL/SQL procedure successfully completed.
2023-03-06T09:52:43.674Z INFO ... Verifying Autonomous Database gateway user 2023-03-06T09:52:43.675Z INFO Completed configuring for Customer Managed Oracle REST Data Services version 22.4.4.r0411526. Elapsed time: 00:00:05.407
[*** Info: Completed configuring for Customer Managed Oracle REST Data Services version 22.4.4.r0411526. Elapsed time: 00:00:05.407 ] 2023-03-06T09:52:43.720Z INFO To run in standalone mode, use the ords serve command: 2023-03-06T09:52:43.723Z INFO ords --config /opt/ords-config serve 2023-03-06T09:52:43.723Z INFO Visit the ORDS Documentation to access tutorials, developer guides and more to help you get started with the new ORDS Command Line Interface (http://oracle.com/rest).
Note that because the Docker entrypoint for the image that we built earlier was specified as /opt/ords-latest/bin/ords which means we can run the ords command line with any supported commands and arguments.
Don’t forget to rmadbs_passwords.txt. You do not need it anymore.
In summary, we’ve just told ORDS to use the wallet zip file and the ADMIN credentials to connect to the hosted service, create some users and persist configuration details on the ords-adb-config volume. The docker container exits because the command is complete. You can see the ORDS configuration by running the ords config list command.
> docker run -v ords-adb-config:/opt/ords-config/ \
             ords-latest/oraclejdk config list

ORDS: Release 22.4 Production on Mon Mar 06 19:07:27 2023

Copyright (c) 2010, 2023, Oracle.

Configuration:
  /opt/ords-config/

Database pool: default

Setting                              Value                                    Source
----------------------------------   --------------------------------------   -----------
database.api.enabled                 true                                     Global
db.password                          ******                                   Pool Wallet
db.username                          ORDS_PUBLIC_USER2                        Pool
db.wallet.zip.path                   /opt/ords-config/Wallet_Autonomous.zip   Pool
db.wallet.zip.service                db202301101106_low                       Pool
feature.sdw                          true                                     Pool
plsql.gateway.mode                   proxied                                  Pool
restEnabledSql.active                true                                     Pool
security.requestValidationFunction   ords_util.authorize_plsql_gateway        Pool
No doubt you will remember this from the previous article about HTTPS and NGINX with ORDS. There’s one more configuration setting to address. That’s to tell ORDS what header key / value pair to use to trust that the request was received by a load balancer over HTTPS even though ORDS is receiving traffic over HTTP.
docker run -v ords-adb-config:/opt/ords-config/ \
  ords-latest/oraclejdk \
  config set security.httpsHeaderCheck "X-Forwarded-Proto: https"
At this point we have a Docker volume ords-adb-config which has all the configuration settings necessary to run one or more Customer Managed ORDS with Autonomous Database instances as we see fit.
Start it up!
From the previous article you have a NGINX configuration that you have running in Docker to talk to two ORDS instances listening on port 8080 and 8090. Now let’s replace those ORDS instances with ones running in Docker with the above ords-adb-config Docker volume. You can leave the NGINX container running but if you have not done so already, shutdown those ORDS instances.
Up until now, we have not specified a container name when running ORDS in Docker. For convenience, we’ll refer to the container listening on port 8080 as ords-latest-8080 and the other one as ords-latest-8090.
To check that they are up and running have a look at the process list.
> docker ps
CONTAINER ID   IMAGE                   COMMAND                  CREATED        STATUS        PORTS                                                                      NAMES
2c11ababaf1b   ords-latest/oraclejdk   "/opt/ords-latest/bi…"   4 hours ago    Up 4 hours    8443/tcp, 0.0.0.0:8090->8080/tcp, :::8090->8080/tcp                        ords-latest-8090
7fd8c821be64   nginx                   "/docker-entrypoint.…"   6 hours ago    Up 6 hours    0.0.0.0:80->80/tcp, :::80->80/tcp, 0.0.0.0:443->443/tcp, :::443->443/tcp   optimistic_kilby
9e0d8ec541bc   30e6e561dc7d            "/opt/ords-latest/bi…"   6 hours ago    Up 6 hours    0.0.0.0:8080->8080/tcp, :::8080->8080/tcp                                  ords-latest-8080
Also use the docker logs command to keep track of the activity and status. We’ve given specific names for the two ORDS containers so we can refer to them directly,
> docker logs -f ords-latest-8080

ORDS: Release 22.4 Production on Mon Mar 06 13:48:57 2023

Copyright (c) 2010, 2023, Oracle.

Configuration:
  /opt/ords-config/

2023-03-06T13:48:58.335Z INFO        HTTP and HTTP/2 cleartext listening on host: 0.0.0.0 port: 8080
2023-03-06T13:48:58.389Z INFO        Disabling document root because the specified folder does not exist: /opt/ords-config/global/doc_root
2023-03-06T13:49:07.009Z INFO        Configuration properties for: |default|lo|
...
Mapped local pools from /opt/ords-config/databases:
  /ords/                              => default                        => VALID


2023-03-06T13:49:14.790Z INFO        Oracle REST Data Services initialized
Oracle REST Data Services version : 22.4.4.r0411526
Oracle REST Data Services server info: jetty/10.0.12
Oracle REST Data Services java info: Java HotSpot(TM) 64-Bit Server VM 17.0.6+9-LTS-190
> docker logs -f ords-latest-8090

ORDS: Release 22.4 Production on Mon Mar 06 13:56:22 2023

Copyright (c) 2010, 2023, Oracle.

Configuration:
  /opt/ords-config/

2023-03-06T13:56:23.011Z INFO        HTTP and HTTP/2 cleartext listening on host: 0.0.0.0 port: 8080
2023-03-06T13:56:23.066Z INFO        Disabling document root because the specified folder does not exist: /opt/ords-config/global/doc_root
2023-03-06T13:56:32.683Z INFO        Configuration properties for: |default|lo|
...
Mapped local pools from /opt/ords-config/databases:
  /ords/                              => default                        => VALID


2023-03-06T13:56:32.683Z INFO        Oracle REST Data Services initialized
Oracle REST Data Services version : 22.4.4.r0411526
Oracle REST Data Services server info: jetty/10.0.12
Oracle REST Data Services java info: Java HotSpot(TM) 64-Bit Server VM 17.0.6+9-LTS-190
As a reminder, to check the logs for the NGINX container you’ll have to specify the container name that was allocated at runtime. In my case it is optimistic_kilby.
> docker logs -f optimistic_kilby
/docker-entrypoint.sh: /docker-entrypoint.d/ is not empty, will attempt to perform configuration
/docker-entrypoint.sh: Looking for shell scripts in /docker-entrypoint.d/
/docker-entrypoint.sh: Launching /docker-entrypoint.d/10-listen-on-ipv6-by-default.sh
10-listen-on-ipv6-by-default.sh: info: Getting the checksum of /etc/nginx/conf.d/default.conf
10-listen-on-ipv6-by-default.sh: info: Enabled listen on IPv6 in /etc/nginx/conf.d/default.conf
/docker-entrypoint.sh: Launching /docker-entrypoint.d/20-envsubst-on-templates.sh
/docker-entrypoint.sh: Launching /docker-entrypoint.d/30-tune-worker-processes.sh
/docker-entrypoint.sh: Configuration complete; ready for start up
 to: 192.168.5.2:8080 {GET / HTTP/1.1} upstream_response_time 0.155 request_time 0.155
172.17.0.1 - - [06/Mar/2023:13:52:58 +0000] "GET /ords/ HTTP/1.1" 301 169 "-" "Mozilla/5.0 (Macintosh; Intel Mac OS X 10_15_7) AppleWebKit/537.36 (KHTML, like Gecko) Chrome/110.0.0.0 Safari/537.36"
 to: 192.168.5.2:8090 {GET /ords/ HTTP/1.1} upstream_response_time 2.356 request_time 2.356
 to: 192.168.5.2:8080 {GET /ords/f?p=4550:1:117375695883225::::: HTTP/1.1} upstream_response_time 2.101 request_time 2.101
 to: 192.168.5.2:8090 {GET / HTTP/1.1} upstream_response_time 0.006 request_time 0.006
172.17.0.1 - - [06/Mar/2023:13:53:03 +0000] "GET /ords/ HTTP/1.1" 301 169 "-" "Mozilla/5.0 (Macintosh; Intel Mac OS X 10_15_7) AppleWebKit/537.36 (KHTML, like Gecko) Chrome/110.0.0.0 Safari/537.36"
 to: 192.168.5.2:8080 {GET /ords/ HTTP/1.1} upstream_response_time 2.045 request_time 2.045
From the NGINX logs you can see that traffic is being alternated between the ORDS instance listening on port 8080 and 8090.
As before, the request goes over HTTPS through NGINX and routed upstream to an ORDS instance.
You can stop a container and restart it to confirm the failover works as before.
Conclusion
Building on the previous articles you now have both NGINX and ORDS running in Docker and using an Autonomous Database. This is still effectively a development / proof of concept environment because the DNS entry and SSL certificate are not properly setup to operate seamlessly. The nginx.conf is hardcoded with two upstream ORDS instances to use and the containers are using two specific ports on the host machine. In the next article we’ll look at using docker compose so that we have more flexibility around this.
Using the Dockerfile from this article you have created an ORDS image which can be used to run ORDS commands and update your configuration in ords-adbs-config. As an additional exercise you can look into increasing pool size (jdbc.MaxLimit) and doing a rolling restart of the two ORDS docker containers to pick up that configuration change.