RESTful Car-Racing Example

Updated for 23ai. The structure for Duality Views changed from 23free to 23ai release. In summary, the identifiers for rows are now _id rather than driverId, raceId, teamId.

Oracle Database 23c Free introduced the concept of JSON-Relational Duality Views which allows you to overlay a JSON document representation over a relational data model. In this article we’ll take Car-Racing Duality View Tutorial setup script and build on that to explore Oracle’s RESTful interface to Duality Views – Oracle REST Data Services (ORDS)

What Are JSON-Relational Duality Views?

JSON-Relational Duality Views provide a seamless way to interact with both JSON documents and relational data within Oracle Database. These views expose relational data as JSON documents, allowing developers to perform query and DML (Data Manipulation Language) operations using conventional SQL or directly with JSON.

Key Features and Benefits:

Unified Access:

  • Developers can choose their preferred approach: SQL for relational data or JSON for document-centric applications.
  • Changes made via one method automatically reflect in the other, maintaining consistency.

Updatable Views:

  • Duality views allow insertion, update, deletion, and querying of documents.
  • Inserting a row into the root table creates a new document, and changes propagate automatically.

Document-Identifier Field:

  • Each document has an identifier (e.g., _id) that corresponds to the primary-key columns of the underlying tables.
  • Ensures efficient updates and consistency.

Integration with APIs:

  • Use SQL/JSON functions, Oracle Database API for MongoDB, Simple Oracle Document Access (SODA), or Oracle REST Data Services (ORDS) to manipulate data.
  • Analytics, reporting, and machine learning can operate on the same data using SQL, PL/SQL, JavaScript, or C.

Car-Racing Example: The Track Ahead

Data related to Formula 1 car races are used in Oracle documentation to present the feature. In our car-racing example, we’ll explore three kinds of documents:

1. Team Document

Contains information about racing teams, including team names and the drivers associated with each team. The underlying tables are TEAM and DRIVER. Example team duality view structure:

{
  "_id":307,
  "name":"Williams",
  "points":15,
  "driver":[
    {
      "driverId":115,
      "name":"Alexander Albon",
      "points":15
    },
    {
      "driverId":116,
      "name":"Logan Sargeant",
      "points":0
    }
  ]
}

2. Driver Document

Represents individual drivers, including their names, and team affiliations. The underlying tables are DRIVER, TEAM and DRIVER_RACE_MAP. Example driver duality view structure:

{
  "_id":115,
  "name":"Alexander Albon",
  "points":15,
  "teamId":307,
  "team":"Williams",
  "race":[
    {
      "driverRaceMapId":22,
      "raceId":202,
      "name":"Saudi Arabian Grand Prix",
      "finalPosition":3
    }
  ]
}

3. Race Document

Captures race details, podium standings, and results for each driver. The underlying tables are RACE, DRIVER, and DRIVER_RACE_MAP. Example driver duality view structure:

{
  "_id":202,
  "name":"Saudi Arabian Grand Prix",
  "laps":50,
  "date":"2022-03-27T00:00:00",
  "podium":{},
  "result":[
    {
      "driverRaceMapId":24,
      "position":1,
      "driverId":101,"
      name":"Max Verstappen"
    }
  ]
}

These example Duality Views and their corresponding tables can be created using DualityViewTutorial.sql which sets to scene for Using JSON-Relational Duality Views.

Setup for Oracle REST Data Services (ORDS)

The Using JSON-Relational Duality Views chapter outlines some examples of using ORDS and references the Support for JSON-Relational Duality View chapter in the ORDS documentation but does not go into details on how to achieve that.

Here’s an additional script for REST Enabling the tables and views so that an access token is required to access them. The following has been tested using the Oracle Developer DB Virtual Machine with Oracle 23free Database. See previous articles on the topic: Oracle Developer DB Virtual Machine – a closer look and Get the latest – Enhance your DB Developer VM. The database account used is HR which has already been REST Enabled. From here on, every URL will start with http://localhost:8080/ords/hr/ because that is the easiest to reference with the Developer DB Virtual Machine.

BEGIN
    ords.enable_object(p_object => 'TEAM', p_auto_rest_auth => TRUE);
    ords.enable_object(p_object => 'DRIVER', p_auto_rest_auth => TRUE);
    ords.enable_object(p_object => 'RACE', p_auto_rest_auth => TRUE);
    ords.enable_object(p_object => 'DRIVER_RACE_MAP', p_auto_rest_auth => TRUE);
    ords.enable_object(p_object => 'RACE_DV', p_object_type => 'VIEW', p_auto_rest_auth => TRUE);

    ords.enable_object(p_object => 'DRIVER_DV', p_object_type => 'VIEW', p_auto_rest_auth => TRUE);

    ords.enable_object(p_object => 'TEAM_DV', p_object_type => 'VIEW', p_auto_rest_auth => TRUE);

    oauth.delete_client(p_name => 'Car Racing Client');
    oauth.create_client(p_name => 'Car Racing Client', 
                    p_grant_type => 'client_credentials', 
                    p_description => 'Used for interacting with Car Racing Duality View Examples', 
                    p_owner => sys_context( 'userenv', 'current_schema' ),
                    p_support_email => 'janus@example.com', 
                    p_privilege_names => null);
  OAUTH.grant_client_role(
    p_client_name => 'Car Racing Client',
    p_role_name   => 'oracle.dbtools.role.autorest.HR.TEAM'
  );

  OAUTH.grant_client_role(
    p_client_name => 'Car Racing Client',
    p_role_name   => 'oracle.dbtools.role.autorest.HR.DRIVER'
  );
  OAUTH.grant_client_role(
    p_client_name => 'Car Racing Client',
    p_role_name   => 'oracle.dbtools.role.autorest.HR.RACE'
  );
  OAUTH.grant_client_role(
    p_client_name => 'Car Racing Client',
    p_role_name   => 'oracle.dbtools.role.autorest.HR.DRIVER_RACE_MAP'
  );
  OAUTH.grant_client_role(
    p_client_name => 'Car Racing Client',
    p_role_name   => 'oracle.dbtools.role.autorest.HR.RACE_DV'
  );
  OAUTH.grant_client_role(
    p_client_name => 'Car Racing Client',
    p_role_name   => 'oracle.dbtools.role.autorest.HR.DRIVER_DV'
  );
  OAUTH.grant_client_role(
    p_client_name => 'Car Racing Client',
    p_role_name   => 'oracle.dbtools.role.autorest.HR.TEAM_DV'
  );

    COMMIT;
END;
/

That pl/sql block makes the tables and views available through ORDS AutoREST but to access them requires authorisation and Car Racing Client OAuth client is created with the necessary roles to do that. It is a client credentials OAuth client so to see the username and password generated for it just run this query:

SELECT client_id, client_secret 
FROM user_ords_clients 
WHERE name = 'Car Racing Client';

CLIENT_ID CLIENT_SECRET
--------------------------- --------------------------------
x9mADG7hKJNlj4LNITBJ3Q.. alRNwbRmezM2E0YDPTe6eA..

That CLIENT_ID and CLIENT_SECRET are the username and password to use to get an access token so that the tables and views can be accessed through ORDS. More on getting that access token later. For now, let’s look at the tables and views. Send a request to http://localhost:8080/ords/hr/open-api-catalog/ and list of services available will include:

   {
"name": "RACE",
"links": [
{
"rel": "canonical",
"href": "http://localhost:8080/ords/hr/open-api-catalog/race/",
"mediaType": "application/openapi+json"
}
]
},
{
"name": "TEAM",
"links": [
{
"rel": "canonical",
"href": "http://localhost:8080/ords/hr/open-api-catalog/team/",
"mediaType": "application/openapi+json"
}
]
},
{
"name": "DRIVER",
"links": [
{
"rel": "canonical",
"href": "http://localhost:8080/ords/hr/open-api-catalog/driver/",
"mediaType": "application/openapi+json"
}
]
},
{
"name": "RACE_DV",
"links": [
{
"rel": "canonical",
"href": "http://localhost:8080/ords/hr/open-api-catalog/race_dv/",
"mediaType": "application/openapi+json"
}
]
},
{
"name": "TEAM_DV",
"links": [
{
"rel": "canonical",
"href": "http://localhost:8080/ords/hr/open-api-catalog/team_dv/",
"mediaType": "application/openapi+json"
}
]
},
{
"name": "DRIVER_DV",
"links": [
{
"rel": "canonical",
"href": "http://localhost:8080/ords/hr/open-api-catalog/driver_dv/",
"mediaType": "application/openapi+json"
}
]
},
{
"name": "DRIVER_RACE_MAP",
"links": [
{
"rel": "canonical",
"href": "http://localhost:8080/ords/hr/open-api-catalog/driver_race_map/",
"mediaType": "application/openapi+json"
}
]
}

Follow those canonical links for an OpenAPI V3 description of the services available. For example, http://localhost:8080/ords/hr/open-api-catalog/driver_dv/ will show something like this…

Portion of the OpenAPI V3 document for driver_dv Duality View

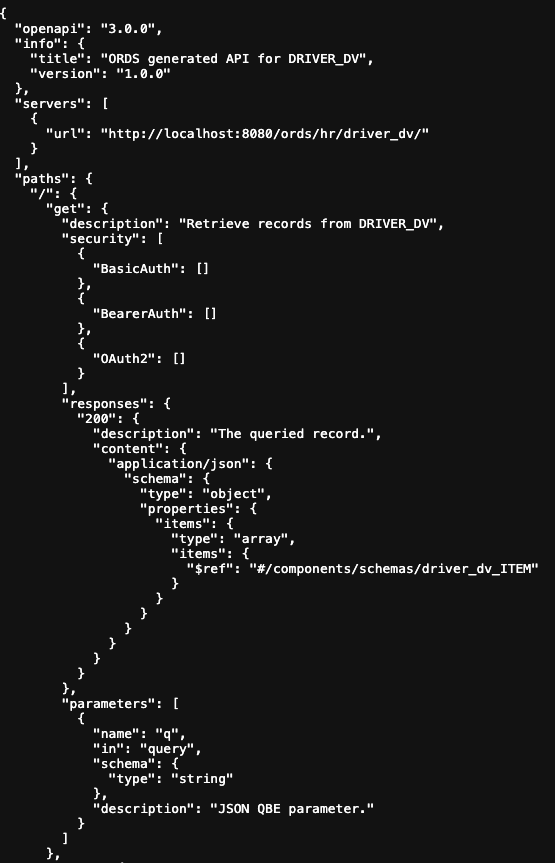
That OpenAPI V3 document can be imported into your development or integration tools so you can get started with building clients to use the services straight away. As a convenience, ORDS Database Actions provides a graphical interface for the OpenAPI document.

In the AutoREST section of ORDS Database Actions REST Workshop the REST Enabled objects are listed.
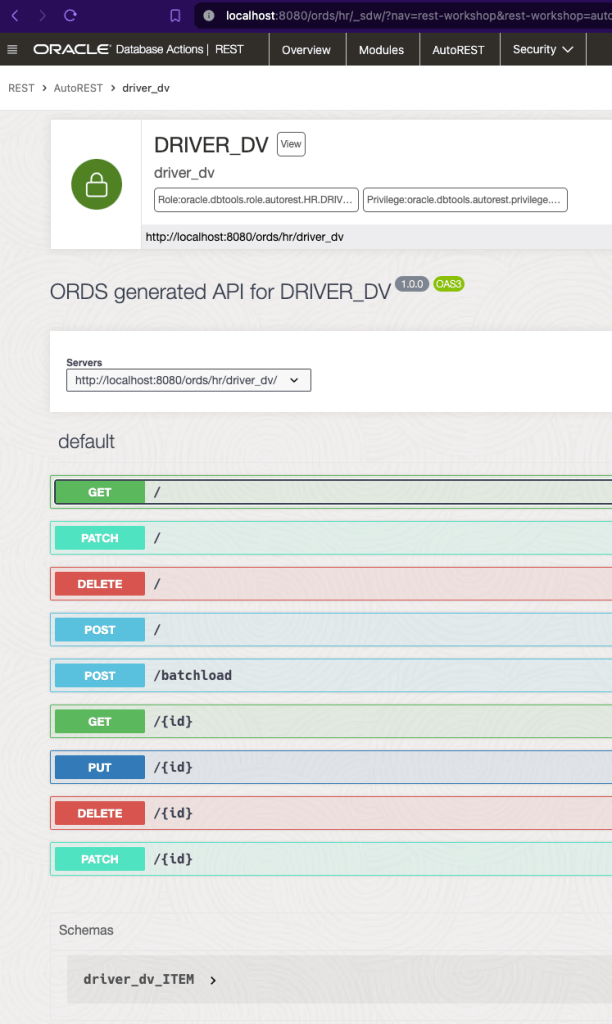
Select OpenAPI View for a visual representation of the OpenAPI V3 document.

Try It Out

In that OpenAPI View there’s even the option to invoke that service directly from your browser.

Expand the operation and details of parameters, expected responses, etc. are shown included this “Try it out” button

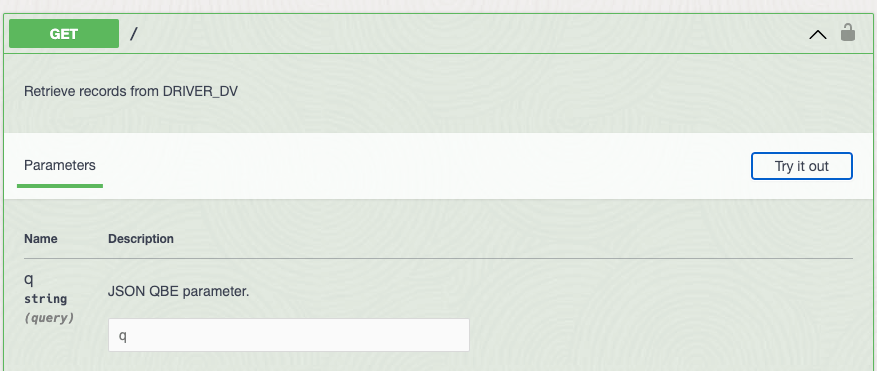
Click on “Try it out” and an Execute button appears at the bottom of the Parameters section.

While in “Try it out” mode we can specific parameters and execute a request.

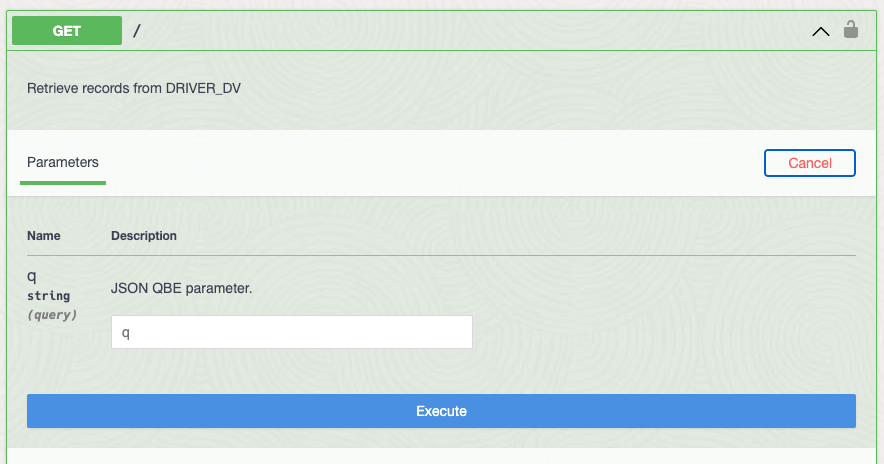
The parameters are optional so just press that Execute button to “Retrieve records from DRIVER_DV”. Note that this is the same as running the following from the command line:

curl -X 'GET' \
  'http://localhost:8080/ords/hr/driver_dv/' \
  -H 'accept: application/json'
The DRIVER_DV endpoint is protected so a request without a valid access token will be rejected.

The DRIVER_DV, in fact none of the Car-Racing example tables and duality views, can be accessed through ORDS without authorisation.
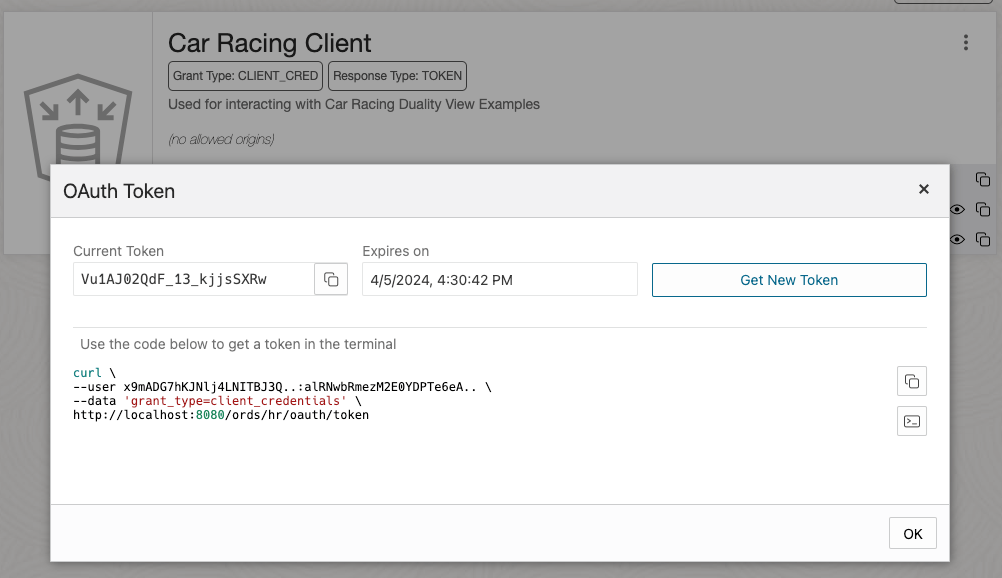
Client Access Token

Let’s get that access token. The PL/SQL block for REST Enabling the tables and views also created a client with the necessary roles for access them: Car Racing Client. We retrieved the Client ID and Client Secret ( aka username and password ) earlier. Those credentials are used to obtain an access token and that access token is sent with every request to ORDS. The database user can revoke that access token and even remove the OAuth client so it is more secure than always relying on usernames & passwords. ORDS supports a variety of OAuth types as well as JWT Profiles for OpenID Connect. Now back to getting that access token…

Command Line

Using the Client ID and Client Secret as username and password the access token can be retrieved using cURL:

curl \
--user x9mADG7hKJNlj4LNITBJ3Q..:alRNwbRmezM2E0YDPTe6eA.. \
--data 'grant_type=client_credentials' \
http://localhost:8080/ords/hr/oauth/token

{
 "access_token":"Fs5Lrsu1g6XAP1mGXMnUig",
 "token_type":"bearer",
 "expires_in":3600
}

Note that every time a new OAuth access token ( aka Bearer token ) is issued the previous one issued for that OAuth client is invalidated. You only need to request a new one when the current one is about, or has already, expired.

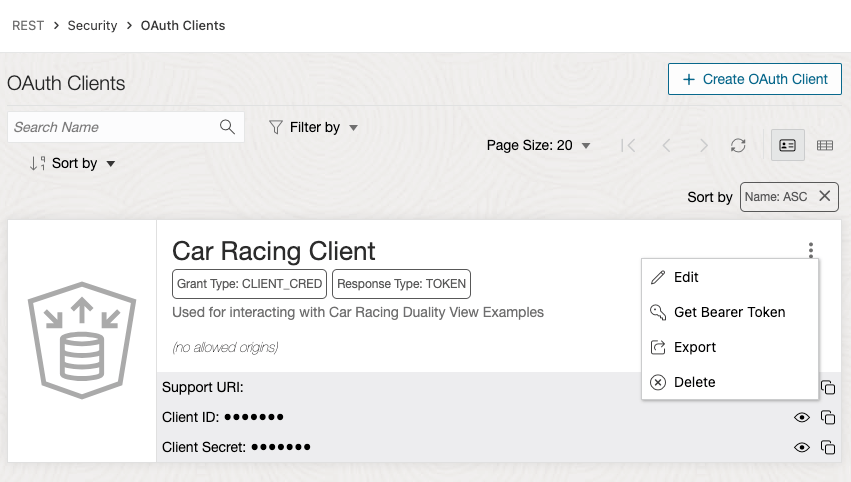
Using Database Actions

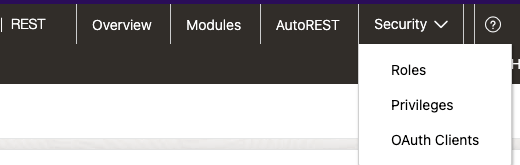
While in ORDS Database Actions REST Workshop and logged in as the HR user you can retrieve that information too by selecting Security -> OAuth Clients.

Head to OAuth Clients view for managing OAuth Clients
OAuth Clients can be managed from here or through ORDS OAuth package subprograms
Obtain a new token – note this value is different from the one previously retrieved and has invalidated it.

Try It Out Again!

Now that we have a valid bearer token Vu1AJ02QdF_13_kjjsSXRw let’s use that in the OpenAPI View to try executing requests again. Navigate back to the OpenAPI View for DRIVER_DV.

Notice that the padlocks are unlocked indicating that now bearer / access token is saved

The Authorize button will launch a dialog box to set the bearer / access token to be used when making requests. Other authorisation flows are supported but since we have a bearer token already we’ll just set that…

A number of authorisation types are available but we’ll use the BearerAuth.

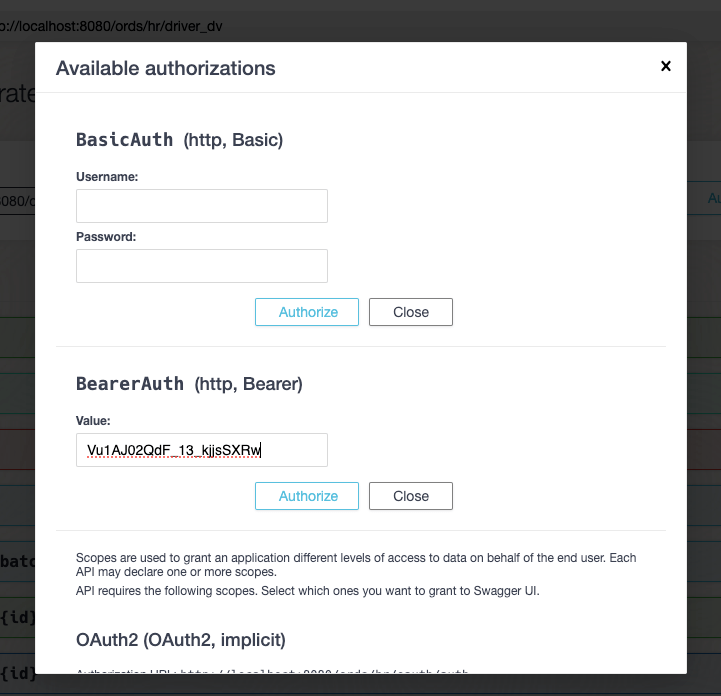
Enter the BearerAuth value and press Authorize to have it saved in the browser session. Now all HTTP requests executed in the OpenAPI View will have this token until you go back this “Available authorizations” dialog and press Logout. Let’s now use that token. Press the “Close” button and now you’ll see that the padlocks now show as locked. Repeating the steps for executing a GET request to Retrieve records from DRIVER_DV we now see data returned…

Success ! The Bearer token is accepted by ORDS and data is returned.

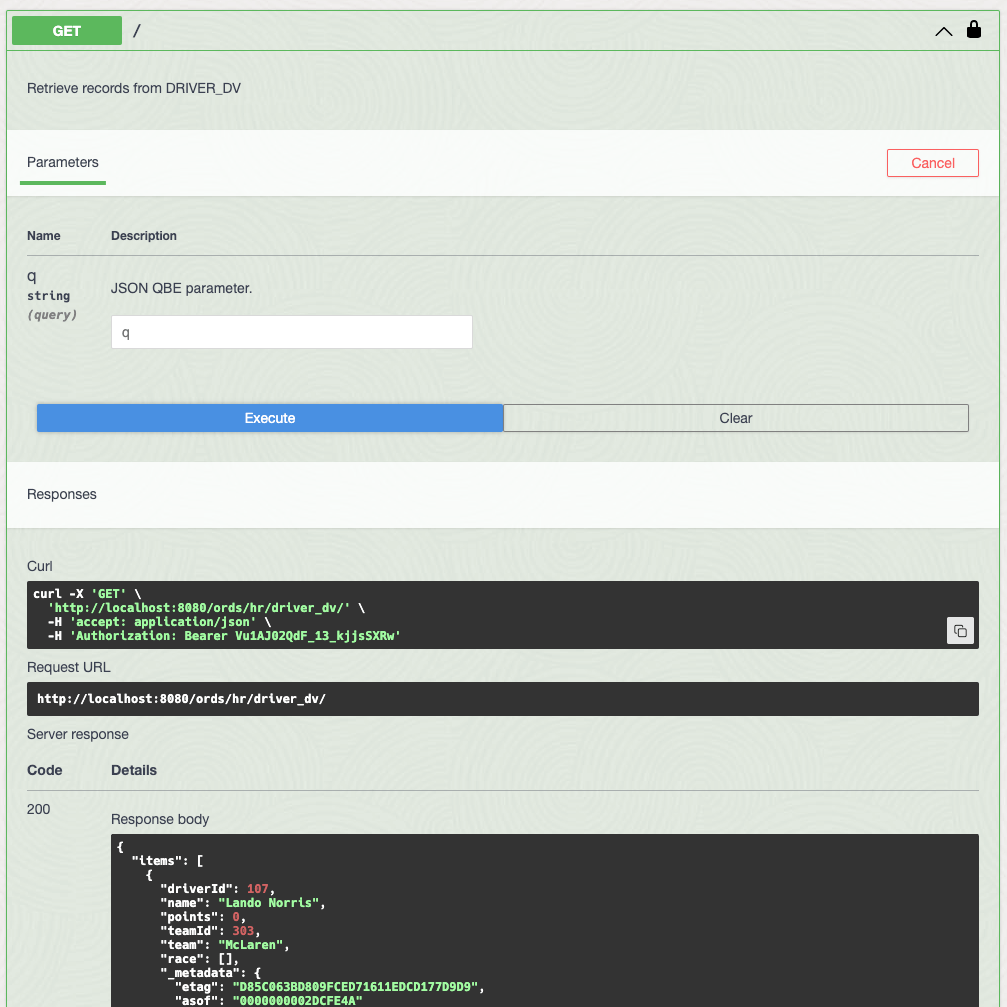
Note that the corresponding cURL command is also displayed so this could also has been executed from the command line as:

curl -X 'GET' \
  'http://localhost:8080/ords/hr/driver_dv/' \
  -H 'accept: application/json' \
  -H 'Authorization: Bearer Vu1AJ02QdF_13_kjjsSXRw'

There are a lot more operations listed so experiment on what you can do through the OpenAPI View or from cURL. Note that Duality View JSON QBE parameter for querying uses the same syntax as SODA so it is not exactly the same as the Filter Object syntax used for AutoREST of relational tables and views.

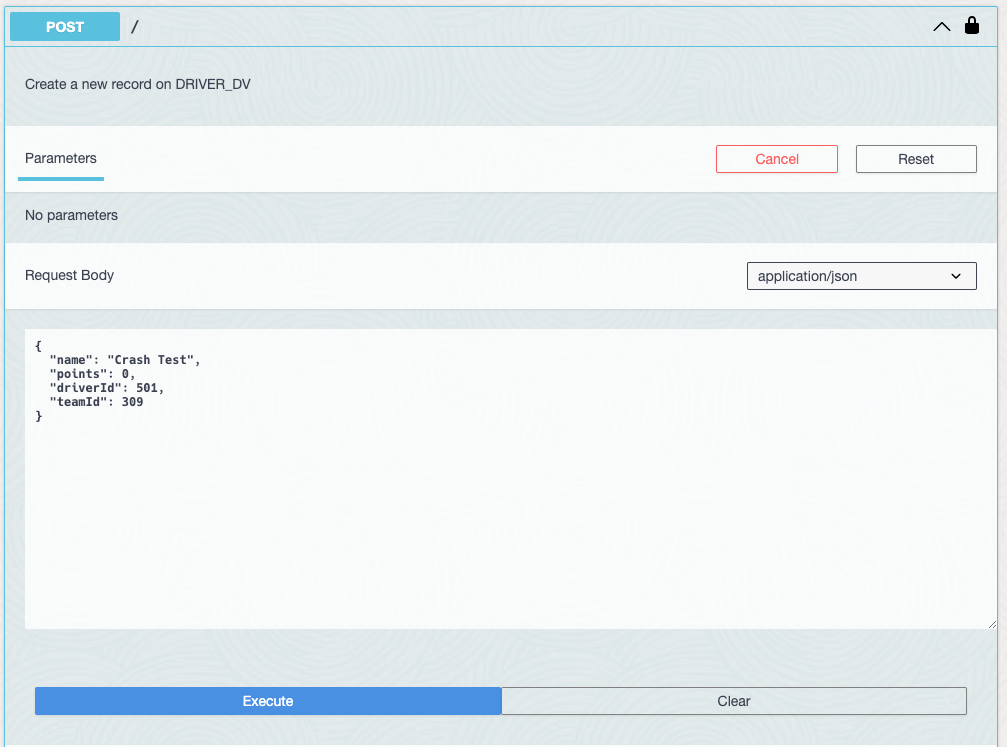
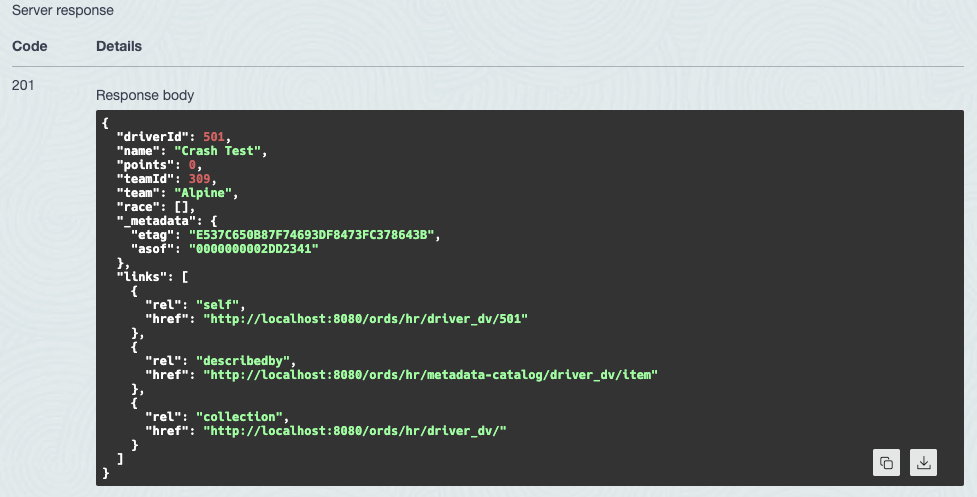
How about trying to create a new driver record?

Try out the POST operation to insert a new Driver!
“Crash Test” is now the latest driver for team Alpine!

Build out the team

Using those Duality View services now let’s start creating new teams and drivers using batchload which is covered in the ORDS documentation. This allows you to perform multiple inserts of data that spans multiple tables. In this case the TEAM and DRIVER tables behind the TEAM_DV Duality View. The add-team.json file contains data for 7 more teams with 2 drivers each. Download it and use the file to populate those tables in one single request…

curl -i -X POST --data-binary @add-team.json \
  -H "Content-Type: application/json" \
  -H 'Authorization: Bearer Vu1AJ02QdF_13_kjjsSXRw' \
  'http://localhost:8080/ords/hr/team_dv/batchload
HTTP/1.1 200 OK
Content-Type: text/plain
Transfer-Encoding: chunked

#INFO Number of rows processed: 7
#INFO Number of rows in error: 0
#INFO Last row processed in final committed batch: 7
SUCCESS: Processed without errors
Loading data to TEAM_DV creates Team and Driver records.

Relational Table

So far the focus has been on Duality Views but as one can see from the above image, the underlying table(s) for a Duality View get updated. ORDS can also provide access to these relational tables and the above PL/SQL block provided we have already configured that.

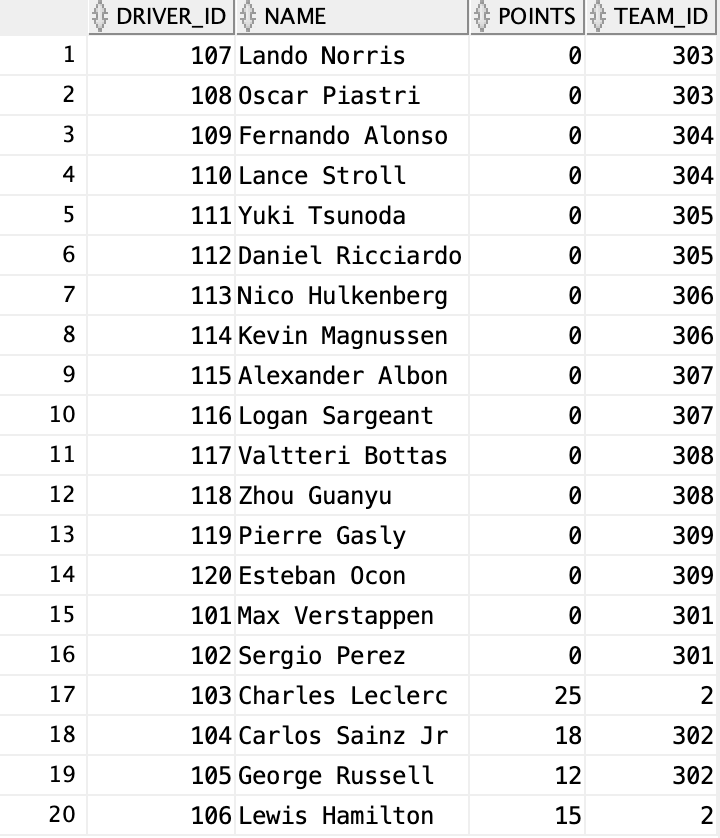
Let’s populate a few race results using ORDS:

curl --request POST \
  --url http://localhost:8080/ords/hr/driver_race_map/ \
  --header 'Content-Type: application/json' \
  --header 'Authorization: Bearer Vu1AJ02QdF_13_kjjsSXRw' \
  --data '{"race_id"   : 202, "driver_id" : 119, "position" : 4}'

curl --request POST \
  --url http://localhost:8080/ords/hr/driver_race_map/ \
  --header 'Content-Type: application/json' \
  --header 'Authorization: Bearer Vu1AJ02QdF_13_kjjsSXRw' \
  --data '{"race_id"   : 202, "driver_id" : 115, "position" : 3}'

curl --request POST \
  --url http://localhost:8080/ords/hr/driver_race_map/ \
  --header 'Content-Type: application/json' \
  --header 'Authorization: Bearer Vu1AJ02QdF_13_kjjsSXRw' \
  --data '{"race_id"   : 202, "driver_id" : 103, "position" : 2}'

curl --request POST \
  --url http://localhost:8080/ords/hr/driver_race_map/ \
  --header 'Content-Type: application/json' \
  --header 'Authorization: Bearer Vu1AJ02QdF_13_kjjsSXRw' \
  --data '{"race_id"   : 202, "driver_id" : 101, "position" : 1}'

Thanks to the driver_race_map_trigger created when we ran the DualityViewTutorial.sql script we can now see the impact on the DRIVER table with Max Verstappen going from zero points to 25.

The insert to DRIVER_RACE_MAP resulted in a points increase on DRIVER

GraphQL

In this Car-Racing example the underlying tables for the Duality Views have been REST Enabled which also means they can be queried using GraphQL if ORDS is running on Oracle GraalVM Enterprise Edition with JS component installed. The advantage of GraphQL is that it allows you to define a query across the relational tables without having to define a Duality View but it would be a read only query. You do not get the create, update and delete capabilities of JSON-Relational Duality Views.

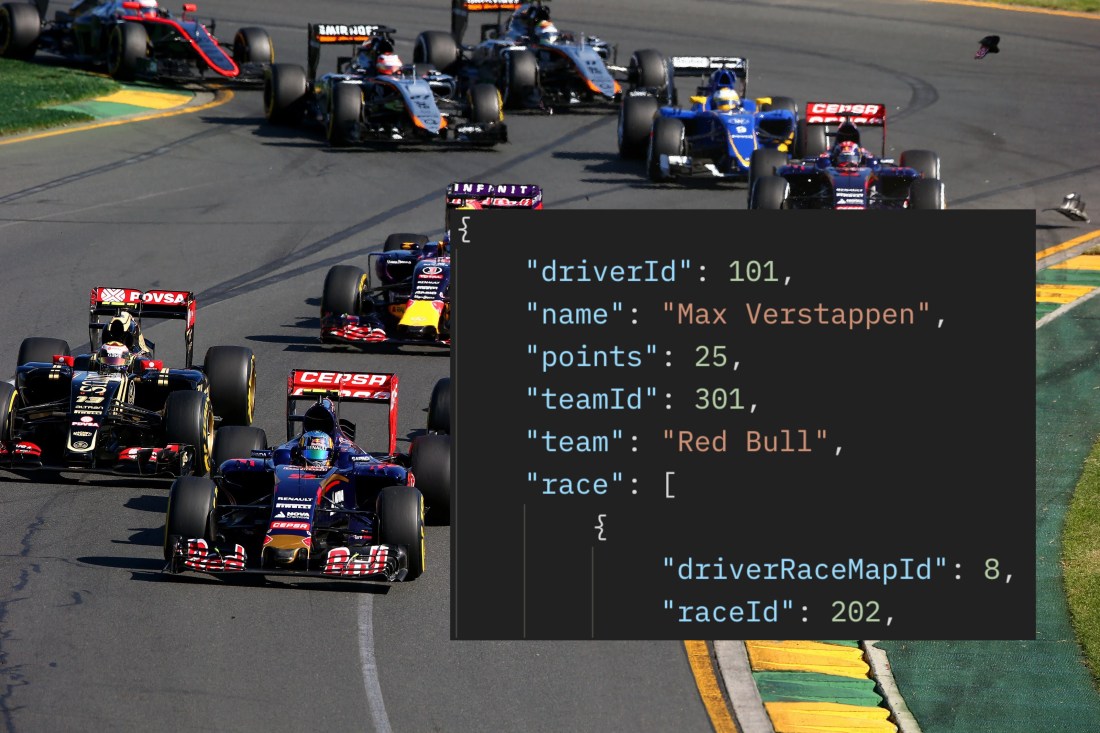
In this section we will take a look at a GraphQL query which can return the race date which is not currently included in the Driver Duality View. As a reminder, the Driver DV row looks like this:

{
"_id":101,
"name":"Max Verstappen",
"points":25,
"teamId":301,
"team":"Red Bull",
"race":[
{
"driverRaceMapId":8,
"raceId":202,
"name":"Saudi Arabian Grand Prix",
"finalPosition":1
}
]
}

It shows the data from DRIVER table, the team name from TEAM table, the RACE name and DRIVER_RACE_MAP finalPosition. However, it does not show the date of the race. Albeit in a slightly different structure, this GraphQL query will return the same data, plus the date of the race:

query Drivers {
driver
{
driver_id
name
points
team_id
team_team_id {
name
}
driver_race_map_driver_id {
driver_race_map_id
race_id
race_race_id {
name
race_date
}
position
}
}
}

It is slightly more nested and uses names reflecting the foreign key constraints between the tables but it does include race_date. Running the query through cURL is simply a POST to the GraphQL endpoint.

curl --location 'http://localhost:8080/ords/hr/_/graphql' \
--header 'Content-Type: application/json' \
--header 'Authorization: Bearer vSs7J_ILrcynMaPWyVcQLA' \
--data '{"query":"query Drivers {\n driver \n { \n driver_id \n name \n points \n team_id\n team_team_id {\n name\n }\n driver_race_map_driver_id {\n driver_race_map_id\n race_id\n race_race_id {\n name\n race_date\n }\n position\n }\n }\n}","variables":{}}'
Running GraphQL query through postman

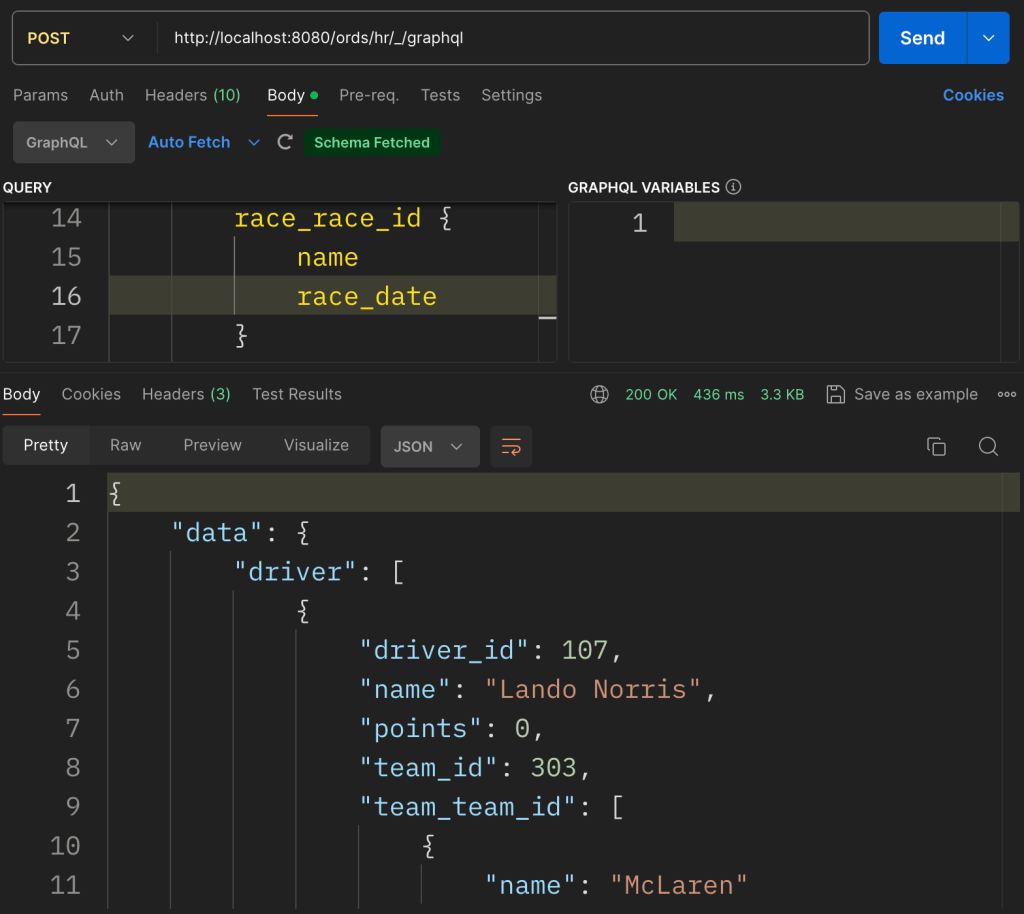
Note that running the query through postman still requires setting the access bearer token. The added advantage of postman’s support for GraphQL is that it will use the same endpoint ( /ords/hr/_/graphql ) to automatically fetch the GraphQL schema so developing the query is guided. Here is the GraphQL query response for that query. It is quite long but it is informative to compare it with the corresponding DRIVER_DV Duality View structure.

{
"data": {
"driver": [
{
"driver_id": 107,
"name": "Lando Norris",
"points": 0,
"team_id": 303,
"team_team_id": [
{
"name": "McLaren"
}
],
"driver_race_map_driver_id": []
},
{
"driver_id": 108,
"name": "Oscar Piastri",
"points": 0,
"team_id": 303,
"team_team_id": [
{
"name": "McLaren"
}
],
"driver_race_map_driver_id": []
},
{
"driver_id": 109,
"name": "Fernando Alonso",
"points": 0,
"team_id": 304,
"team_team_id": [
{
"name": "Aston Martin"
}
],
"driver_race_map_driver_id": []
},
{
"driver_id": 110,
"name": "Lance Stroll",
"points": 0,
"team_id": 304,
"team_team_id": [
{
"name": "Aston Martin"
}
],
"driver_race_map_driver_id": []
},
{
"driver_id": 112,
"name": "Daniel Ricciardo",
"points": 0,
"team_id": 305,
"team_team_id": [
{
"name": "RB"
}
],
"driver_race_map_driver_id": []
},
{
"driver_id": 111,
"name": "Yuki Tsunoda",
"points": 0,
"team_id": 305,
"team_team_id": [
{
"name": "RB"
}
],
"driver_race_map_driver_id": []
},
{
"driver_id": 113,
"name": "Nico Hulkenberg",
"points": 0,
"team_id": 306,
"team_team_id": [
{
"name": "Haas"
}
],
"driver_race_map_driver_id": []
},
{
"driver_id": 114,
"name": "Kevin Magnussen",
"points": 0,
"team_id": 306,
"team_team_id": [
{
"name": "Haas"
}
],
"driver_race_map_driver_id": []
},
{
"driver_id": 115,
"name": "Alexander Albon",
"points": 15,
"team_id": 307,
"team_team_id": [
{
"name": "Williams"
}
],
"driver_race_map_driver_id": [
{
"driver_race_map_id": 6,
"race_id": 202,
"race_race_id": [
{
"name": "Saudi Arabian Grand Prix",
"race_date": "2022-03-27T00:00:00Z"
}
],
"position": 3
}
]
},
{
"driver_id": 116,
"name": "Logan Sargeant",
"points": 0,
"team_id": 307,
"team_team_id": [
{
"name": "Williams"
}
],
"driver_race_map_driver_id": []
},
{
"driver_id": 118,
"name": "Zhou Guanyu",
"points": 0,
"team_id": 308,
"team_team_id": [
{
"name": "Kick Sauber"
}
],
"driver_race_map_driver_id": []
},
{
"driver_id": 117,
"name": "Valtteri Bottas",
"points": 0,
"team_id": 308,
"team_team_id": [
{
"name": "Kick Sauber"
}
],
"driver_race_map_driver_id": []
},
{
"driver_id": 119,
"name": "Pierre Gasly",
"points": 12,
"team_id": 309,
"team_team_id": [
{
"name": "Alpine"
}
],
"driver_race_map_driver_id": [
{
"driver_race_map_id": 5,
"race_id": 202,
"race_race_id": [
{
"name": "Saudi Arabian Grand Prix",
"race_date": "2022-03-27T00:00:00Z"
}
],
"position": 4
}
]
},
{
"driver_id": 120,
"name": "Esteban Ocon",
"points": 0,
"team_id": 309,
"team_team_id": [
{
"name": "Alpine"
}
],
"driver_race_map_driver_id": []
},
{
"driver_id": 101,
"name": "Max Verstappen",
"points": 25,
"team_id": 301,
"team_team_id": [
{
"name": "Red Bull"
}
],
"driver_race_map_driver_id": [
{
"driver_race_map_id": 8,
"race_id": 202,
"race_race_id": [
{
"name": "Saudi Arabian Grand Prix",
"race_date": "2022-03-27T00:00:00Z"
}
],
"position": 1
}
]
},
{
"driver_id": 102,
"name": "Sergio Perez",
"points": 0,
"team_id": 301,
"team_team_id": [
{
"name": "Red Bull"
}
],
"driver_race_map_driver_id": []
},
{
"driver_id": 105,
"name": "George Russell",
"points": 12,
"team_id": 302,
"team_team_id": [
{
"name": "Ferrari"
}
],
"driver_race_map_driver_id": []
},
{
"driver_id": 104,
"name": "Carlos Sainz Jr",
"points": 18,
"team_id": 302,
"team_team_id": [
{
"name": "Ferrari"
}
],
"driver_race_map_driver_id": []
},
{
"driver_id": 103,
"name": "Charles Leclerc",
"points": 43,
"team_id": 2,
"team_team_id": [
{
"name": "Mercedes"
}
],
"driver_race_map_driver_id": [
{
"driver_race_map_id": 7,
"race_id": 202,
"race_race_id": [
{
"name": "Saudi Arabian Grand Prix",
"race_date": "2022-03-27T00:00:00Z"
}
],
"position": 2
}
]
},
{
"driver_id": 106,
"name": "Lewis Hamilton",
"points": 15,
"team_id": 2,
"team_team_id": [
{
"name": "Mercedes"
}
],
"driver_race_map_driver_id": []
}
]
}
}

GraphQL requires ORDS to be running on GraalVM with the JS component installed but unlike Duality Views, you don’t require Oracle RDBMS 23 to use it. The Car-Racing relational tables could still be used in a 19c database for example. However, JSON-Relational Duality Views in Oracle RDBMS release 23 can do so much more.

Crossing the Finish Line

In this blog post we have taken the Car Racing example Duality Views and their corresponding tables, created using DualityViewTutorial.sql, and REST Enabled them for secure RESTful access through ORDS. Using batchload we loaded multiple team and driver records in one single request. We have interacted with the underlying tables and even performed dynamic cross table join queries using GraphQL. By introducing GraphQL into the conversation it makes the Duality View advantages much clearer.

JSON-Relational Duality Views provide a powerful bridge between the structured world of relational databases and the flexible world of JSON documents. Whether you’re building APIs, applications, or analytical tools, these views offer a unified approach to data manipulation on the fast track. 🏁🚀

Data Magic: Oracle HR REST Service with Faker.js Sample Data

About a year ago Oracle 23c Database Free became available as a preview of the new “converged database” which introduces a huge range of application developer concepts right in the database. Since then I’ve written a couple of articles about it in the context of the Oracle Developer DB Virtual Machine…

April 2023
January 2024

The latter covers upgrading your version of ORDS which is important for this article which will explore some Oracle Multilingual Engine ( MLE ) concepts which will require ORDS 23.4.0 ( or later ) just for the simplicity of the MLE editing support in Database Actions.

The goal here is to take Javascript based function which generates sample data and make that available as a REST service which will return data in a format which can be POSTed to the REST Enabled HR Employees table. Strictly speaking there’s no great advantage there because you could do that all in the DB anyway, but what gets covered here is the approach to take JSON data from Javascript and return it in the snake case format which can be used in Oracle REST Data Services.

Today we’re building on previous articles. In fact, the starting point is Jeff Smith’s Using JavaScript to create test data in Oracle Database 23c. Jeff’s blog post highlights all that Martin Bach’s article Using faker-js/Faker to generate test data respecting referential integrity in Oracle Database 23c delivers, showing how to follow Martin’s steps in Database Actions MLE JS editor. That can be run in your Oracle Developer DB Virtual Machine with ORDS 23.4.0. Of course you could just use the database in the VM and have ORDS 23.4.0 running outside it too. Either way, once you’ve gone through Jeff’s blog post you will have an MLE JavaScript module in place called MLE_FAKER and an MLE Call Specification called MLE_FAKER_API.

Therefore you can run this select statement to get a JSON object with random data for the HR Employee record:

select mle_faker_api.random_employee('female') employee;
Employee is a JSON object with random values but should be valid
The randomEmployee function uses camel case for field names
Responses for REST Enabled objects use snake case

You would think that you could use the generated JSON object as the payload body for a POST to the REST Enabled HR Employees table. The difference in naming convention for field names prevents that from happening. Send the mle_faker_api.random_employee JSON object to ORDS and you will get a HTTP 400 Bad Request response. Of course we could change the MLE_MAKER function implementation to use snake case. That would deviate from what Martin has implemented and he may have subsequent articles building on that implementation so it’s best to avoid interfering with that.

Camel to Snake – we’ll handle it

It is quite simple really, we write a PL/SQL block handler which will take the fields from the JSON object and define the OUT parameters using the field naming convention we want. The handler takes a gender parameter to pass to the call specification and defines the data types for the fields. The database JSON_VALUE function is key here…

DECLARE
random_employee JSON;
BEGIN
select mle_faker_api.random_employee(:gender)
into random_employee;
:first_name := JSON_VALUE(random_employee, '$.firstName');

For your convenience here is a script to define the module/template/handler…

BEGIN
  ORDS.DEFINE_MODULE(
      p_module_name    => 'mle_faker_api',
      p_base_path      => '/faker/',
      p_items_per_page => 25,
      p_status         => 'PUBLISHED',
      p_comments       => NULL);

  ORDS.DEFINE_TEMPLATE(
      p_module_name    => 'mle_faker_api',
      p_pattern        => 'employee',
      p_priority       => 0,
      p_etag_type      => 'HASH',
      p_etag_query     => NULL,
      p_comments       => NULL);

  ORDS.DEFINE_HANDLER(
      p_module_name    => 'mle_faker_api',
      p_pattern        => 'employee',
      p_method         => 'GET',
      p_source_type    => 'plsql/block',
      p_mimes_allowed  => NULL,
      p_comments       => NULL,
      p_source         => 
'DECLARE
  random_employee JSON;
begin
select mle_faker_api.random_employee(:gender) into random_employee;
:first_name := JSON_VALUE(random_employee, ''$.firstName'');
:last_name := JSON_VALUE(random_employee, ''$.lastName'');
:email := JSON_VALUE(random_employee, ''$.email'');
:phone_number := JSON_VALUE(random_employee, ''$.phoneNumber'');
:hire_date := JSON_VALUE(random_employee, ''$.hireDate'');
:job_id := JSON_VALUE(random_employee, ''$.jobId'');
:salary := JSON_VALUE(random_employee, ''$.salary'');
:commission_pct  := JSON_VALUE(random_employee, ''$.commissionPct'');
:department_id := JSON_VALUE(random_employee, ''$.departmentId'');
:manager_id := JSON_VALUE(random_employee, ''$.managerId'');

end;');

  ORDS.DEFINE_PARAMETER(
      p_module_name        => 'mle_faker_api',
      p_pattern            => 'employee',
      p_method             => 'GET',
      p_name               => 'gender',
      p_bind_variable_name => 'gender',
      p_source_type        => 'URI',
      p_param_type         => 'STRING',
      p_access_method      => 'IN',
      p_comments           => NULL);

  ORDS.DEFINE_PARAMETER(
      p_module_name        => 'mle_faker_api',
      p_pattern            => 'employee',
      p_method             => 'GET',
      p_name               => 'first_name',
      p_bind_variable_name => 'first_name',
      p_source_type        => 'RESPONSE',
      p_param_type         => 'STRING',
      p_access_method      => 'OUT',
      p_comments           => NULL);

  ORDS.DEFINE_PARAMETER(
      p_module_name        => 'mle_faker_api',
      p_pattern            => 'employee',
      p_method             => 'GET',
      p_name               => 'last_name',
      p_bind_variable_name => 'last_name',
      p_source_type        => 'RESPONSE',
      p_param_type         => 'STRING',
      p_access_method      => 'OUT',
      p_comments           => NULL);

  ORDS.DEFINE_PARAMETER(
      p_module_name        => 'mle_faker_api',
      p_pattern            => 'employee',
      p_method             => 'GET',
      p_name               => 'email',
      p_bind_variable_name => 'email',
      p_source_type        => 'RESPONSE',
      p_param_type         => 'STRING',
      p_access_method      => 'OUT',
      p_comments           => NULL);

  ORDS.DEFINE_PARAMETER(
      p_module_name        => 'mle_faker_api',
      p_pattern            => 'employee',
      p_method             => 'GET',
      p_name               => 'phone_number',
      p_bind_variable_name => 'phone_number',
      p_source_type        => 'RESPONSE',
      p_param_type         => 'STRING',
      p_access_method      => 'OUT',
      p_comments           => NULL);

  ORDS.DEFINE_PARAMETER(
      p_module_name        => 'mle_faker_api',
      p_pattern            => 'employee',
      p_method             => 'GET',
      p_name               => 'hire_date',
      p_bind_variable_name => 'hire_date',
      p_source_type        => 'RESPONSE',
      p_param_type         => 'STRING',
      p_access_method      => 'OUT',
      p_comments           => NULL);

  ORDS.DEFINE_PARAMETER(
      p_module_name        => 'mle_faker_api',
      p_pattern            => 'employee',
      p_method             => 'GET',
      p_name               => 'job_id',
      p_bind_variable_name => 'job_id',
      p_source_type        => 'RESPONSE',
      p_param_type         => 'STRING',
      p_access_method      => 'OUT',
      p_comments           => NULL);

  ORDS.DEFINE_PARAMETER(
      p_module_name        => 'mle_faker_api',
      p_pattern            => 'employee',
      p_method             => 'GET',
      p_name               => 'salary',
      p_bind_variable_name => 'salary',
      p_source_type        => 'RESPONSE',
      p_param_type         => 'DOUBLE',
      p_access_method      => 'OUT',
      p_comments           => NULL);

  ORDS.DEFINE_PARAMETER(
      p_module_name        => 'mle_faker_api',
      p_pattern            => 'employee',
      p_method             => 'GET',
      p_name               => 'commission_pct',
      p_bind_variable_name => 'commission_pct',
      p_source_type        => 'RESPONSE',
      p_param_type         => 'DOUBLE',
      p_access_method      => 'OUT',
      p_comments           => NULL);

  ORDS.DEFINE_PARAMETER(
      p_module_name        => 'mle_faker_api',
      p_pattern            => 'employee',
      p_method             => 'GET',
      p_name               => 'department_id',
      p_bind_variable_name => 'department_id',
      p_source_type        => 'RESPONSE',
      p_param_type         => 'INT',
      p_access_method      => 'OUT',
      p_comments           => NULL);

  ORDS.DEFINE_PARAMETER(
      p_module_name        => 'mle_faker_api',
      p_pattern            => 'employee',
      p_method             => 'GET',
      p_name               => 'manager_id',
      p_bind_variable_name => 'manager_id',
      p_source_type        => 'RESPONSE',
      p_param_type         => 'INT',
      p_access_method      => 'OUT',
      p_comments           => NULL);


COMMIT;

END;

Now a simple GET will return a generated sample Employee record using the snake case naming convention.

curl http://localhost:8080/ords/hr/faker/employee?gender=male

{
"first_name":"Tommie",
"last_name":"Dach",
"phone_number":"1.650.555.5072",
"job_id":"SA_MAN",
"department_id":20,
"email":"TDACH",
"hire_date":"2022-04-25T13:29:04.961000Z",
"salary":16520.0,
"manager_id":201
}

Which in turn can be used in a POST request to insert the record for real and generate an employee id.

The Employee JSON object is accepted and Tommie is employee number 221 !

Since one of the steps covered in Martin’s blog posts dealt with importing existing Javascript libraries ( Faker ) into the database, the transformation of the generated Employee JSON structure could possibly be achieved through Javascript libraries such as change-case. That’s a homework exercise for extra merit.

The real foundational work for this simple example of generating HR Employee sample data has been laid by Martin Bach. It was through building on that with a visual representation of the steps through ORDS’s Database Action UI that Jeff Smith brought it to my attention. I am grateful to both for the starting point they provided.

Invalid SNI – What is it and how to fix it

Everyone was happy. The web application uptime and response rates have been well within the Service Level Agreements for months. Uptake of the published REST Services was on the rise. Both internally and externally, more and more systems were consuming the services and the three ORDS instances behind an NGINX load balancer took it all in their stride. No long running queries or inefficient PL/SQL code locking DB resources. Everything humming along like a finely tuned engine. Then it came time to upgrade…

The ORDS product team have been operating to the usual cadence of one major release every 3 months. Although not ancient, our system is a few releases behind and not only are there interesting new features that are worth exploring but there’s always the security fixes to recent critical 3rd party Common Vulnerabilities and Exposures ( CVE ) that justifies being at the most recent stable release.

Upgrade time comes around so the test environment is setup to run through the ORDS upgrade process before applying the same to production. Then this happens for all the requests: HTTP ERROR 400 Invalid SNI

But this was working before I upgraded !

What is my SNI and how did it get invalid?

The same web server could be hosting multiple sites. In the case of ORDS, the same ORDS instance could have multiple domain name entries that route to it. Server Name Indication ( SNI ) is an extension to the Transport Layer Security (TLS) networking protocol for a client ( such as your browser ) to indicate to the server ( ORDS running standalone mode for example ) which site it wishes to talk to. To put it simply, SNI is used at the start of the secure connection handshake between client and server. The client sends a Host header in the request to indicate what site it is requesting and the server goes looking for its certificate for that server name. See https://datatracker.ietf.org/doc/html/rfc4366#section-3.1 for more details on the role of Server Name Indication in keeping communication secure.

You’ll notice from the stack trace and the error page that the Invalid SNI response does not look like a standard ORDS error page. It is in fact generated by the Eclipse Jetty embedded in ORDS when running in standalone mode.

org.eclipse.jetty.http.BadMessageException: 400: Invalid SNI
A typical ORDS generated error page. It looks a lot different from the Invalid SNI error page!

It is a feature, not a bug – Jetty 10

When running ORDS in standalone mode an embedded Eclipse Jetty server is used. Before ORDS 22.3.0 that was Jetty 9 but since that release ORDS has been using Jetty 10 and for very good reason: more secure. As mentioned in the second paragraph at the start of this article there a fixes and optimisation that are worth making the upgrade for. Jetty 10 addressed some issues in the TLS handshake. Not least Better handling for wrong SNI #5379. Beforehand it didn’t really matter what the client sent in the Host header, Jetty would return any certificate it had.

What is in that certificate anyway?

The certificate, self-signed or otherwise, holds some important information about the server and is essential in establishing trust. To see the contents of the certificate, use the keytool utility in your Java distribution.

keytool -printcert -file self-signed.pem 
Owner: CN=localhost
Issuer: CN=localhost
Serial number: 5e90f747912dd350
Valid from: Thu Feb 08 17:55:19 GMT 2024 until: Fri Feb 07 17:55:19 GMT 2025
Certificate fingerprints:
	 SHA1: FB:F2:E7:30:B5:3F:D1:8B:AC:D0:8E:C3:49:15:3B:B2:75:F1:6E:AD
	 SHA256: 54:B1:4E:6E:92:DC:7F:88:E8:66:6B:69:91:C9:E1:01:CB:69:97:4A:B7:24:BA:F9:A0:52:AC:F3:C3:15:AB:39
Signature algorithm name: SHA256withRSA
Subject Public Key Algorithm: 3072-bit RSA key
Version: 3

The above output shows that the Owner of this certificate has a Common Name ( CN ) value localhost which is the default standalone.https.host configuration setting value.

What to do about it

Now that you know the root cause how do you go about resolving it? It is as simple as ensuring the Common Name ( CN ) or Subject Alternative Name ( SAN ) field in the certificate matches what the client is sending the in Host header of the request. For more information on having more than one hostname in a single certificate see a previous article: Beyond the Common Name: Secure multiple domains with a single self-signed certificate

ORDS will generate a self-signed certificate if necessary when it is started in standalone mode and configured for HTTPS. In other words, the standalone.https.port is specified in the global configuration settings or --secure option is used in the ords serve command. If no certificate exists at the configured standalone.https.cert location, ORDS will generate the self-signed certificate and key file.

The Common Name used for the self-signed certificate is taken from the standalone.https.host configuration setting. If not set, the value is localhost. Traditional certificate practices often rely solely on the Common Name (CN) field. That’s the approach taken by ORDS by default when generating the self-signed certificate.

This can sometimes catch people out when they start up ORDS in secure standalone mode the first time. The self-signed certificate is generated but they may not have specified the standalone.https.host configuration setting and when they do later, they still get HTTP 400 Invalid SNI responses. That’s because the self-signed certificate is already generated so no matter what the standalone.https.host configuration setting says, the certificate will not be generated again.

Simple steps

The simplest course of action is to rename the self-signed certificate and key files and restart ORDS. It will not find the files and therefore will attempt to generate new self-signed certificates.

In summary, make sure the standalone.https.host configuration setting matches the Host header value that clients will send for requests being routed to your ORDS standalone server.

Get the latest – Enhance your DB Developer VM

As technology evolves, staying ahead is not just an option but a necessity. We can’t run headlong into every new technology though. Trying out new concepts without disrupting the systems that are relied upon day in, day out, requires caution. This year I have found the Oracle Developer DB Virtual Machine to be really useful for trying out new converged database concepts without impacting what I’m working with on a daily basis. By keeping the database and tools in a sandbox that I can just park and come back to when I’ve got time, I can comfortably fire up the VM and start experimenting.

In April of 2023 the Oracle DB Developer VM was released with the Oracle 23c Free database and related database tools which were released at the time. Just under 6 months later the virtual machine image was update in September 2023 to have more recent versions of those tools. In December 2023 ORDS 23.4.0 was released. Do you have to wait another 5 – 6 months before you can start using the latest release of ORDS? No – and this article will walk you through the steps to achieve that…

Inside Job

Everything is going to take place inside the VM so make sure that is running…

VirtualBox Graphical User Interface

In fact, most of the steps will be commands in one of the terminals. The user is oracle and the working directory is /home/oracle/. This is our starting point…

One of the terminal sessions already started

Current running ORDS

By default there’s only one ORDS instance running in your VM. Get the details of the current ORDS instance using the jps command with some options which will tell you what the startup parameters were. Piping through grep keeps the list to just the ords instances running in standalone mode…

jps -ml | grep ords

3488 /home/oracle/ords/ords.war --config /home/oracle/ords_config serve --port 8080 --apex-images /home/oracle/apex_images

From the above we have a process id but more importantly, confirmation that the configuration directory is /home/oracle/ords_config and that certain serve options are provided too. We will use that information later.

Download latest ORDS

Oracle REST Data Services is available under the Oracle Free Use Licence so the latest released version is always available at https://download.oracle.com/otn_software/java/ords/ords-latest.zip. Remember all these commands are taking place in /home/oracle/ unless otherwise stated.

[oracle@localhost ~]$ wget https://download.oracle.com/otn_software/java/ords/ords-latest.zip

--2024-01-03 12:57:37-- https://download.oracle.com/otn_software/java/ords/ords-latest.zip
Resolving download.oracle.com (download.oracle.com)... 23.36.48.85
Connecting to download.oracle.com (download.oracle.com)|23.36.48.85|:443... connected.
HTTP request sent, awaiting response... 200 OK
Length: 114754880 (109M) [application/zip]
Saving to: ‘ords-latest.zip’

ords-latest.zip 100%[==============================================>] 109.44M 9.58MB/s in 12s

2024-01-03 12:57:50 (9.18 MB/s) - ‘ords-latest.zip’ saved [114754880/114754880]

[oracle@localhost ~]$

Backup the current version

Just in case there is an issue and you need to go back to the version that came with your VM make a backup.

[oracle@localhost ~]$ cp -r ords ords_previous

Verify all the files are ready

Just make sure the files are in place…

[oracle@localhost ~]$ ls -l | grep ords
drwxrwxr-x. 10 oracle oracle 190 Sep 13 19:46 ords
drwxrwxr-x. 4 oracle oracle 37 Sep 13 19:46 ords_config
-rw-rw-r--. 1 oracle oracle 114754880 Dec 20 12:25 ords-latest.zip
drwxrwxr-x. 10 oracle oracle 190 Jan 3 12:59 ords_previous
[oracle@localhost ~]$

As you can see there’s the /home/oracle/ords/ directory that has the ORDS distribution that the VM shipped with. The /home/oracle/ords_config/ directory for ORDS configuration settings. The ords-latest.zip file which at the time of writing is ORDS 23.4.0. The /home/oracle/ords_previous/ directory which is a copy of the ORDS distribution that came with the virtual machine. Hopefully we’ll never have to use it.

Extract the ords-latest

Let’s put the most recent release of ORDS into it’s own directory…

[oracle@localhost ~]$ mkdir ords-latest
[oracle@localhost ~]$ unzip ords-latest.zip -d ords-latest
Archive: ords-latest.zip
creating: ords-latest/bin/
creating: ords-latest/linux-support/
creating: ords-latest/linux-support/man/
...
inflating: ords-latest/examples/plugins/lib/ords-plugin-apt-23.4.0.346.1619.jar
inflating: ords-latest/examples/plugins/lib/jakarta.inject-api-2.0.0.jar
inflating: ords-latest/examples/plugins/lib/ords-plugin-api-23.4.0.346.1619-javadoc.jar
[oracle@localhost ~]$ ls -l ords-latest
total 110032
drwxr-xr-x. 2 oracle oracle 34 Dec 12 16:36 bin
drwxr-xr-x. 3 oracle oracle 21 Dec 12 16:36 docs
drwxr-xr-x. 7 oracle oracle 93 Mar 27 2023 examples
drwxr-xr-x. 2 oracle oracle 28 Nov 24 17:50 icons
drwxr-xr-x. 3 oracle oracle 17 Nov 24 17:50 lib
-rw-r--r--. 1 oracle oracle 5996 Dec 12 05:35 LICENSE.txt
drwxr-xr-x. 3 oracle oracle 86 Dec 12 16:36 linux-support
-rw-r--r--. 1 oracle oracle 210 Dec 12 05:35 NOTICE.txt
-rw-r--r--. 1 oracle oracle 112653905 Dec 12 16:36 ords.war
drwxr-xr-x. 4 oracle oracle 38 Mar 27 2023 scripts
-rw-r--r--. 1 oracle oracle 365 Dec 12 05:35 THIRD-PARTY-LICENSES.txt
[oracle@localhost ~]$

Perform upgrade to DB

Now that you have the most recent version of ORDS you can upgrade the ORDS Metadata in the database. We must tell ORDS where the configuration directory is but we have that information from earlier…

[oracle@localhost ~]$ /home/oracle/ords-latest/bin/ords --config /home/oracle/ords_config install

ORDS: Release 23.4 Production on Wed Jan 03 13:06:06 2024

Copyright (c) 2010, 2024, Oracle.

Configuration:
/opt/oracle/userhome/oracle/ords_config/

Oracle REST Data Services - Interactive Install

Enter a number to select the type of installation
[1] Install or upgrade ORDS in the database only
[2] Create or update a database pool and install/upgrade ORDS in the database
[3] Create or update a database pool only
Choose [1]:

Just go with the default to upgrade ORDS in the database only and use SYS as the administrator. Remember that the password for everything in this Developer DB virtual machine is oracle. Here’s the output from running my upgrade…

Oracle REST Data Services - Interactive Install

Enter a number to select the type of installation
[1] Install or upgrade ORDS in the database only
[2] Create or update a database pool and install/upgrade ORDS in the database
[3] Create or update a database pool only
Choose [1]:
Enter a number to select the database pool to use or specify the database connection
[1] default jdbc:oracle:thin:@//localhost:1521/FREEPDB1
[2] Specify the database connection
Choose [1]:
Provide database user name with administrator privileges.
Enter the administrator username: sys
Enter the database password for SYS AS SYSDBA:
Connecting to database user: SYS AS SYSDBA url: jdbc:oracle:thin:@//localhost:1521/FREEPDB1

Retrieving information.
Connecting to database user: ORDS_PUBLIC_USER url: jdbc:oracle:thin:@//localhost:1521/FREEPDB1
2024-01-03T13:07:08.935Z INFO Created folder /opt/oracle/userhome/oracle/ords_config/logs
2024-01-03T13:07:08.936Z INFO The log file is defaulted to the current working directory located at /opt/oracle/userhome/oracle/ords_config/logs
2024-01-03T13:07:09.036Z INFO Upgrading Oracle REST Data Services schema 23.2.3r2421937 to version 23.4.0.r3461619 in FREEPDB1
2024-01-03T13:07:16.182Z INFO Completed upgrade for Oracle REST Data Services version 23.4.0.r3461619. Elapsed time: 00:00:07.1

2024-01-03T13:07:16.183Z INFO Log file written to /opt/oracle/userhome/oracle/ords_config/logs/ords_upgrade_2024-01-03_130708_93718.log

Symbolic gesture

This is not entirely necessary but we are going to make /home/oracle/ords/ a soft symbolic link so we can point it to whatever directory we like. If necessary, pointing it to /home/oracle/ords_previous/ if we encounter a problem.

[oracle@localhost ~]$ rm -rf ords
[oracle@localhost ~]$ ln -s ords-latest ords
[oracle@localhost ~]$ /home/oracle/ords/bin/ords --version

ORDS: Release 23.4 Production on Wed Jan 03 13:13:10 2024

Copyright (c) 2010, 2024, Oracle.

Configuration:
/opt/oracle/userhome/oracle/

Oracle REST Data Services 23.4.0.r3461619
[oracle@localhost ~]$

That confirms we have /home/oracle/ords/ now pointing to the ORDS we just downloaded.

Serve it up!

Although /home/oracle/ords/ now points to the latest release of ORDS the currently running version of ORDS is the previous one. We could just restart the VM to address that. The ORDS service is defined with the DB service in /etc/init.d/oracle so the database and ORDS can be restarted together. Just for now, let’s find the ORDS standalone instance, stop it and start it in the terminal window just to see that the same startup command gives us ORDS 23.4.0.

# Find the currently running ORDS instance and kill it
ps -ef | grep ords
kill -9 <pid>

# Restart ORDS
/bin/bash /home/oracle/ords/bin/ords --config /home/oracle/ords_config serve --port 8080 --apex-images /home/oracle/apex_images

2024-01-03T13:22:51.292Z INFO

Mapped local pools from /home/oracle/ords_config/databases:
/ords/ => default => VALID


2024-01-03T13:22:51.547Z INFO Oracle REST Data Services initialized
Oracle REST Data Services version : 23.4.0.r3461619
Oracle REST Data Services server info: jetty/10.0.18
Oracle REST Data Services java info: Java HotSpot(TM) 64-Bit Server VM 11.0.19+9-LTS-224

That confirms the same ORDS serve command that we saw at the top of this article will startup ORDS in standalone mode listening on port 8080.

ORDS 23.4.0 running on Database Developer VM

Stop and Start

Starting ORDS in standalone mode is part of the service startup for the VM so powering off the VM and starting it again will bring you back to the clean state of new terminal windows, but the version of ORDS running is now 23.4.0. When there is a more recent version of ORDS released that can be extracted into a new directory and the /home/oracle/ords/ soft symbolic link could be changed to point to that.

Restart the VM and the version of ORDS is the latest

Success! You now have your Oracle Database 23c Free VirtualBox Appliance running with the most recent version of ORDS.

Unlock GraphQL – ORDS on GraalVM with Docker

ORDS 23.3.0 introduced GraphQL functionality which makes it possible for a user to define complex queries on REST Enable tables and views in the database. Specific information on how to use GraphQL is in the ORDS Developer Guide. Although ORDS is known as a Java Web Application, the GraphQL implementation is primarily in JavaScript. To use the GraphQL feature, ORDS must be running on Oracle GraalVM with the JavaScript component installed.

That’s as simple as downloading the Oracle GraalVM ( for Java 11 or Java 17 ), installing the JavaScript component, and running ORDS as usual with that JVM. See GraalVM Configuration in the Installation and Configuration Guide.

Running with docker / podman / kubernetes is also straight forward but there are one or two steps that may not be intuitive. Building on concepts introduced in a previous article I’ll walk through the steps to create an image for running the latest release of ORDS on Oracle GraalVM Enterprise.

The goal is to build a docker image which is based on a GraalVM image. The build process for that image will install the required GraalVM JavaScript component and download the latest release of ORDS. The resulting image can be used to spin up a new container which is running ORDS standalone. Similar to the containers used from the above previous article, the containers will use a shared docker volume for configuration.

Getting GraalVM

GraalVM is a high-performance runtime that provides support for various programming languages and execution modes. It includes a Java Virtual Machine (JVM) that is enhanced with the GraalVM compiler, which can improve the performance of Java applications such as ORDS. GraalVM is a polyglot virtual machine that supports multiple programming languages, including JavaScript, Python and more. To use these programming languages, specific components must also be installed, and as is common, licences for their use must be agreed. The Oracle Free Use Terms and Conditions licence that ORDS is available under, and the GraalVM Free Use Terms and Conditions licence that GraalVM is available under, do not extend to these components. Although convenient Docker images are available, to run a Java application which also uses JavaScript requires that JavaScript runtime component to be installed in the image. To install that component requires an activated download token which confirms you have accepted the software licence. This article will cover getting that token, but first, which image should be used?

GraalVM Image

Oracle GraalVM Enterprise container images are published in the Oracle Container Registry and there are quite a few to choose from. The following images are available:

Image NameDescription
jdk-eeA compact image containing the GraalVM Enterprise JDK.
native-image-eeA compact image containing the GraalVM Enterprise native-image utility and JDK
enterpriseProvides the GraalVM Enterprise JDK along with the gu (Graal Updater) utility to enable installation of additional features.
nodejs-eeIncludes the Node.js runtime and the GraalVM Enterprise JDK.
Images available at container-registry.oracle.com

We will require a GraalVM Enterprise JDK to run ORDS which is a Java application but will also require the JavaScript component installed so we’ll need the Graal Updater utility too. That means the enterprise image is the one for us. In fact, we’ll use container-registry.oracle.com/graalvm/enterprise:ol8-java17 which gives us a Java 17 JDK. At the time of writing, the only supported Java versions for ORDS are Java 11 and Java 17.

GraalVM Download Token

To install the GraalVM JavaScript component requires an activated download token. This token indicates that you have accepted a licence agreement for using the component and in this article we pass it as a parameter when building the image. There are a number of ways to obtain a token, in fact just by using the Graal Updater utility ( gu ) to install a component will initiate it…

Downloading: Artifacts catalog from gds.oracle.com
Skipping ULN EE channels, no username provided.
Downloading: Component catalog from www.graalvm.org
Processing Component: Graal.js
Enter your download token and press ENTER, or press ENTER to generate a new download token.
Enter a valid download token:

However, at this stage up may not have the Graal Updater on your machine. The most convenient way on a unix based operating system with bash is the handy dandy GraalVM Download Token Generator.

bash <(curl -sL https://get.graalvm.org/ee-token)

That will run a script to generate a token and initiate the licence agreement process. In this scenario I just copy the token string rather than persisting it.

About to request a download token for GraalVM Enterprise Edition...
Please provide an email address and review Oracle's Privacy Policy at https://www.oracle.com/legal/privacy/privacy-policy.html.
Enter a valid email address: pobalopalous@ordsexample.org
Your new download token is: 'NzY4MDYwYTk4ZjIyMTZmNTgzYWE3NzMwNGFkOGJiMmIwZTVlYTU3MmI3YThjZmY3NzExYzFlOWQxNjgyNTUwZGNiNzUxNmNlODIxNTkwYjM0MjA4NzkwNDVhNzUx'
Please check your email inbox and accept the license to activate your download token.
Would you like to persist this token in '/Users/pobalopalous/.gu/config' on this machine? (y/N): N
Download token not persisted.

Now I have an 88 character token but it has not been activated. Next, I must check my email for a link to accept the licence.

Email for activating the download token
Click that “Accept license and verity download token” button

The link will take you through the Oracle SSO sign-on process if you’re not already logged in. Keep the download token value safe. It will be baked into your docker image so do not go publishing the image out on the internet, in other words … distributing the software, because the token can be linked back to your Oracle SSO account.

Get Building

Now that an activated download token is at hand we can get on with building the docker image. The Dockerfile is very similar to the one used in Get started with Oracle REST Data Services (ORDS) and Docker but has a couple of extra lines for installing the JavaScript component.

#
# Defines a docker image, based on the Oracle JDK image, to run Oracle REST Data Services. During the image building 
# process the most recent version of ORDS will be automatically downloaded and extracted.
#
# Volumes for configuration and lib/ext are defined.
#
# docker run -p 8080:8080 -v ords-config:/opt/ords-config/ -v ords-lib-ext:/opt/ords/latest/lib/ext ords-latest/graaljdk
#
# See https://peterobrien.blog/ for more information and examples.
#
FROM container-registry.oracle.com/graalvm/enterprise:ol8-java17
MAINTAINER Peter O'Brien

# Get an Oracle Graal EE Download token and provide that value when building the image.
# See https://github.com/graalvm/graalvm-jdk-downloader/blob/main/README.md#set-up-a-download-token-for-graalvm-enterprise-edition-installations
# docker build  --build-arg="GRAAL_TOKEN=Get your own token" --tag ords-latest/graaljdk .
# Note that token will be baked into the image.
ARG GRAAL_TOKEN
ENV GRAAL_EE_DOWNLOAD_TOKEN=$GRAAL_TOKEN
RUN gu install --auto-yes --non-interactive js

ENV LATEST=/opt/ords-latest/
ENV CONFIG=/opt/ords-config/
WORKDIR $LATEST
ADD https://download.oracle.com/otn_software/java/ords/ords-latest.zip $LATEST
RUN jar xf ords-latest.zip; rm ords-latest.zip; chmod +x bin/ords
VOLUME $LATEST/lib/ext/ $CONFIG
EXPOSE 8080
EXPOSE 8443
WORKDIR $CONFIG
ENTRYPOINT ["/opt/ords-latest/bin/ords"]
CMD ["serve"]

When running docker build with this Dockerfile the download token must be provided as an argument. Otherwise there will be a build failure similar to this:

Step 3/13 : RUN gu install --auto-yes --non-interactive js
 ---> Running in 86da6cdbc24f
Downloading: Artifacts catalog from gds.oracle.com
Skipping ULN EE channels, no username provided.
Downloading: Component catalog from www.graalvm.org
Processing Component: Graal.js
Enter your download token and press ENTER, or press ENTER to generate a new download token.
Enter a valid download token:The command '/bin/sh -c gu install --auto-yes --non-interactive js' returned a non-zero code: 5

Convenient Dockerfile

To make things even easier, I’ve created a Dockerfile that you can use and the only thing you have to change is the token value on the command line:

docker build  --build-arg="GRAAL_TOKEN=NzY4MDYwYTk4ZjIyMTZmNTgzYWE3NzMwNGFkOGJiMmIwZTVlYTU3MmI3YThjZmY3NzExYzFlOWQxNjgyNTUwZGNiNzUxNmNlODIxNTkwYjM0MjA4NzkwNDVhNzUx" --tag ords-latest/graaljdk https://gist.githubusercontent.com/pobalopalous/a8c78d45c69fdb40763c913e2bda82c6/raw/4b57a40639385085e51dae21dec4b3fec7b1708c/

Let’s break those docker build command arguments down..

--build-arg="GRAAL_TOKEN=NzY4MDYwYTk4ZjIyMTZmNTgzYWE3NzMwNGFkOGJiMmIwZTVlYTU3MmI3YThjZmY3NzExYzFlOWQxNjgyNTUwZGNiNzUxNmNlODIxNTkwYjM0MjA4NzkwNDVhNzUx"

This specifies the GRAAL_TOKEN build argument that the Dockerfile will use to set the GRAAL_EE_DOWNLOAD_TOKEN environment variable which is used by the gu install js command when building the image.

--tag ords-latest/graaljdk 

The image that we build is going to be called ords-latest/graaljdk. That will differentiate it from the ords-latest/oraclejdk image we created in Get started with Oracle REST Data Services (ORDS) and Docker.

https://gist.githubusercontent.com/pobalopalous/a8c78d45c69fdb40763c913e2bda82c6/raw/4b57a40639385085e51dae21dec4b3fec7b1708c/

That’s the URL for the Dockerfile build context I have created for you so you don’t have to copy the text locally. Isn’t that nice?

Run that with your download token and you’ll see something like this…

Downloading build context from remote url: https://gist.githubusercontent.com/pobalopalous/a8c78d45c69fdb40763c913e2bda82c6/raw/4b57a40Downloading build context from remote url: https://gist.githubusercontent.com/pobalopalous/a8c78d45c69fdb40763c913e2bda82c6/raw/4b57a40639385085e51dae21dec4b3fec7b1708c/ORDS_Latest_GraalVM_Dockerfile [==================================================>]  1.371kB/1.371kB
Sending build context to Docker daemon  3.072kB
Step 1/16 : FROM container-registry.oracle.com/graalvm/enterprise:ol8-java17
 ---> 64dca1a5fa2a
Step 2/16 : MAINTAINER Peter O'Brien
 ---> Running in 33db11ef151e
Removing intermediate container 33db11ef151e
 ---> d38b7a7f3b67
Step 3/16 : ARG GRAAL_TOKEN
 ---> Running in 7613b2d725f7
Removing intermediate container 7613b2d725f7
 ---> f67809364f83
Step 4/16 : ENV GRAAL_EE_DOWNLOAD_TOKEN=$GRAAL_TOKEN
 ---> Running in fa3dc864e3b5
Removing intermediate container fa3dc864e3b5
 ---> 5fb687d736d1
Step 5/16 : RUN gu install --auto-yes --non-interactive js
 ---> Running in 9fb627218998
Downloading: Artifacts catalog from gds.oracle.com
Skipping ULN EE channels, no username provided.
Downloading: Component catalog from www.graalvm.org
Processing Component: Graal.js
Downloading: Component js: Graal.js from gds.oracle.com
Installing new component: Graal.js (org.graalvm.js, version 22.3.3)
Refreshed alternative links in /usr/bin/
Removing intermediate container 9fb627218998
 ---> ecef6d97d8db
Step 6/16 : ENV LATEST=/opt/ords-latest/
 ---> Running in f661804977a7
Removing intermediate container f661804977a7
 ---> 1005a3e3690b
Step 7/16 : ENV CONFIG=/opt/ords-config/
 ---> Running in 50901e104315
Removing intermediate container 50901e104315
 ---> 8a376e3151ee
Step 8/16 : WORKDIR $LATEST
 ---> Running in bd9810fe29f9
Removing intermediate container bd9810fe29f9
 ---> c18a57d2a8db
Step 9/16 : ADD https://download.oracle.com/otn_software/java/ords/ords-latest.zip $LATEST
Downloading [==================================================>]  114.1MB/114.1MB
 ---> 3cec2554cd2b
Step 10/16 : RUN jar xf ords-latest.zip; rm ords-latest.zip; chmod +x bin/ords
 ---> Running in 50a97beac418
Removing intermediate container 50a97beac418
 ---> 3f9fff9bded5
Step 11/16 : VOLUME $LATEST/lib/ext/ $CONFIG
 ---> Running in 0276fc517e42
Removing intermediate container 0276fc517e42
 ---> 5a8b5e5947e6
Step 12/16 : EXPOSE 8080
 ---> Running in c4dbf726988b
Removing intermediate container c4dbf726988b
 ---> c2ad8e7b94d3
Step 13/16 : EXPOSE 8443
 ---> Running in da46a9b873a3
Removing intermediate container da46a9b873a3
 ---> 5619e6b04ece
Step 14/16 : WORKDIR $CONFIG
 ---> Running in d5959c70115b
Removing intermediate container d5959c70115b
 ---> 440d4e54a4ce
Step 15/16 : ENTRYPOINT ["/opt/ords-latest/bin/ords"]
 ---> Running in 4452ce4de261
Removing intermediate container 4452ce4de261
 ---> f23c5cf67824
Step 16/16 : CMD ["serve"]
 ---> Running in 9f9f69dce7ae
Removing intermediate container 9f9f69dce7ae
 ---> ab2e0a2981e0
Successfully built ab2e0a2981e0
Successfully tagged ords-latest/graaljdk:latest

If you have made it this far, you now have an ords-latest/graaljdk image ready to be put into action.

Now RUN !

This is the part we’ve been waiting for. Remember that just like in Get started with Oracle REST Data Services (ORDS) and Docker the database already has ORDS installed and the configuration directory is a docker volume called ords-adb-config which gets mapped to /opt/ords-config/ in the container.

docker run --detach --rm --name ords-latest-8080 \
             -p 8080:8080 \
             -v ords-adb-config:/opt/ords-config/ \
             ords-latest/graaljdk

That will run in the background so you can use the docker logs command to check the output: docker logs -f ords-latest-8080

ORDS: Release 23.3 Production on Fri Nov 17 13:32:11 2023

Copyright (c) 2010, 2023, Oracle.

Configuration:
  /opt/ords-config/

2023-11-17T13:32:11.890Z INFO        HTTP and HTTP/2 cleartext listening on host: 0.0.0.0 port: 8080
...
java.vm.name=Java HotSpot(TM) 64-Bit Server VM
java.vendor.version=GraalVM EE 22.3.3
...
2023-11-17T13:32:27.906Z INFO        

Mapped local pools from /opt/ords-config/databases:
  /ords/                              => default                        => VALID     


2023-11-17T13:32:28.233Z INFO        Oracle REST Data Services initialized
Oracle REST Data Services version : 23.3.0.r2891830
Oracle REST Data Services server info: jetty/10.0.17
Oracle REST Data Services java info: Java HotSpot(TM) 64-Bit Server VM 17.0.8+9-LTS-jvmci-22.3-b21

The GraphQL implementation in ORDS is based on REST Enabled tables and views. Therefore, to get any sensible use of GraphQL with ORDS one must first have a REST Enabled schema with some REST Enabled tables or views. Thankfully I already have that in my database so I can dive right in…

GraphQL in action with ORDS on GraalVM

Over to you

To sum it up, this article explained how to create a Docker image using GraalVM, specifically focusing on adding the JavaScript component needed for ORDS GraphQL. The image build process involves installing the GraalVM JavaScript part and downloading the latest ORDS release, resulting in a Docker image. Before doing so, you had to get and activate a download token so that the JavaScript component could be installed in the image. This image, when used, makes it easy to start a standalone ORDS container. You now have a straightforward solution for using ORDS GraphQL in a GraalVM environment that is ready for production.

To explore all the powerful querying options available to you with ORDS GraphQL see the relevant chapter in the ORDS Developer Guide.