- Introduction
- For your convenience
- Conclusion
Introduction
In a previous post, we explored how to use the Mustache template engine with ORDS mle/javascript Handlers to transform SQL query responses into application/json responses. If you missed that, check it out – Transform your SQL Results with Mustache and ORDS JavaScript Handlers.
The idea was inspired by a tweet from @FriedholdMatz and I put together an initial implementation at the time which I have since refined.
Easily done with @OracleREST ! I haven't written this up yet…TEMPLATES table contains a list of templates and mle/javascript handler does the work 👍 pic.twitter.com/mRQvTcbQJE
— Peter O'Brien (@pobalopalous) July 29, 2024
This follow-up dives deeper into the concept of using Mustache as a service, enabling users to submit their own template definitions and payloads for dynamic transformations. This service can be incredibly useful when you need to allow external users or applications to define how they want data structured without modifying your code every time.
In fact, this article is going to cover a wide range of subjects related to developing services with ORDS. These include:
- Use of implicit parameters both in query, PL/SQL and mle/javascript handlers.
- Protecting all services defined in a module using a single privilege definition.
- Invoking the secured services from Postman using OAuth 2.0 Client Credentials to automatically obtain a new bearer token.
Let’s walk through the implementation steps. As a REST Enabled user connect to your 23ai database where you have already defined your MLE library for Mustache as covered in the previous article. Just like in that article, our REST Enabled user in this article is the HR schema and all statements are executed in the database as that user.
NOTE! The following steps are based on Oracle 23ai MLE database objects which you should have created from Transform your SQL Results with Mustache and ORDS JavaScript Handlers. Having the MLE Module for Mustache and an MLE library making it available to mle/javascript handlers is a prerequisite.
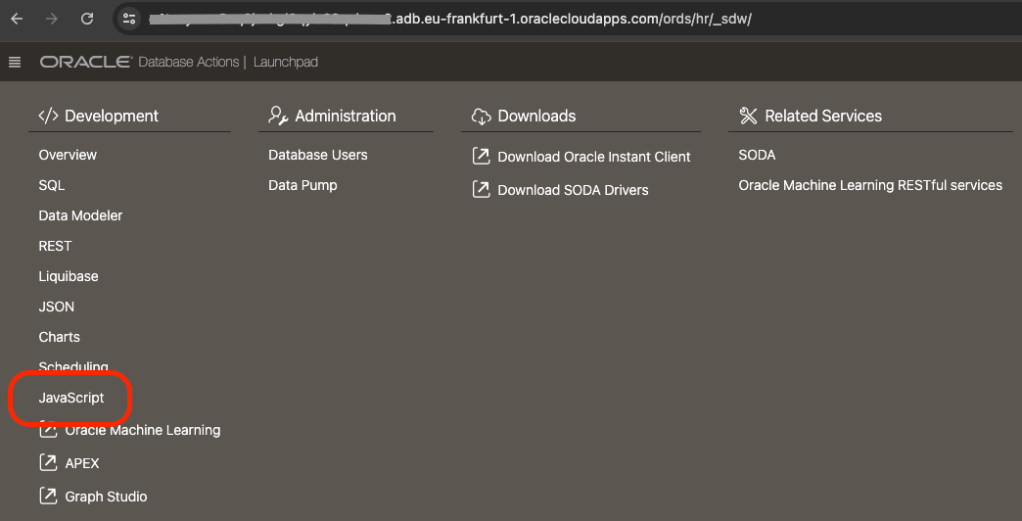
Step 1: Setting up the Database Table for Mustache Templates
First, we need a database table to store the template definitions. This table will allow clients to create and manage their templates, identified by a unique ID.
CREATE TABLE mustache_templates (
    template_id NUMBER GENERATED BY DEFAULT AS IDENTITY PRIMARY KEY,
    template_name VARCHAR2(100) not null,
    template_text CLOB not null,
    template_owner VARCHAR2(200) not null,
    template_content_type VARCHAR2(100) not null,
    created_at TIMESTAMP DEFAULT CURRENT_TIMESTAMP
);
In this table, template_name is used for a meaningful description of the Mustache template, while template_text will store the Mustache template itself. You will also notice a template_owner column which we will use to keep the rows distinct for each template owner. Put simply, a user, identified by their OAuth client identifier, manages their own templates. Both the primary key template_id and the created_at columns are automatically assigned values on insert.
Step 2: Defining ORDS services for Mustache Template creation, retrieval and use
Now, we need an API endpoint to submit, retrieve and use templates. Access to each row is going to be restricted based on the OAuth client identifier so we will require a slightly more complex set of logic than what REST Enabling the mustache_templates table will provide. That will all be taken care of in one module with base path = /templates/ and a few of REST Service templates defined. These are:
- /templates/. – This will have a GET handler to retrieve all rows the user has access to and a POST handler to add new Mustache templates.
- /templates/:id – This will have a GET handler to retrieve a specific Mustache template by template_id and a PUT handler to update that specific Mustache template.
- /templates/id/generate – This will have a single POST handler to apply the Mustache template to the request body and return the generated content.
The GET handlers will be simple query handlers. The PUT and handler will involve a PL/SQL block. One of the POST handlers will be defined using PL/SQL and the other will use JavaScript. In all cases they will use the ORDS provided implicit parameter for referencing the current user which will be the Client ID of the OAuth client used at runtime.
Define the ORDS REST module
This PL/SQL block will create the module which all the service handlers will belong to.
BEGIN
  ORDS.DEFINE_MODULE(
      p_module_name    => 'templates',
      p_base_path      => '/templates/',
      p_items_per_page => 25,
      p_status         => 'PUBLISHED');
  COMMIT;
END;
Define the ORDS REST templates
ORDS uses templated REST Service definitions and we will create three now:
BEGIN
  ORDS.DEFINE_TEMPLATE(
      p_module_name    => 'templates',
      p_pattern        => '.',
      p_comments       => 'Retrieve all Mustache templates the runtime user has access to and create new ones');

  ORDS.DEFINE_TEMPLATE(
      p_module_name    => 'templates',
      p_pattern        => ':id',
      p_comments       => 'Retrieve or update a specific Mustache template');

  ORDS.DEFINE_TEMPLATE(
      p_module_name    => 'templates',
      p_pattern        => ':id/generate',
      p_comments       => 'Transform the request payload using the specified Mustache template');

  COMMIT;
END;
With these in place the next step is to define the relevant handlers for the GET, PUT and POST methods.
GET: /templates/
This will retrieve all Mustache template records that the runtime user has access to. This query uses the implicit parameter :current_user and a special column alias $.id which is used to generate a self reference link in the response.
BEGIN
  ORDS.DEFINE_HANDLER(
      p_module_name    => 'templates',
      p_pattern        => '.',
      p_method         => 'GET',
      p_source_type    => 'json/collection',
      p_source         =>
'select TEMPLATE_ID as "$.id",
TEMPLATE_ID, TEMPLATE_NAME, TEMPLATE_CONTENT_TYPE, TEMPLATE_TEXT, CREATED_AT from MUSTACHE_TEMPLATES where TEMPLATE_OWNER = :current_user');
  COMMIT;
END;
The above handler will return a response similar to this when invoked by an authorised user:
{
"items": [
{
"template_id": 1,
"template_name": "Employees",
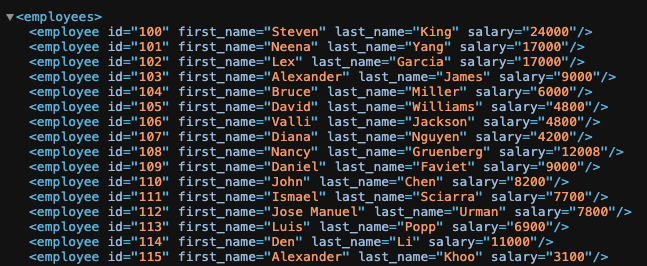
"template_content_type": "text/xml",
"template_text": "<employees>{{#rows}} <employee id=\"{{EMPLOYEE_ID}}\" first_name=\"{{FIRST_NAME}}\" last_name=\"{{LAST_NAME}}\" salary=\"{{SALARY}}\"/>{{/rows}}</employees>",
"created_at": "2024-10-06T20:33:43.816865Z",
"links": [
{
"rel": "self",
"href": "https://ords.example.com/ords/hr/templates/1"
}
]
},
{
"template_id": 2,
"template_name": "Baeldung Inverted Sections",
"template_content_type": "text/xml",
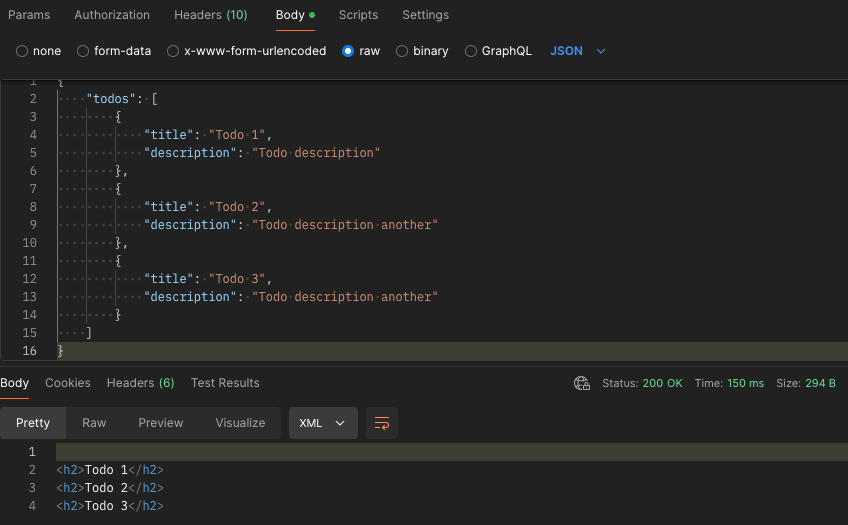
"template_text": "{{#todos}} <h2>{{title}}</h2> {{/todos}} {{^todos}} <p>No todos!</p> {{/todos}}",
"created_at": "2024-10-06T20:37:39.144667Z",
"links": [
{
"rel": "self",
"href": "https://ords.example.com/ords/hr/templates/2"
}
]
},
{
"template_id": 3,
"template_name": "Tsmean Mustache Example",
"template_content_type": "text/plain",
"template_text": "{{#users}} {{.}} {{/users}}",
"created_at": "2024-10-06T21:13:40.682858Z",
"links": [
{
"rel": "self",
"href": "https://ords.example.com/ords/hr/templates/3"
}
]
}
],
"hasMore": false,
"limit": 25,
"offset": 0,
"count": 3,
"links": [
{
"rel": "self",
"href": "https://ords.example.com/ords/hr/templates/"
},
{
"rel": "edit",
"href": "https://ords.example.com/ords/hr/templates/"
},
{
"rel": "describedby",
"href": "https://ords.example.com/ords/hr/metadata-catalog/templates/"
},
{
"rel": "first",
"href": "https://ords.example.com/ords/hr/templates/"
}
]
}
POST: /templates/
This handler is a PL/SQL handler which will insert a new Mustache template record. This handler has some content of note.
- The implicit parameter
:current_useris used to limit queries to rows that the runtime user has access to. - Once the runtime user has 10 Mustache templates they can not create any more.
- The implicit parameters
:status_codeand:forward_locationare used to generate a reference to the just inserted Mustache template. ORDS will generate a response body containing the json representation of that new record. - You will notice that parameters are not defined for :template_name, :template_content_type and :template_text. When not explicitly defined they are assumed to be fields in the request body.
- The p_mimes_allowed argument makes it clear that application/json payloads are expected by this handler.
BEGIN
  ORDS.DEFINE_HANDLER(
      p_module_name    => 'templates',
      p_pattern        => '.',
      p_method         => 'POST',
      p_source_type    => 'plsql/block',
      p_mimes_allowed  => 'application/json',
      p_source         =>
'DECLARE
  existing_templates_count NUMBER;
  new_template_id NUMBER;
BEGIN
    select count(*) into existing_templates_count from mustache_templates where TEMPLATE_OWNER = :current_user;
    if existing_templates_count < 10 then
      insert into MUSTACHE_TEMPLATES (TEMPLATE_NAME, TEMPLATE_CONTENT_TYPE, TEMPLATE_TEXT, TEMPLATE_OWNER) VALUES(:template_name, :template_content_type, :template_text, :current_user)
      RETURNING template_id INTO new_template_id;
      :status_code := 201;
      :forward_location := new_template_id;
    else
-- Too many records
       :status_code := 400;
    end if;
  END;');
  COMMIT;
END;
This handler will take a request payload such as the following…
{
            "template_name": "Deployment YAML",
            "template_content_type": "application/yaml",
            "template_text": "apiVersion: apps/v1\nkind: Deployment\nmetadata:\n  name: {{app_name}}\nspec:\n  replicas: {{replicas}}\n  selector:\n    matchLabels:\n      app: {{app_label}}\n  template:\n    metadata:\n      labels:\n        app: {{app_label}}\n    spec:\n      containers:\n      - name: {{container_name}}\n        image: {{image}}\n        ports:\n        - containerPort: {{port}}\n"
}
…and return a response like this…
HTTP/1.1 201 Created
Date: Tue, 08 Oct 2024 21:08:08 GMT
Content-Type: application/json
Transfer-Encoding: chunked
Connection: keep-alive
Content-Location: https://ords.example.com/ords/hr/templates/21
ETag: "jzuprj2x/Ns2nMQhQ9frDCwWLZH7T+B3S3klPT8FpP3MFejzkndlqsqFV80rx85Auh5N83fF5mKFb4sZd+haEg=="
Location: https://ords.example.com/ords/hr/templates/21

{
  "template_id":21,
  "template_name":"Deployment YAML",
  "template_content_type":"application/yaml",
  "template_text":"apiVersion: apps/v1\nkind: Deployment\nmetadata:\n name: {{app_name}}\nspec:\n replicas: {{replicas}}\n selector:\n matchLabels:\n app: {{app_label}}\n template:\n metadata:\n labels:\n app: {{app_label}}\n spec:\n containers:\n - name: {{container_name}}\n image: {{image}}\n ports:\n - containerPort: {{port}}\n","created_at":"2024-10-08T21:08:07.993387Z",
  "links":[
    {
      "rel":"self",
      "href":"https://ords.example.com/ords/hr/templates/21"
    },
    {
      "rel":"edit",
      "href":"https://ords.example.com/ords/hr/templates/21"
    },
    {
      "rel":"describedby",
      "href":"https://ords.example.com/ords/hr/metadata-catalog/templates/item"
    },
    {
      "rel":"collection",
      "href":"https://ords.example.com/ords/hr/templates/"
    }
  ]
}
GET: /templates/{id}
This will retrieve a Mustache template by its unique identifier. Similar to the GET /templates/ handler it is a simple query but uses the :current_user implicit parameter and the $.id alias for generating a self link in the response. Note that the value for :id in the query comes from the URL path pattern of the template.
BEGIN
  ORDS.DEFINE_HANDLER(
      p_module_name    => 'templates',
      p_pattern        => ':id',
      p_method         => 'GET',
      p_source_type    => 'json/item',
      p_source         =>
'select
   TEMPLATE_ID as "$.id",
   TEMPLATE_ID,
   TEMPLATE_NAME,
   TEMPLATE_CONTENT_TYPE,
   TEMPLATE_TEXT,
   CREATED_AT
from MUSTACHE_TEMPLATES
where TEMPLATE_OWNER = :current_user and TEMPLATE_ID = :id');

COMMIT;
END;
This returns the specific Mustach template requested so one can see what it produces based on the content in the template_text. Hopefully the template_name is descriptive too 😀
PUT: /templates/{id}
This handler will update an existing Mustache template if the runtime user has access to the row. Similar to the POST /templates/ handler it uses implicit parameters for the SQL query but also to instruct ORDS on how to generate the response.
BEGIN
  ORDS.DEFINE_HANDLER(
      p_module_name    => 'templates',
      p_pattern        => ':id',
      p_method         => 'PUT',
      p_source_type    => 'plsql/block',
      p_source         =>
'BEGIN
    update MUSTACHE_TEMPLATES set
    TEMPLATE_NAME = :template_name,
    TEMPLATE_CONTENT_TYPE = :template_content_type,
    TEMPLATE_TEXT = :template_text
    where template_id = :id and TEMPLATE_OWNER = :current_user;
    :status_code := 200;
    :forward_location := :id;
END;');
  COMMIT;
END;
POST: /templates/{id}/generate
And now the mle/javascript handler that will apply the Mustache template to the request body to return a generated document. The request payload will be the data to be used into the Mustache template which is specified by the templates identifier. This endpoint will:
- Retrieve the template corresponding to
template_id. - Use the JavaScript Mustache engine to transform the payload.
Similar to the mle/javascript handler in the previous article it relies on an MLE environment to reference the Mustache template. Other items to note about this mle/javascript handler:
- Checks the
content_typeimplicit parameter and returns an appropriate status code if it is not application/json. - Provides fetchInfo to database session so that it knows how to represent CLOB values from the TEMPLATE_TEXT column.
- Refers to the
:idparameter using the uri_parameters of the request. - Refers to the
current_userimplicit parameter
The syntax for referring to this parameters is covered in the ORDS Developer Guide – Manually Creating RESTful Services Using Javascript.
  ORDS.DEFINE_HANDLER(
      p_module_name    => 'templates',
      p_pattern        => ':id/generate',
      p_method         => 'POST',
      p_source_type    => 'mle/javascript',
      p_mle_env_name   => 'LIBRARY_ENV',
      p_source         =>
'
 (req, resp) => {
    if (''application/json''.localeCompare(req.content_type) != 0) {
       resp.status(415);
    } else {
        const requestBody = req.body;
          const template_query = ''select * from mustache_templates where template_id = :1 and template_owner = :2'';
          const options = { fetchInfo: { TEMPLATE_TEXT: { type: oracledb.STRING } } };
          const template_definition = session.execute(template_query, [req.uri_parameters.id, req.current_user], options);
          if (template_definition.rows.length != 1) {
            resp.status(404);
          } else {
                const mustache = await import(''mustache'');

                var output = mustache.default.render(template_definition.rows[0].TEMPLATE_TEXT, requestBody);
                resp.content_type(template_definition.rows[0].TEMPLATE_CONTENT_TYPE);
                resp.status(200);
                resp.send(output);
          }
    }
}
');
Invoking this service specifying the Mustache template id in the URL will transform the request payload into a generated document using the specified template. It will even set the response content type as specified by the Mustache template.

The eagle eyed reader will have noticed that this mle/javascript handler source is checking that the content type of the request is application/json and strictly speaking the Mustache Templating Engine can work with more than JSON as the source context. As an additional homework exercise you could explore working with different request payload structures.
Step 3: Protecting the Services
For this service we’re going to restrict access to only authenticated users. Note that every handler refers to the implicit parameter :current_user. Every row will belong to a specific template_owner user and that will correspond to an OAuth client that we can issue for each prospective user. To achieve that a Role must be defined and a Privilege explicitly protecting the module created earlier is required. Run this…
DECLARE
L_PRIV_ROLES owa.vc_arr;
L_PRIV_PATTERNS owa.vc_arr;
L_PRIV_MODULES owa.vc_arr;
BEGIN

ORDS.CREATE_ROLE(
    P_ROLE_NAME => 'blog.peterobrien.MustacheTemplateUser'
);

L_PRIV_MODULES( 1 ) := 'templates';
L_PRIV_ROLES( 1 ) := 'blog.peterobrien.MustacheTemplateUser';

ORDS.DEFINE_PRIVILEGE(
    P_PRIVILEGE_NAME => 'blog.peterobrien.MustachTemplate',
    P_ROLES => L_PRIV_ROLES,
    P_PATTERNS =>  L_PRIV_PATTERNS,
    P_MODULES => L_PRIV_MODULES,
    P_LABEL => 'Mustache Template Privilege',
    P_DESCRIPTION => 'Protects access to the Mustache Template module',
    P_COMMENTS=> 'Mustache Template module provides the managed and use of Mustache Template as a Service.'
);
COMMIT;
END;
Send a request to one of the handlers now and one should get a HTTP 401 response.
GET /ords/hr/templates/ HTTP/1.1
User-Agent: PostmanRuntime/7.41.0
Accept: */*
Cache-Control: no-cache
Host: ords.example.com
Accept-Encoding: gzip, deflate, br
Connection: keep-alive

HTTP/1.1 401 Unauthorized
Date: Tue, 08 Oct 2024 21:49:45 GMT
Content-Type: text/html
Content-Length: 451668
Connection: keep-alive
With the module now directly protected let’s create an OAuth client that can access it. Note that this is using OAUTH package but ORDS is moving to a new OAUTH_SECRETS package which I will refer to here when the documentation for it is published…
BEGIN
    ORDS_METADATA.OAUTH.CREATE_CLIENT(
        P_NAME => 'TemplateClient1',
        P_GRANT_TYPE => 'client_credentials',
        P_OWNER => 'HR',
        P_DESCRIPTION => 'A client for the Mustache Template as a Service module',
        P_SUPPORT_EMAIL => 'test@example.com',
        P_PRIVILEGE_NAMES => 'blog.peterobrien.MustachTemplate'
    );
    ORDS_METADATA.OAUTH.GRANT_CLIENT_ROLE(
        P_CLIENT_NAME => 'TemplateClient1',
        P_ROLE_NAME => 'blog.peterobrien.MustacheTemplateUser'
    );
    COMMIT;
END;
Execute a select statement on USER_ORDS_CLIENTS to get the CLIENT_ID and CLIENT_SECRET for this TemplateClient1.
select
   client_id, client_secret
from user_ords_clients
where name = 'TemplateClient1';
With that client_id and client_secret you can get an access token which can then be used to invoke the Mustache template services we have created. The :current_user value in our handlers will be the client_id value from the request.
For more information on protecting access to your ORDS services see the Developer Guide – Configuring Secure Access to RESTful Services.
Step 4: Some Postman OAuth token magic
The access token will expire after an hour and another one will have to be requested. Rather than going through all that manually we can use our REST client to manage that, even automatically requesting a new access token when the current one expires. In this article we’ll use Postman but there are alternatives. In fact if you are coding a client application to use the Mustache Template as a Service endpoints then a similar framework for handling the OAuth token lifecycle will be required. For Postman, we’ll define our authorisation flow and requests in a collection called Mustache.

The collection is useful for keeping important metadata in one place such as how authentication and authorisation will be achieved…

Let’s look at some of those specifics…
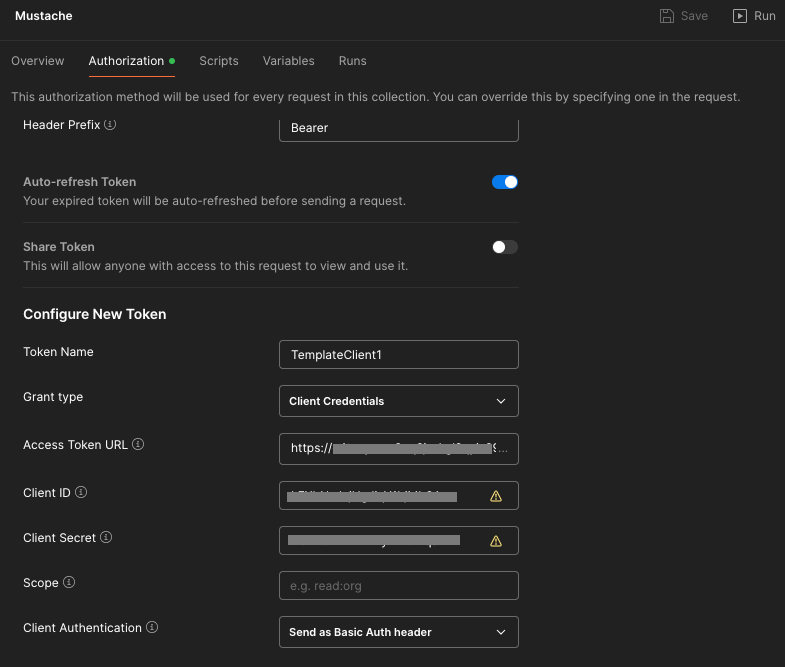
- The token name doesn’t really matter. You can use any name you want.
- The grant type should match your ORDS OAuth client definition: Client Credentials
- The access token URL will be the full URL for your REST Enabled schema’s access endpoint. Generally that is
<server>/ords/<schema alias>/oauth/tokenFor example: https://ords.example.com/ords/hr/oauth/token - The client ID and client secret comes from the query on user_ords_clients earlier.
- The client authentication should be
Send as Basic Auth header. Postman will send the Client ID and Client Secret as basic authentication to the Access Token URL endpoint to get an access token.
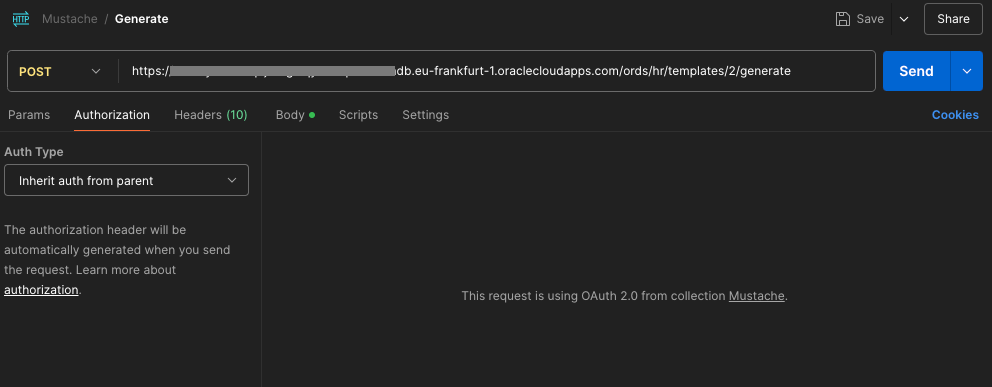
With that in place then every request defined in the Mustache collection can just inherit that definition from the collection and the OAuth client token lifecycle is all automagically taken care of.
For your convenience
The ORDS module / template / handler and OAuth client definition as well as the Postman collection definition are available at https://gist.github.com/pobalopalous/1d9ad8c36d81074bb9af146dc95dfe42 so you can get up and running fast. 🚀
Note that if you import that Mustache Collection into Postman the hostname referred to will be ords-23ai.adb.eu-frankfurt-1.oraclecloudapps.com which doesn’t exist. You will have to change those entries to point to your own system.
Don’t want to set this up yourself but still want to try it out? Leave a comment below and I’ll get back to you with your own Client ID and Client Secret for you to use on a trial basis for a few days. All I have to do is create a new OAuth client with the same privilege and role and then forward you the Client ID and Client Secret. After a few days I can just delete the OAuth client.
Conclusion
By extending ORDS with Mustache templates as a service, you now have a flexible system that allows users to dynamically define and utilize templates. This can be a practical, reusable tool for building customisable reporting, notifications, or any scenario where the structure of data needs to be adaptable.
Feel free to experiment with more complex templates and explore how Mustache’s logic-less approach can simplify many data transformation tasks in your applications.
Stay tuned for future articles where we dive deeper into templating and ORDS functionalities!
If you have any questions or feedback, drop a comment below.