Free and open source software (FOSS) has become an integral part of our lives. For those of us developing, hosting or supporting software applications anyway. Whether it’s a web server, a database, or a programming language, open source software is everywhere. That could be a single jar or javascript library, a framework, a utility or an entire software stack. It is hard to avoid it. Sometimes the free and open source option is the reference implementation for a specification which has a commercial alternative but it can be difficult to justify the cost of paying for that software. More often then not, one can find that modern commercial software systems are built with, or rely on, some form of free and open source software. It’s no surprise, considering all the benefits that come with it. Here are just a few reasons why it makes sense to use FOSS.
The case for free and open source
The reasons for choosing free and open source are compelling.
First and foremost, FOSS is free. This means that you don’t have to pay for a license or subscription, which can be a huge cost savings. It also means that you don’t have to worry about license renewals or updates. All of the software is available for free and can be used indefinitely.
Second, FOSS is open source, which means that anyone can view and modify the code. This makes it easier for developers to customise the software to meet their needs, and it can be a great way to learn programming.
Third, FOSS is typically more secure than proprietary software. The code is open, so any potential security vulnerabilities can be identified and fixed quickly. Additionally, many of these programs are built by volunteers and have a large community of users who can help identify and fix bugs.
Finally, and slightly similar to the previous point, FOSS can have a faster turnaround of fixes than proprietary software. Since the code is open, developers are more likely to fix bugs and make improvements more quickly. This can mean fewer interruptions to your workflow.
Overall, free and open source software makes a lot of sense for individuals and businesses alike. With so many benefits, it’s easy to see why FOSS has become so popular.
Hidden costs to the convenience
Complex systems involve a lot of components which need to be maintained
Unfortunately, many people are not aware of the importance of upgrading their open source software. Upgrading the components of the system is essential for keeping your system secure, stable, and up to date. Over time, vulnerabilities are discovered in software packages and the only way to fix these vulnerabilities is to upgrade to the latest version. By not upgrading, you are essentially leaving your system open to malicious attacks. You are not taking advantage of a core FOSS benefit.
As outlined earlier, upgrading to the latest version of a software component can give you access to bug fixes and performance enhancements that make your system more reliable and efficient. Furthermore, new features can be added to software packages to make them even more powerful and useful. Finally, upgrading open source software can help you stay ahead of the competition. By keeping your software up to date, you can ensure that you are using the latest technologies and staying ahead of the curve. This can help you gain an edge over your competitors and give you a competitive advantage. In conclusion, upgrading open source software is essential for keeping your system secure, stable, and up to date. It also can give you access to bug fixes, performance enhancements, and new features. Finally, it can help you stay ahead of the competition and give you a competitive advantage. So make sure you keep your open source software up to date!
Oracle REST Data Services does rely on components from third parties including FOSS components and critical vulnerabilities and exploits are regularly monitored for known issues that would require an upgrade. Not only that, keeping on top of the security support commitments for those libraries. That is one of the reasons ORDS moved to Eclipse Jetty 10 last year. When a new version of ORDS is available, it is recommended to upgrade as soon as possible.
Why upgrade to Apache Tomcat 10.1 though?
With complex dependencies an upgrade is not always easy
Upgrading is easier said than done though. The interdependencies of the components in a software system can be quite complex. Upgrading to the latest version of one component could cause another component to no longer work. There is a tension between trying to keep existing systems running, introduce new applications / functionality and reduce complexity / costs in the runtime environment.
Which sets the scene for why we’re discussing Apache Tomcat 10.1. Why would someone want to use Apache Tomcat 10.1?
Support considerations
We can expect Tomcat versions released after 2007 to have around 10 years of support before they reach end of life. Tomcat 7, for example, was released in 2011 and reached end of life in 2021. Tomcat 9.0 was released in 2017 and declared stable in 2018. At the time of writing, version 9.0.71 was released earlier this month. No end of life date has been specified but one can expect it to be around 2027. With five years to go for new releases with fixes to bugs and security vulnerabilities there’s no pressing need to move off Tomcat 9.0. However, with Tomcat 8.5 scheduled for EOL at the end of March 2024 anyone currently using Tomcat 8.5 in production would be considering the stable release with the longest runway: Tomcat 10.1.
Jakarta
At this point you’ll note that Tomcat 10.0 does not get a mention. It has already reached it’s EOL and no further builds for that particular release will happen, irrespective of any CVE reported against it. The most likely motivation for moving to Tomcat 10.1 is because it is a Jakarta EE platform. It builds on Tomcat 10.0.x and implements the Servlet 6.0, JSP 3.1, EL 5.0, WebSocket 2.1 and Authentication 3.0 specifications (the versions required by Jakarta EE 10 platform). For businesses or individuals that deploy multiple applications there may be a conflict with wanting to use Jakarta Servlet API based web applications in the same infrastructure they have Javax Servlet API based web applications. The main difference between Javax Servlet API and Jakarta Servlet API is the addition of new features in the Jakarta version. Jakarta Servlet API adds features such as asynchronous servlet requests, Non-blocking IO, improved security, and better integration with other Jakarta EE APIs. Having one single version of Apache Tomcat to maintain would be preferable.
ORDS running on Apache Tomcat 10.1
Your Jakarta Servlet API based applications and ORDS on the same Apache Tomcat 10.1 ! Photo by Christina Morillo on Pexels.com
ORDS is a web application based on the Javax Servlet API and as such can not be deployed as a regular web application in Tomcat 10.1 which expects web applications to be implemented using Jakarta Servlet API. Thankfully, Apache has provided a comprehensive migration guide to help make transitioning from any version of Tomcat 9 to Tomcat 10 as simple as possible. In addition to that, there is a migration utility which converts the java byte code of the javax.servlet.HttpServlet classes to jakarta.servlet.http.HttpServlet classes. This is really useful because it makes it possible to deploy the generated ords.war using the Apache Tomcat migration tool for Jakarta EE. https://tomcat.apache.org/migration-10.html#Specification_APIs
Referring to the Deploying ORDS on Apache Tomcat instructions it is simply a matter of generating the ords.war to the correct location:
ords --config /path/to/config war $CATALINA_HOME/webapps-javaee/ords.war
It really is as simple as that. This article was originally going to be a step by step guide but when you get down to it, there’s only one step!
Strictly speaking, Apache Tomcat 10.1 is not an officially supported release of Tomcat for deploying ORDS. At the time of writing it is Tomcat release 8.5.x through to release 9.0.x. Therefore, if there are any ORDS issues encountered the first thing you’ll be asked to do is see does the same issue occur with latest version of ORDS deployed on a recent Tomcat 9.0.x release.
Use of the Apache Tomcat migration tool for Jakarta EE to have ORDS running on Apache Tomcat 10.1 is worth considering if one has Jakarta Servlet API based web applications to deploy and only want a single version of Tomcat running.
Are you looking for an effective way to monitor the performance of your Oracle REST Data Services deployments? ORDS provides a RESTful interface for Oracle databases. It allows you to access and manipulate data stored in Oracle databases in a secure and efficient manner. That efficiency depends on a multitude of factors. There is a reason you will not find any documented guidance on sizing of JVM memory, garbage collection, or UCP pool size. The appropriate settings are unique to the real world scenarios that the product will be used in. The optimum settings will be different from customer to customer, workload to workload. For most customers the defaults will probably be just fine. As their workload increases, with more concurrent clients, spinning up an additional ORDS instance in their cluster is generally the only change in the deployment topology. Slow response times are generally due to inefficient queries rather than not allocating heap space or the number of CPUs available.
What if you want to delve into the usage of computing resources when ORDS is running? Oracle Application Process Monitoring (Oracle APM) can help you get the job done. It is an enterprise-grade monitoring solution designed to help you identify, analyse, and troubleshoot performance issues in your applications. When you use ORDS with Oracle APM, you can monitor the performance of your deployment in real-time, allowing you to make informed decisions about where and when to make performance tuning changes to the topology. Oracle APM is available as part of the Oracle Cloud Observability and Management Platform. Many of the services and resources require an upgrade to a paid OCI account but the focus here will be on what can be achieved with the Oracle APM services using OCI Free Tier.
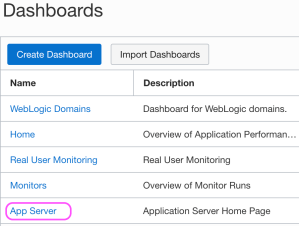
Use the preconfigured Application Server dashboard to determine if resource limits are being hit
Overview
In this article we will go over the steps for setting up Oracle APM and using the Oracle APM Java Agent with ORDS 22.4.0 deployed on an Apache Tomcat 9.0.56 server. Oracle APM supports various deployment topologies including Apache Tomcat, Oracle WebLogic Server and in OCI comes with a preconfigured Application Server dashboard.
Although the Oracle APM services are hosted in Oracle Cloud the Oracle APM Java Agent can be used anywhere. In this scenario Oracle APM is used from the OCI Frankfurt region but the Apache Tomcat server running ORDS 22.4.0 is running on-premise. The process for deploying ORDS on Tomcat is already well documented so this article will focus on the Oracle APM aspects.
The steps outlined below are based on Provision and Deploy APM Java Agents on Application Servers but do not follow it to the letter. For further details and more in depth explanation of the process you should refer to that documentation.
Oracle APM is a service in OCI Observability & Management
Create your APM Domain
The APM Domain specifies the Data Upload Endpoint and keys for the APM Java Agent to use at runtime.
The APM Domain is the key resource for using Oracle APM. The domain contains important configuration information about what data is stored and for how long. Follow these steps to create a Free Tier domain. Note that with Free Tier there are limits in place. In the above screenshot you can see that an APM Domain called ORDS has been created. You can use whatever name is suitable for your environment.
Take note of the Data Upload Endpoint and the Private Data Key. You’ll need them when provisioning the APM Java Agent instance which will be used with the Apache Tomcat server later.
Provision the agent
Provisioning the agent is the process of defining the specific properties for a Java Agent instance to be used with a specific Java application at runtime. In this case the Java application is Apache Tomcat which will have an ORDS web application deployed to it. If there were more than one Apache Tomcat server then a Java Agent would have to be provisioned for each. The provisioning process creates a directory containing jars, configuration log directories which will be used at runtime.
In this case the directory will be ~/work/ora_apm but you can use a directory that makes sense for you. The Oracle APM documentation does suggest using a directory where your application server is installed. For example the $CATALINA_HOME for your Apache Tomcat server but in this case a separate directory is used just to keep the APM configuration separate from the Tomcat configuration.
Before we do that, the Java Agent installer must first be downloaded.
Find the download link in the Administration section.
Once downloaded run the installer to provision the Java Agent. Here the server name is specified as ords_1 but that’s just to identify which Java Application is pushing the metrics to Oracle APM. It could be whatever value makes sense for your environment.
That creates a ApmAgentInstall.log file and oracle-apm-agent directory in ~/work/ora_apm. Your provisioned Java Agent, including jar files and configuration details, is in the oracle-apm-agent directory.
Start Apache Tomcat
Now that you have a Java Agent it can be specified when starting Apache Tomcat. In this environment the Apache Tomcat installation is at ~/work/apache/tomcat/9.0.56/. The Oracle APM documented steps for deploying to Apache Tomcat does outline steps for modifying the catalina.sh script. That’s the best thing to do so that the Java Agent is applied every time Tomcat starts. However, in this case the JAVA_OPTS environment variable will be used. When specifying the javaagent parameter the full directory path must be used.
export JAVA_OPTS="-javaagent:~/work/ora_apm/oracle-apm-agent/bootstrap/ApmAgent.jar"
~/work/apache/tomcat/9.0.56/bin/catalina.sh start

Using CATALINA_BASE:   /Users/peobrie/work/apache/tomcat/9.0.56
Using CATALINA_HOME:   /Users/peobrie/work/apache/tomcat/9.0.56
Using CATALINA_TMPDIR: /Users/peobrie/work/apache/tomcat/9.0.56/temp
Using JRE_HOME:        /Library/Java/JavaVirtualMachines/jdk-11.0.13.jdk/Contents/Home
Using CLASSPATH:       /Users/peobrie/work/apache/tomcat/9.0.56/bin/bootstrap.jar:/Users/peobrie/work/apache/tomcat/9.0.56/bin/tomcat-juli.jar
Using CATALINA_OPTS:
Tomcat started.
Apache Tomcat log shows Oracle APM and ORDs startup output
Monitor performance
Once Tomcat is up and running, you can begin monitoring application performance. This can be done using the APM console, or by setting up custom dashboards and alerts. The later features only available if you have upgraded to a paid OCI account. Time to review what metric information has been sent to Oracle APM data upload endpoint for your domain.
Navigate to the Dashboards page
Choose the Application Server Dashboard
The Oracle-defined dashboards are listed on the Dashboards page. When a dashboard is initially selected one must specify the following details:
Select the compartment in which your APM domain resides. Note that if a compartment is selected on the Dashboards page, then it’s displayed by default.
Select the APM domain that contains the systems being monitored by Application Performance Monitoring.
Select the resource that you want to monitor. For example, in the App Server dashboard, select an application server in the App Server drop-down list.
Select the time period for which you want data to be populated in the dashboard.
The App Server dropdown values will correspond to the Apache Tomcat server that the Oracle APM Java Agent is being used with. After you specify the details, the dashboards are populated with data and provide a quick insight into the health and performance of your application and enable you to identify the area that requires your attention.
The Oracle-defined dashboards, including the default Home dashboard will include information on metrics and APM resources which are not available in the Free Tier account. In this article we focus on the App Server dashboard.
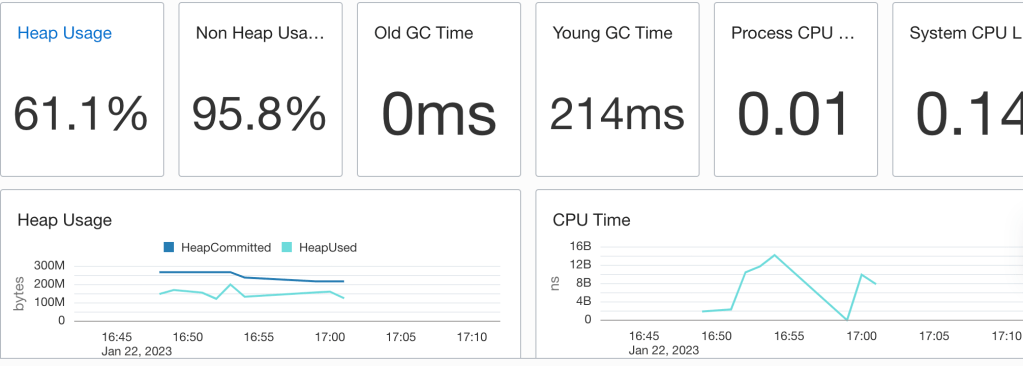
The App Server dashboard is the Home page for your application servers and enables you to analyse the resources used by your application servers and understand resource constraints and requirements. For instance, you can monitor this dashboard to analyse the heap and CPU usage of your application server.
No performance issues highlighted
In the above example heap used does get close to the heap committed so there may be some tuning to apply. One could apply some Java Performance Tuning options there to optimise for throughput, faster response times or just memory footprint. Note that the CPU load is quite low which suggests that there’s no need for additional ORDS instances.
But wait, there’s more
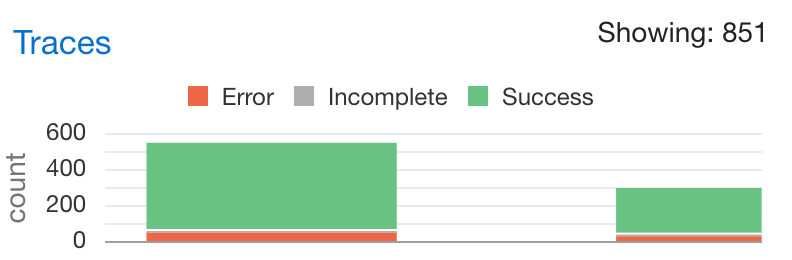
Not only do you have information on the resource usage of the Java application but there’s also tracing information on the requests received by ORDS. Moreover, that has a breakdown on time spend executing SQL queries and that can be really useful when optimising services. For example, running a SELECT on a table which is REST Enabled could take longer than necessary if there are a lot of columns. In some cases, a custom query to just return the data needed, using indexed columns, may the correct solution. This information is in the Oracle APM Trace Explorer. The restriction of the OCI Free Tier is that one can only have 1000 traces an hour so not all metrics for all requests are persisted.
Explore the trace data for requestsTracing data on the AutoREST service for EMPLOYEES table
The options for tracing services will be explored in a later article. Those on the Free Tier will benefit from reviewing them but will only have a small snapshot of the metrics and diagnostics data.
Conclusion
In this brief overview, you have seen the configuration and use of Oracle APM with ORDS ( and it could be any web application for that matter ) deployed on Apache Tomcat. Even in the Free Tier, with the hosted Oracle APM services provide a great performance insight option for anyone on a budget.
April 2024 Update !
Standalone mode was not mentioned in this article due to a Java Agent / Classloader issue. ORDS 24.1.0 no longer has this issue.
Use ORDS 24.1.0 or a later version.
My previous example for adding a YAML filter to ORDS service responses no longer applies with ORDS 22.1.0 and later. In the past the approach for extending the ORDS functionality was to modify the distributed ords.war with a plugin jar. Now there is a separate lib/ext/ directory for extension jars. This post will revisit last year’s Plugin Example – Get YAML response for ORDS services and cover what is different now. The end goal will still be to have YAML returned for an AutoREST table rather than JSON.
As mentioned in the previous post, when an ORDS service is created, by rest enabling a table for example, the default content type for requests and response payloads is application/json. The end goal for this exercise is to convert any application/json response to a text/yaml response without having to modify the service implementation. The client specifies that YAML should be returned by stating that text/yaml is acceptable…
To achieve this we will code our own custom plugin to ORDS. The ORDS distribution from oracle.com/rest contains example plugins and for simplicity one of these examples will be copied as the basis of our new custom plugin. First I’ll provide the code and steps to build the plugin. Then I will go through the plugin code to explain key parts.
Assumptions and prerequisites
This example is based on the plugin examples in the ORDS Getting Started tutorial. It is assumed that you are already familiar with that plugin-demo Servlet example.
We’re using ORDS 22.3.3 with Oracle Java 11 in standalone mode. A configuration directory has already been created containing valid connection details to a database that has ORDS installed. There is a REST Enabled schema in the database with a REST Enabled table that does not require authentication to access. In my example the schema is HR, the table is EMPLOYEES and the RESTful endpoint is http://localhost:8080/ords/hr/employees.
ORDS 22.3.3 ships with Jackson which will be the basis for the YAML conversation of the JSON response. However, other jars will be required at compile and runtime.
In this article I will refer to the new plugin as plugin-yaml but you can use any name that suits.
Copy the examples/plugins/plugins-demo directory to examples/plugins/plugin-yaml
Change the project name in the build.xml to plugin-yaml
<project default=”dist” name=”plugin-yaml”>
Remove the examples/plugins/plugin-yaml/src/example/PluginDemo.java
Download PluginYaml.java to examples/plugins/plugin-yaml/src/example/
So far, all the steps have been the same as for last year’s example. Now, instead of adding the jars to the ords.war we add them to the existing lib/ext/ directory where ORDS has been installed.
Copy the following files to ORDS home lib/ext/ directory:
There are 3 jars to add to the lib/ext/ directory to be picked up in the ORDS classpath at runtime in. The plugin-yaml.jar which we have built from source and the 2 runtime dependencies jackson-dataform-yaml and snakeyaml. Any subsequent code changes in examples/plugins/plugin-yaml/src/ will require the ant project to be built again but only the produced plugin-yaml.jar must be added to the lib/ext/ directory again.
Example output from running ant command:
Buildfile: /scratch/ords-22.3.3.311.1929/examples/plugins/plugin-yaml/build.xml

clean:
   [delete] Deleting directory /scratch/ords-22.3.3.311.1929/examples/plugins/plugin-yaml/built

compile:
    [mkdir] Created dir: /scratch/ords-22.3.3.311.1929/examples/plugins/plugin-yaml/built/classes
    [javac] Compiling 1 source file to /scratch/ords-22.3.3.311.1929/examples/plugins/plugin-yaml/built/classes
    [javac] Note: Discovered type annotated with @Provides: example.PluginYaml

dist:
      [jar] Building jar: /scratch/ords-22.3.3.311.1929/examples/plugins/plugin-yaml/built/plugin-yaml.jar

BUILD SUCCESSFUL
Total time: 0 seconds
Code Overview
The PluginYaml.java is a basic javax.servlet.Filter implementation that replaces the response output stream when the servlet container is about to return that response to the calling client. To achieve this, when it is determined that the client provides Accepts: text/yaml in the request, the filter supplies a HttpServletResponseWrapper which captures the original response. That wrapper, in this case called ServletResponseWrapperCopier, uses Jackson mappers to produce a YAML representation of the JSON response content and return that instead.
The performance overhead of producing a response in one structure and creating a copy of it in a different structure may be quite significant for large payloads. Although ORDS provides a plugin framework for you to add functionality, your custom plugin, or any third party jars that you add to the lib/ext/ are not supported by Oracle. The upshot is obvious. When it comes to plugins: test , test , test.
What about Tomcat and WebLogic?
The astute reader will have noticed that if the distributed ords.war is no longer modified then the additional jars will not be in the classpath of the ORDS web application when deployed to Apache Tomcat or Oracle WebLogic Server. That is where the ords war command comes in. Use the ords war command to create a deployable web application archive file which has the config.url context parameter explicitly set and any jar files from lib/ext folder are included.
There’s a performance section in the ORDS Best Practice document that encourages the use of OAuth2 clients rather than basic authentication for REST Services. It is excellent advice. The overhead of verifying a database username and password can add hundreds of milliseconds to the total response time. That can be avoided by using an OAuth2 client with ORDS.
A client can be granted ORDS roles: standard roles and custom roles. One of the standard ORDS roles that can be granted is SQL Developer role. This is a very useful, and powerful, role which when it is granted, should be granted with caution. Having said that, any grant of any role should be carefully considered and the implications evaluated.
Here’s an example of creating a Client Credentials type OAuth2 client and granting it SQL Developer role:
With that client created one can get the client_id and secret for obtaining an access token:
SELECT name, client_id, client_secret FROM user_ords_clients;

NAME             CLIENT_ID  CLIENT_SECRET
---------------- ---------- --------------
sql_dev_client   3WjIAi..   myb-nW..
Using curl one can request an access token. This is what is referred to as a Two-Legged process where the client_id and client_secret is used to get an access token and that token is then used for subsequent service calls. Note that <schema alias> is the alias of the REST Enabled user that has created the client:
That access token is time based. It will only be valid for an hour. After which the above oauth/token request would have to be submitted again. Now that we have an access token, let’s use it to invoke a service which ships with ORDS but requires the SQL Developer role. In this example we’ll get a list of Data Pump jobs and our schema alias is hr:
An interesting snippet of information. Of course one can do a lot more with these Database API services. Those Database API services that can be access by clients with SQL Developer role are not limited to just getting information.
Anything your database account can do
The Database API services perform a specific set of well defined operations. While access to the services require an ORDS role, such as SQL Developer or SQL Administrator, the database account used to execute the corresponding SQL is the REST Enabled schema.
There are other services provided by ORDS which require the SQL Developer role to access and one of note is the REST Enabled SQL Service. With the access token for a client with SQL Developer role one can submit any SQL script or statement.
For example, show the corresponding database account username:
curl 'https://my-database.adb.eu-frankfurt-1.oraclecloudapps.com/ords/hr/_/sql' \
  -H 'Authorization: bearer 9EVGMlgDLQ8N5clLKVLj0Q' \
  -H 'Content-Type: application/json' \
  --data-raw '{"statementText":"select user from dual","offset":0,"limit":256}'
Which confirms that the database user in this case is the HR schema…
For those familiar with ORDS this is not a great revelation and there are plenty of legitimate cases where an ORDS OAuth2 client would have the SQL Developer role. In fact a quick search online for ORDS OAuth2 examples will show some. My intent is to highlight that the SQL Developer role provides access to a range of powerful ORDS services and the use of the role should be carefully considered.
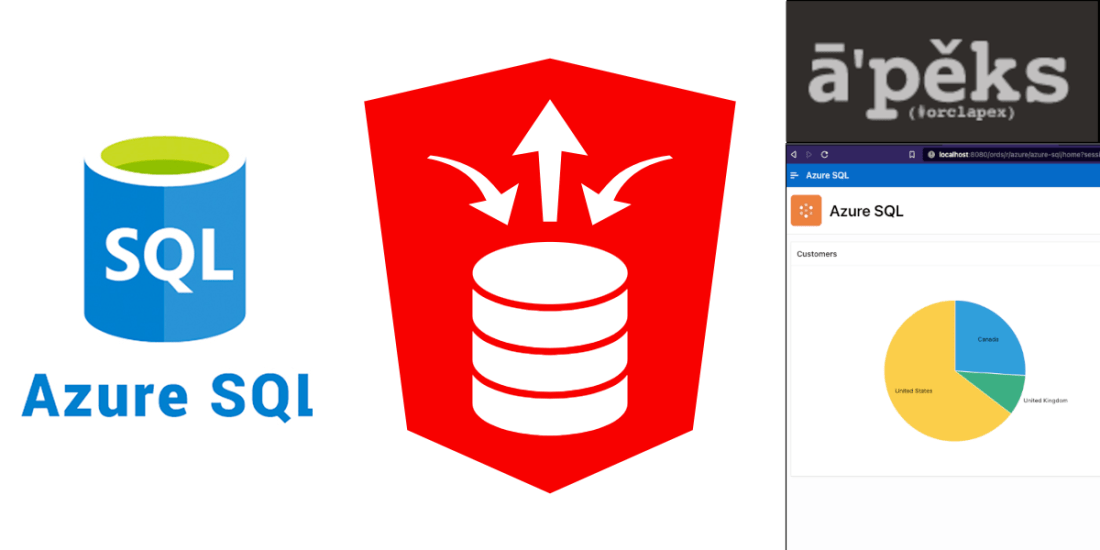
One of the big announcements this month was the Oracle Database Service for Microsoft Azure. With this new fully managed service, Azure customers can seamlessly build Azure applications using the high-performance, high-availability, and automated management of Oracle Database services such as Autonomous Database running on OCI. Did you know that even before this announcement you could have a REST interface to Azure SQL through ORDS?
In this article I’ll show you how I have data from a hosted Azure SQL database used in an APEX application all made possible through ORDS. Although I’m using released products it is important to point out that using ORDS with SQL Server is not officially supported. Therefore, although you can use this approach, you mind find a use case that does not work. For example, an unsupported column data type.
This is your goal, sample data from Azure SQL rendered in an APEX application
Azure SQL Sample Database
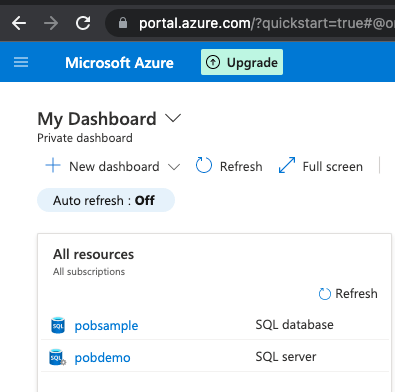
To get started, if you do not have an Azure SQL database already, head over to https://portal.azure.com/ and set yours up. By default you will get a functional, but empty database. In my case, I selected Sample for Use existing data option in the Additional Settings section of the create database sequence so that I had some data in place.
Create your database with sample data
SQL Server and Database
The overall process from zero involves creating an SQL Server ( pobdemo in my case ) and an SQL Database ( pobsample in my case ) which can be accessed outside of Azure.
You will also need to create some logins and users to access the database so Azure Data Studio, or some other client for working with Azure SQL will be needed. The administrator user should not be used for anything more than managing the database.
One login will be used by ORDS to verify the pool connection configuration. It does not require any specific privileges in the database just the ability to make a connection over JDBC. The login could be any value but for consistency we’ll call it ORDS_PUBLIC_USER
CREATE LOGIN ORDS_PUBLIC_USER WITH PASSWORD = '< keep this secret >';
The other login and database user is for the account that will be used to interact with the database. In this example: ords_demo
CREATE LOGIN ords_demo WITH PASSWORD = '< keep this secret >';
CREATE USER ords_demo FROM LOGIN ords_demo;
ALTER ROLE db_datareader ADD MEMBER [ords_demo];
ALTER ROLE db_datawriter ADD MEMBER [ords_demo];
Configure ORDS
Now that we have our database accounts let’s configure ORDS. In my case I already have an ORDS instance setup with the default pool configured for my Oracle 19c database and APEX is installed.
The directory that I extracted the ORDS 22.2.0 distribution to is ~/Downloads/ords-22.2.0.172.1758/ and the configuration directory is ~/Documents/Personal/azure_sql/. That directory looks like this:
The configuration for the azure_sql pool was achieved as follows while the configuration directory is the working directory. Note that you will need to know your JDBC connection string from your Azure Dashboard. You’ll find that under Show database connection strings.
See the ‘Show database connection strings’ to get your JDBC connection string
Armed with that information it is time to configure your azure_sql pool:
~/Downloads/ords-22.2.0.172.1758/bin/ords config --db-pool azure_sql set db.connectionType customurl

~/Downloads/ords-22.2.0.172.1758/bin/ords config --db-pool azure_sql set db.customURL jdbc:sqlserver://<rest of the JDBC connection string from Azure dashboard>

~/Downloads/ords-22.2.0.172.1758/bin/ords config --db-pool azure_sql set jdbc.driverName com.microsoft.sqlserver.jdbc.SQLServerDriver

~/Downloads/ords-22.2.0.172.1758/bin/ords config --db-pool azure_sql set db.credentialsSource request

~/Downloads/ords-22.2.0.172.1758/bin/ords config --db-pool azure_sql set restEnabledSql.active true

~/Downloads/ords-22.2.0.172.1758/bin/ords config --db-pool azure_sql set db.username ORDS_PUBLIC_USER
Every command entry should show a message confirming that the setting was applied. Now to set the password for ORDS_PUBLIC_USER. That should be treated as a secret:
~/Downloads/ords-22.2.0.172.1758/bin/ords config --db-pool azure_sql secret db.password

Enter the database password:
Confirm password:
The setting named: db.password was set to: ****** in configuration: azure_sql
When done, assuming that you are using the same pool name, your databases/azure_sql/pool.xml should look like this but without the comments:
<?xml version="1.0" encoding="UTF-8" standalone="no"?>
<!DOCTYPE properties SYSTEM "http://java.sun.com/dtd/properties.dtd">
<properties>
<comment>Saved on Fri Oct 11 11:21:28 IST 2019</comment>
<entry key="db.connectionType">customurl</entry>
<entry key="db.customURL">jdbc:sqlserver://your_sql_server.database.windows.net:1433;database=your_sql_db;encrypt=true;trustServerCertificate=false;hostNameInCertificate=*.database.windows.net;loginTimeout=30;</entry>
<entry key="jdbc.driverName">com.microsoft.sqlserver.jdbc.SQLServerDriver</entry>
<!-- username for account required to verify pool connection details are
correct. User does not require special privileges -->
<entry key="db.username">ORDS_PUBLIC_USER</entry>
<!-- Credentials in the request will be used to create injected DB connection
and ORDS Role will be SQL Developer. Authentication mode will be ANY_SCHEMA -->
<entry key="db.credentialsSource">request</entry>
<!-- REST Enabled SQL must be enabled -->
<entry key="restEnabledSql.active">true</entry>
</properties>
One of the settings is the JDBC driver to use ( jdbc.driverName ) and that is com.microsoft.sqlserver.jdbc.SQLServerDriver but ORDS does not ship with that JDBC driver. Download the SQL Server JDBC driver and copy the Java 11 jar into the ORDS lib/ext directory. In my case that is ~/Downloads/ords-22.2.0.172.1758/lib/ext
Time to startup ORDS in standalone mode and verify the connection pool is loaded correctly.
~/Downloads/ords-22.2.0.172.1758/bin/ords serve

ORDS: Release 22.2 Production on Fri Jul 29 13:52:06 2022

Copyright (c) 2010, 2022, Oracle.
...
2022-07-29T13:52:10.561Z INFO        Configuration properties for: |azure_sql|lo|
gopherProxySet=false
awt.toolkit=sun.lwawt.macosx.LWCToolkit
java.specification.version=11
...
2022-07-29T13:52:45.126Z INFO        Oracle REST Data Services initialized
Oracle REST Data Services version : 22.2.0.r1721758
Oracle REST Data Services server info: jetty/9.4.46.v20220331
Oracle REST Data Services java info: Java HotSpot(TM) 64-Bit Server VM 11.0.13+10-LTS-370
Test REST Enabled SQL
If you have gotten this far without errors that means ORDS can connect to the Azure SQL database using the db.username account and therefore the custom connection aspect of the pool configuration is correct. Now to confirm the REST Enabled SQL can use that pool configuration to access the database with basic authentication credentials provided. For that we’ll use the login that is a user in the database and cURL to submit a GET request
curl -u ords_demo http://localhost:8080/ords/azure_sql/_/sql
Enter host password for user 'ords_demo': ********
{
 "database_product_name":"Microsoft SQL Server",
 "database_product_version":"12.00.312",
 "database_major_version":12,
 "database_minor_version":0,
 "env":{"defaultTimeZone":"UTC","ordsVersion":"22.2.0.r1721758"}
}
We could just stop here and just use REST Enabled SQL directly with our Azure SQL database but let’s do something really interesting with APEX, which is probably why you’re here. First, a few words about how APEX works with SQL Server natively: it does not.
SQL Server Syntax
APEX has powerful support for consuming data over REST services including the ability to construct queries for Oracle and MySQL which are executed through ORDS REST Enabled SQL. This allows for a very dynamic no code approach to developing applications. See previous article How to use the Oracle Database Tools Service to provide MySQL data to APEX on this topic.
APEX does not provide the same level of support for SQL Server. Although one can configure an ORDS pool so that REST Enabled SQL can be used, APEX will not recognise the database type when you try create the REST Enabled SQL reference. All is not lost though. The work around is to write ORDS REST Services which have the specific SQL Server statements. Those services make the REST Enabled SQL calls and return the response. They are effectively custom wrapper services.
APEX calls custom ORDS Service which calls ORDS REST Enabled SQL which talks to Azure SQL
Now, on with the APEX adventure…
APEX Workspace
In my local Oracle database I have APEX installed and have created a workspace called AZURE which is using the AZURE database schema. That schema has been REST Enabled too.
The ‘azure’ workspace is in the ‘AZURE’ schema and that schema is REST Enabled
This AZURE database schema in the Oracle database will have the REST Services ( module/template/handler ) defined and those services will make the REST Enabled SQL calls. For convenience these services are not secured but obviously should be if they are to be used in a real world scenario. What is secured is the REST Enabled SQL endpoint. A username and password for the database user in Azure SQL must be provided but rather than having that in plain text in the handler source we’ll use an APEX Web Credential that the AZURE schema will have access to.
APEX Web Credentials
Web Credentials are a really useful feature in APEX that allows you to store authentication credentials for external REST services or REST Enabled SQL services. We’ll use that in our ORDS Service handler pl/sql block but more on that later. First, let’s define a Web Credential in the workspace.
Web Credential with Azure SQL username and password
There are a few things to highlight about the above Credentials for Azure
The Static Identifier is Credentials_for_Azure – we will refer to that later in the ORDS handler
The Authentication Type is Basic Authentication – the REST Enabled SQL endpoint uses this Authentication Type
The Valid for URLs specifies host.docker.internal as the server address. Remember how I said that Oracle 19c database was running in docker? Localhost would just point to the running container in my case. This is how the database can address the host machine ( my laptop ) which is running ORDS.
Stating the obvious here but it’s significant that you can change the username and password in the Web Credential without modifying the handler. Just thought I’d mention that.
And now with the Web Credential in place lets define the services in the AZURE schema that will submit SQL queries over REST Enabled SQL to Azure SQL database.
Wrapper Services
We’re going to define two services which follow this pattern: send a query, return the response. This relies on the APEX_WEB_SERVICE.MAKE_REST_REQUEST function to create the POST request, with Content-Type application/sql, and return the payload response. The previously defined Web Credentials are used to authenticate those requests.
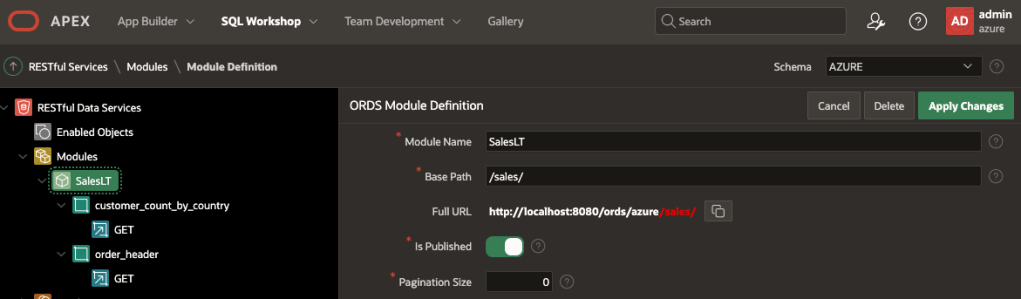
The module, templates and handlers can be defined in APEX or SQL Developer Web. One module with Base Path/sales/ along with two templates: customer_count_by_country and order_header.
One module with /sales/ Base Path and two templatesOf course the ORDS REST Services can be edited in SQL Developer Web too
Handler for /sales/customer_count_by_country
This handler executes an aggregation query to get the number of customers with a Main Office in each country.
DECLARE
  l_clob    CLOB;
  l_result  VARCHAR2(32767);
BEGIN
  APEX_WEB_SERVICE.g_request_headers.delete();
  APEX_WEB_SERVICE.g_request_headers(1).name := 'Content-Type';
  APEX_WEB_SERVICE.g_request_headers(1).value := 'application/sql';

  l_clob := APEX_WEB_SERVICE.make_rest_request(
    p_url         => 'http://host.docker.internal:8080/ords/azure_sql/_/sql',
    p_http_method => 'POST',
    p_credential_static_id => 'Credentials_for_Azure',
    p_body => 'select address.CountryRegion, count(CustomerAddress.CustomerID) as "CustomerCount"
from SalesLT.Address, SalesLt.CustomerAddress
where CustomerAddress.AddressID = Address.AddressID and CustomerAddress.AddressType = ''Main Office''
group by address.CountryRegion'
  );

HTP.print(l_clob);

END;
Handler for /sales/order_header
This handler executes a basic query to get all records from the SalesOrderHeader table.
DECLARE
  l_clob    CLOB;
  l_result  VARCHAR2(32767);
BEGIN
  APEX_WEB_SERVICE.g_request_headers.delete();
  APEX_WEB_SERVICE.g_request_headers(1).name := 'Content-Type';
  APEX_WEB_SERVICE.g_request_headers(1).value := 'application/sql';
  -- Get the XML response from the web service.
  l_clob := APEX_WEB_SERVICE.make_rest_request(
    p_url         => 'http://host.docker.internal:8080/ords/azure_sql/_/sql',
    p_http_method => 'POST',
    p_credential_static_id => 'Credentials_for_Azure',
    p_body => 'SELECT * FROM [SalesLT].[SalesOrderHeader]'
  );
  HTP.print(l_clob);
END;
Service Handler Walkthrough
Keep in mind that these handlers execute in the AZURE database schema which is the schema for the APEX Workspace we’ll create the Data Source references and APEX Application in. Both handlers follow these steps:
Set the Content-Type header to application/sql
Make a POST request with Web Credentials for authentication and a query
Write the REST Enabled SQL result to the HTTP Response stream.
There’s no validation on the response, or parsing that response to change the structure. We’ll leave it to APEX to figure out how to parse the response payload.
Now is it a good time to verify that the two handlers work. We can invoke them through cURL. Remember the schema alias is azure, the module base path is /sales/ so the URL will begin with http://localhost:8080/ords/azure/sales/
Now is a good time to reiterate that the ORDS REST Services are not protected and if the Azure SQL database you’re connecting to had any sensitive data it should be protected but that’s not the focus of this article.
As you can see from the above tests, these are REST Enabled SQL responses with lots of information about the statement executed, the metadata of the columns when all we’re really interested in is the data at items.resultSet.items. That will be relevant when we look into Data Sources.
APEX Data Sources
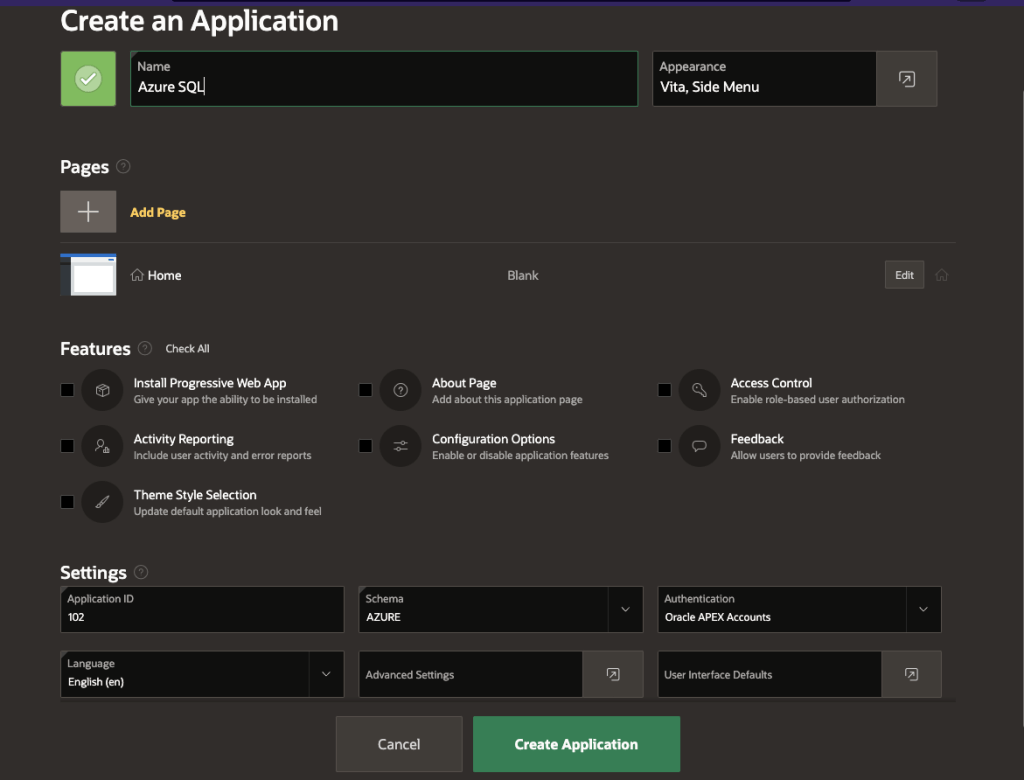
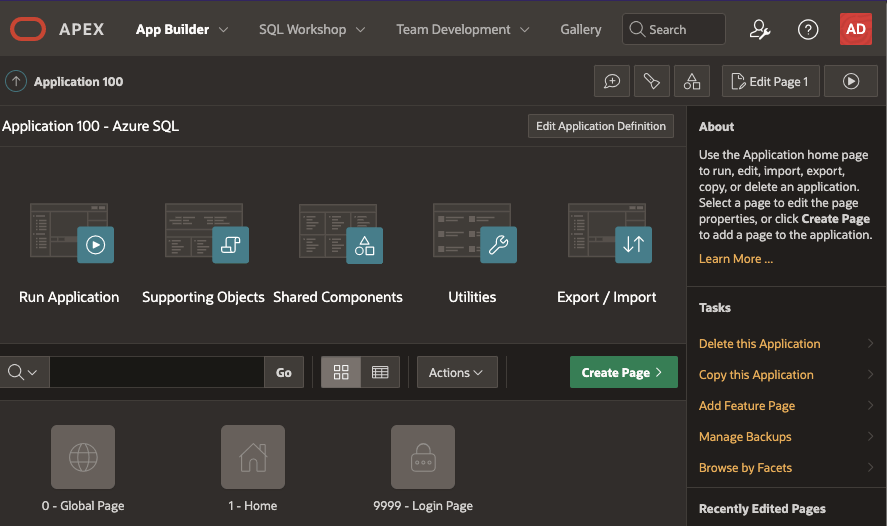
Let’s create a basic APEX application called Azure SQL with just the defaults.
Basic application with a Home page
Once created, edit the application and navigate to the Shared Components section.
Shared Components is where Data Source references can be defined
The Data Source references section has various options for getting data over REST.
Data Sources section has lots of options
Define REST Data Sources for both endpoints but specify their REST Data Source Type as Simple HTTP.
Note the URL has host.docker.internal has the server name because the Oracle database is running in Docker
Remember how the REST Enabled SQL response structure contains lots of metadata? For Data Profile specify the Row Selector as items.resultSet.items so that APEX can find the array of rows that it can interrogate for Data Profile.
The Row Selector must be specified to find the data in the response
Two Data Source references must be defined. In my case I also defined synchronisation for the AzureSalesHeader Data Source to pull in data to a local table. I’ll cover that in a separate article.
Data Source references that are Simple HTTP types
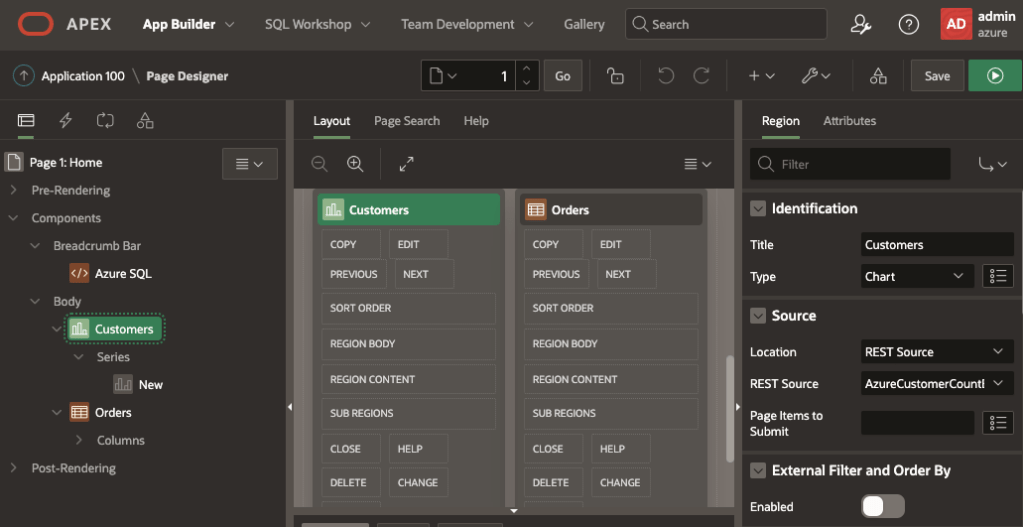
Now let’s put those to use. Edit the Home page and drop in a Chart and a Classic Report to the body. The Chart will use REST SourceAzureCustomerCountByCountry and the Classic Report will use REST SourceAzureSalesHeader.
Source for the components are REST Source
The Classic Report is very basic and includes the column list from the AzureSalesHeader Data Source. For the Customers chart the Series Source Location should be set to Region Source so that it inherits the source from the Chart and columns can be selected.
For the Chart series Source Location is Region Source and the Column Mapping for what to show
With all that in place, run the application to see the Home page with the Chart and Classic Report. Note that by following the default application setup a login is required. Just use the same workspace developer username and password.
Pie Chart and Classic Report with live data from Azure SQL
Conclusion
In theory ORDS REST Enabled SQL can be used with any database that you have a JDBC driver for which will run on Java 11. In practice, only Oracle RDBMS and Oracle Cloud MySQL is supported. Keeping that in mind, the capability of bringing in data from other databases, such as Azure SQL and using it in your APEX applications opens up a lot of integration possibilities.
What projects does this make possible for you now? I’d be really interested to hear about it.
In future articles I will cover synchronisation, joining local with remote data as well as going beyond just select statements.
Addendum to the original article…if you are looking for an approach that is supported you can create database links from Autonomous Database to Non-Oracle databases.