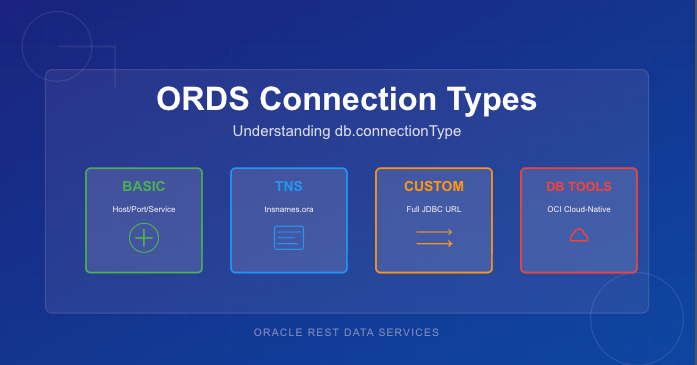
Oracle REST Data Services (ORDS) supports four different ways to create database connection pools, each designed for a specific deployment model or infrastructure environment. While most people are familiar with the common Basic connection settings, the other options—TNS, Custom URL, and Database Tools Connection—offer powerful alternatives when you need more flexibility or cloud-native authentication.
This article provides a concise comparison of all four db.connectionType values, explains when each option makes sense, and lists the configuration settings required for each type.
Why db.connectionType Matters
Every ORDS deployment includes one or more database pools. The connection type determines:
how ORDS constructs the JDBC URL
where host/service metadata comes from
whether credentials are stored locally or remotely
what additional ORDS settings are required
Choosing the right connection type simplifies configuration, avoids hard-coding credentials, and ensures ORDS connects using the most appropriate mechanism for the environment.
The Four ORDS Connection Types
1. Basic — Direct Host/Port/Service Connections
This is the simplest and most commonly used configuration. ORDS constructs the JDBC URL automatically based on host, port, and service name.
Use this when:
the database is customer-managed (on-prem or IaaS)
you want simple, explicit connection parameters
you’re not using TNS descriptors or OCI integrations
Note that as a secret, the db.password value is expected to be persisted in a wallet file locally and set using the ORDS command line interface.
2. TNS — Use tnsnames.ora
When you choose the tns connection type, ORDS reads the connect descriptor from a tnsnames.ora file. This allows you to use advanced Oracle Net features such as load balancing, failover, and connect-time routing.
Use this when:
your organisation standardises on Oracle Net
you need RAC/Service failover descriptors
TNS files already exist and are centrally managed
Required Settings:
db.connectionType=tns
db.tnsDirectory=<directory containing tnsnames.ora>
db.tnsAlias=<alias in tnsnames.ora>
db.username=<db user>
db.password=<secret>
Note that as a secret, the db.password value is expected to be persisted in a wallet file locally and set using the ORDS command line interface. Moreover, the directory containing the tnsnames.ora must be accessible to the ORDS runtime instance. This can be over a networked filesystem but must be readable by the ORDS process.
3. Custom URL — Full JDBC URL Control
The customurl connection type gives you complete control of the JDBC URL. ORDS simply uses whatever you provide. This is the most flexible option and the only one suitable for non-Oracle databases.
Use this when:
you are connecting to MySQL or another JDBC-compatible database
you need URL parameters not supported by Basic or TNS
you prefer to manage the full connection string manually
Required Settings:
db.connectionType=customurl
db.customURL=jdbc:oracle:thin:@//host:port/service
# or MySQL, PostgreSQL etc.
db.username=<db user>
db.password=<secret>
Note that as, a secret the db.password value is expected to be persisted in a wallet file locally and set using the ORDS command line interface. ORDS only ships with the Oracle JDBC driver so if using a different JDBC driver the jar files that must be in the lib/ext directory.
4. Database Tools Connection — Cloud-Native Authentication via OCI
This option integrates ORDS with Oracle Cloud Infrastructure Database Tools, allowing ORDS to use an OCI-managed “Database Tools Connection” object. Credentials are stored in OCI Vault, not in ORDS configuration files. See https://docs.oracle.com/en-us/iaas/database-tools/home.htm for more information on this managed service.
This is the most secure and most cloud-native way to connect ORDS to an Autonomous Database or Oracle Base Database running in OCI.
Use this when:
ORDS is running inside OCI (Compute, Functions, OKE)
you want to avoid storing DB passwords in file systems
you want automatic credential rotation via Vault
you manage DB access through OCI IAM policies
Required Settings:
When your OCI compute instance is configured in a dynamic group which contains a policy granting it access to the dbtools service…
db.connectionType=databaseToolsConnection
db.databaseToolsConnection=<OCID of Database Tools Connection>
When your not running ORDS on an OCI compute instance but you have the OCI Command Line Interface installed…
db.connectionType=databaseToolsConnection
db.databaseToolsConnection=<OCID of Database Tools Connection>
db.authProvider=oci-profile
db.ociProfile=<only if using oci-profile>
Remember: No hostname, port, service name, or password required — OCI provides everything.
Quick Comparison Table
Type
URL Source
Credentials Stored Locally?
Suitable For
Notes
basic
Host/port/service name
Yes
On-prem & simple setups
Most common
tns
tnsnames.ora descriptor
Yes
RAC, complex descriptors
Centralised Net configs
customurl
Full JDBC URL provided by you
Yes
Non-Oracle DBs, exotic configs
Max flexibility
databaseToolsConnection
OCI Database Tools metadata
No
Cloud-native deployments
Best security
Choosing the Right Connection Type
If you’re unsure which to pick, here’s a simple decision flow:
Running on OCI and want the best security? → Use databaseToolsConnection
Need RAC/SCAN/FAN/Load Balancing descriptors? → Use tns
Connecting to MySQL or need a very specific JDBC URL? → Use customurl
Standard on-prem or IaaS database with straightforward networking? → Use basic
Final Thoughts
ORDS has grown far beyond its early single-connection configuration model. Understanding the four db.connectionType settings helps you choose the best option for your environment—whether that’s a classic on-premises Oracle instance or a fully cloud-native, password-free deployment in OCI.
If you’re standardising ORDS across multiple environments, I recommend experimenting with each type in a test pool. You’ll quickly see which one aligns with your organisation’s approach to connectivity, configuration management, and security.
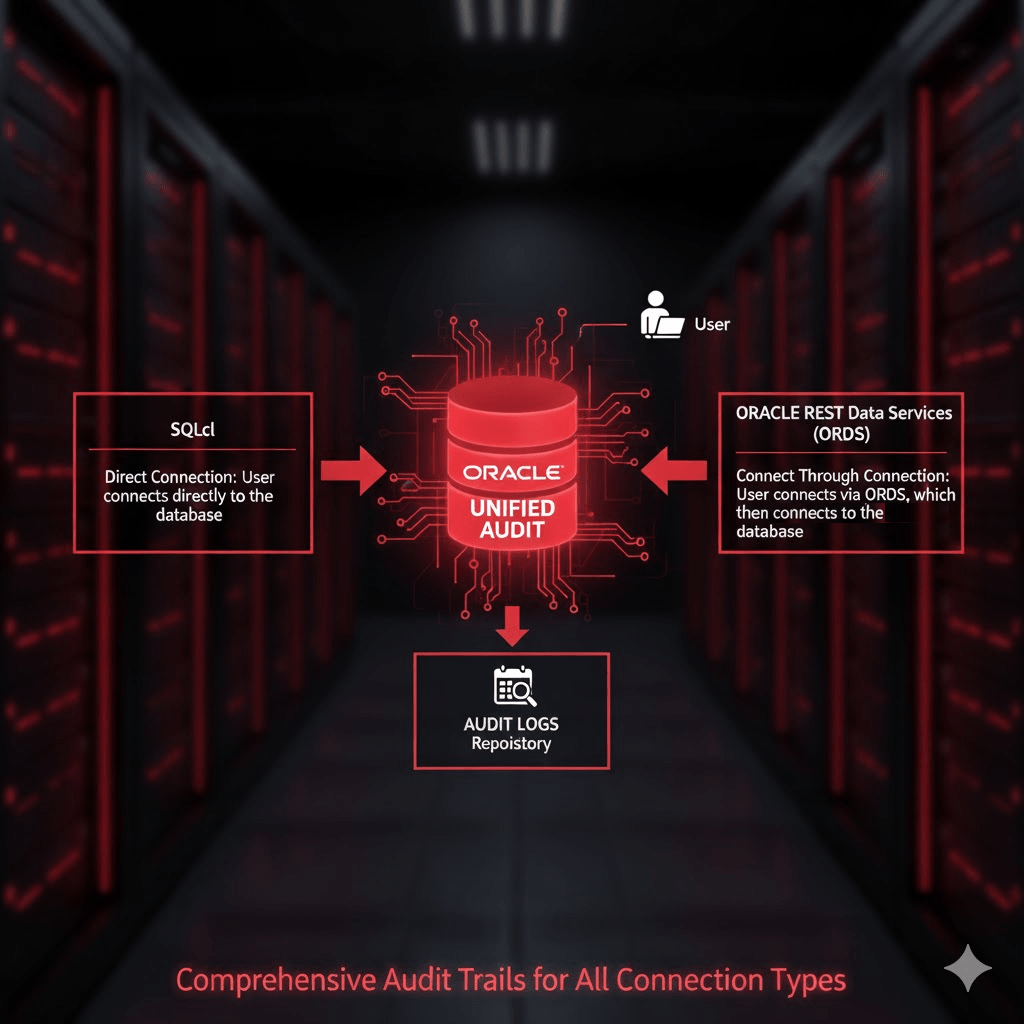
Managing Oracle database accounts is an essential part of database security and operational hygiene. One key task is identifying accounts that have not been used for extended periods, such as over 30 days. While queries against DBA_USERS or ALL_USERS provide basic metadata about database accounts, they do not reliably indicate actual usage, particularly for REST-enabled schemas. This is because Oracle REST Data Services (ORDS) and other middleware may connect to the database via a “connect through” mechanism, creating sessions on behalf of the schema without a traditional direct login.
Unified Auditing consolidates Oracle’s auditing mechanisms into a single, consistent framework. It allows administrators to define audit policies that track database activity across sessions, users, and even system-level events.
A Unified Audit Policy is a set of rules that specifies which actions are audited. When enabled, it records events in the UNIFIED_AUDIT_TRAIL view, including logins, logouts, DML operations, and privilege usage. This provides a reliable, timestamped record of actual database activity.
Define The Policy
Oracle 26ai ships with a predefined Unified Audit Policy called ORA_LOGIN_LOGOUT. This policy is designed to track user logins and logouts. However, by default it only tracks failures unless your System Administrator has altered the policy definition. So lets verify your audit policy state.
To confirm that Unified Audit is enabled in your database run this query. It should return TRUE.
SELECT VALUE
FROM V$OPTION
WHERE PARAMETER = 'Unified Auditing';
Now check the status of the predefined ORA_LOGIN_LOGOUT policy…
SELECT * FROM audit_unified_enabled_policies where POLICY_NAME = 'ORA_LOGIN_LOGOUT';
The results could look like this indicating that only failed attempts are recorded.
If the predefined ORA_LOGIN_LOGOUT policy is not recording on SUCCESS then define a new policy to achieve that and activate it…
Now that you are recording the LOGON activity you can review the audit trail view. To find database accounts that have not logged in for over 30 days, you can query the UNIFIED_AUDIT_TRAIL using the following SQL:
SELECT
    UAT.DBUSERNAME,
    MAX(UAT.EVENT_TIMESTAMP_UTC) AS LAST_LOGIN_UTC
FROM
    UNIFIED_AUDIT_TRAIL UAT,
    ALL_USERS           AU
WHERE
    UAT.ACTION_NAME = 'LOGON'
    AND UAT.DBUSERNAME = AU.USERNAME
GROUP BY
    UAT.DBUSERNAME
HAVING
    MAX(UAT.EVENT_TIMESTAMP_UTC) < SYSTIMESTAMP AT TIME ZONE 'UTC' - INTERVAL '30' DAY
ORDER BY
    LAST_LOGIN_UTC DESC;
Explanation of the query:
DBUSERNAME identifies the database account.
EVENT_TIMESTAMP_UTC captures the precise UTC timestamp of the last login.
MAX(EVENT_TIMESTAMP_UTC) gives the most recent login per user.
The join on ALL_USERS ensures you only see database users that still exist.
HAVING MAX(EVENT_TIMESTAMP_UTC) < SYSTIMESTAMP AT TIME ZONE 'UTC' - INTERVAL '30' DAY filters accounts that have been inactive for over 30 days.
ORDER BY LAST_LOGIN_UTC DESC lists the accounts from least to most recently active.
This approach is far superior to just using DBA_USERS.LAST_LOGIN or ALL_USERS because it captures all session activity, including sessions initiated via REST services like ORDS. Accounts that appear “inactive” in DBA_USERS may, in fact, be used regularly through REST-enabled access.
Why DBA_USERS or ALL_USERS Isn’t Enough
Traditional queries like:
SELECT username, last_login
FROM dba_users;
or
SELECT username
FROM all_users;
have limitations:
No REST context – They only reflect direct database logins, missing sessions created via middleware using “connect through” mechanisms.
Potentially outdated – DBA_USERS.LAST_LOGIN is only updated on direct logins.
Unified Auditing solves all these limitations by taking advantage ofUNIFIED_AUDIT_TRAIL, recording every login event centrally, giving administrators a reliable view of database account activity.
Conclusion
By taking advantage ofUNIFIED_AUDIT_TRAIL, administrators can:
Accurately determine which accounts are truly inactive.
Include REST-enabled schemas in their audits.
Improve security by identifying accounts that may no longer require access.
If it is enabled for SUCCESS then the ORA_LOGIN_LOGOUT Unified Audit Policy is the recommended approach for identifying inactive database accounts in Oracle 26ai. Otherwise, you will have to define a new policy as detailed in this article.
Enabling and managing the audit policies is a critical best practice for modern Oracle databases, particularly those supporting REST services through ORDS. It is important to also have procedures in place to archive old audit trail records so they do not fill disk space.
What audit policies for ORDS do you have in place for monitoring activity?
Everyone was happy. The web application uptime and response rates have been well within the Service Level Agreements for months. Uptake of the published REST Services was on the rise. Both internally and externally, more and more systems were consuming the services and the three ORDS instances behind an NGINX load balancer took it all in their stride. No long running queries or inefficient PL/SQL code locking DB resources. Everything humming along like a finely tuned engine. Then it came time to upgrade…
The ORDS product team have been operating to the usual cadence of one major release every 3 months. Although not ancient, our system is a few releases behind and not only are there interesting new features that are worth exploring but there’s always the security fixes to recent critical 3rd party Common Vulnerabilities and Exposures ( CVE ) that justifies being at the most recent stable release.
Upgrade time comes around so the test environment is setup to run through the ORDS upgrade process before applying the same to production. Then this happens for all the requests: HTTP ERROR 400 Invalid SNI
But this was working before I upgraded !
What is my SNI and how did it get invalid?
The same web server could be hosting multiple sites. In the case of ORDS, the same ORDS instance could have multiple domain name entries that route to it. Server Name Indication ( SNI ) is an extension to the Transport Layer Security (TLS) networking protocol for a client ( such as your browser ) to indicate to the server ( ORDS running standalone mode for example ) which site it wishes to talk to. To put it simply, SNI is used at the start of the secure connection handshake between client and server. The client sends a Host header in the request to indicate what site it is requesting and the server goes looking for its certificate for that server name. See https://datatracker.ietf.org/doc/html/rfc4366#section-3.1 for more details on the role of Server Name Indication in keeping communication secure.
You’ll notice from the stack trace and the error page that the Invalid SNI response does not look like a standard ORDS error page. It is in fact generated by the Eclipse Jetty embedded in ORDS when running in standalone mode.
A typical ORDS generated error page. It looks a lot different from the Invalid SNI error page!
It is a feature, not a bug – Jetty 10
When running ORDS in standalone mode an embedded Eclipse Jetty server is used. Before ORDS 22.3.0 that was Jetty 9 but since that release ORDS has been using Jetty 10 and for very good reason: more secure. As mentioned in the second paragraph at the start of this article there a fixes and optimisation that are worth making the upgrade for. Jetty 10 addressed some issues in the TLS handshake. Not least Better handling for wrong SNI #5379. Beforehand it didn’t really matter what the client sent in the Host header, Jetty would return any certificate it had.
What is in that certificate anyway?
The certificate, self-signed or otherwise, holds some important information about the server and is essential in establishing trust. To see the contents of the certificate, use the keytool utility in your Java distribution.
The above output shows that the Owner of this certificate has a Common Name ( CN ) value localhost which is the default standalone.https.host configuration setting value.
What to do about it
Now that you know the root cause how do you go about resolving it? It is as simple as ensuring the Common Name ( CN ) or Subject Alternative Name ( SAN ) field in the certificate matches what the client is sending the in Host header of the request. For more information on having more than one hostname in a single certificate see a previous article: Beyond the Common Name: Secure multiple domains with a single self-signed certificate
ORDS will generate a self-signed certificate if necessary when it is started in standalone mode and configured for HTTPS. In other words, the standalone.https.port is specified in the global configuration settings or --secure option is used in the ords serve command. If no certificate exists at the configured standalone.https.cert location, ORDS will generate the self-signed certificate and key file.
The Common Name used for the self-signed certificate is taken from the standalone.https.host configuration setting. If not set, the value is localhost. Traditional certificate practices often rely solely on the Common Name (CN) field. That’s the approach taken by ORDS by default when generating the self-signed certificate.
This can sometimes catch people out when they start up ORDS in secure standalone mode the first time. The self-signed certificate is generated but they may not have specified the standalone.https.host configuration setting and when they do later, they still get HTTP 400 Invalid SNI responses. That’s because the self-signed certificate is already generated so no matter what the standalone.https.host configuration setting says, the certificate will not be generated again.
Simple steps
The simplest course of action is to rename the self-signed certificate and key files and restart ORDS. It will not find the files and therefore will attempt to generate new self-signed certificates.
In summary, make sure the standalone.https.host configuration setting matches the Host header value that clients will send for requests being routed to your ORDS standalone server.
As technology evolves, staying ahead is not just an option but a necessity. We can’t run headlong into every new technology though. Trying out new concepts without disrupting the systems that are relied upon day in, day out, requires caution. This year I have found the Oracle Developer DB Virtual Machine to be really useful for trying out new converged database concepts without impacting what I’m working with on a daily basis. By keeping the database and tools in a sandbox that I can just park and come back to when I’ve got time, I can comfortably fire up the VM and start experimenting.
In April of 2023 the Oracle DB Developer VM was released with the Oracle 23c Free database and related database tools which were released at the time. Just under 6 months later the virtual machine image was update in September 2023 to have more recent versions of those tools. In December 2023 ORDS 23.4.0 was released. Do you have to wait another 5 – 6 months before you can start using the latest release of ORDS? No – and this article will walk you through the steps to achieve that…
Inside Job
Everything is going to take place inside the VM so make sure that is running…
VirtualBox Graphical User Interface
In fact, most of the steps will be commands in one of the terminals. The user is oracle and the working directory is /home/oracle/. This is our starting point…
One of the terminal sessions already started
Current running ORDS
By default there’s only one ORDS instance running in your VM. Get the details of the current ORDS instance using the jps command with some options which will tell you what the startup parameters were. Piping through grep keeps the list to just the ords instances running in standalone mode…
From the above we have a process id but more importantly, confirmation that the configuration directory is /home/oracle/ords_config and that certain serve options are provided too. We will use that information later.
Download latest ORDS
Oracle REST Data Services is available under the Oracle Free Use Licence so the latest released version is always available at https://download.oracle.com/otn_software/java/ords/ords-latest.zip. Remember all these commands are taking place in /home/oracle/ unless otherwise stated.
As you can see there’s the /home/oracle/ords/ directory that has the ORDS distribution that the VM shipped with. The /home/oracle/ords_config/ directory for ORDS configuration settings. The ords-latest.zip file which at the time of writing is ORDS 23.4.0. The /home/oracle/ords_previous/ directory which is a copy of the ORDS distribution that came with the virtual machine. Hopefully we’ll never have to use it.
Extract the ords-latest
Let’s put the most recent release of ORDS into it’s own directory…
[oracle@localhost ~]$ mkdir ords-latest
[oracle@localhost ~]$ unzip ords-latest.zip -d ords-latest
Archive:  ords-latest.zip
   creating: ords-latest/bin/
   creating: ords-latest/linux-support/
   creating: ords-latest/linux-support/man/
...
  inflating: ords-latest/examples/plugins/lib/ords-plugin-apt-23.4.0.346.1619.jar
  inflating: ords-latest/examples/plugins/lib/jakarta.inject-api-2.0.0.jar
  inflating: ords-latest/examples/plugins/lib/ords-plugin-api-23.4.0.346.1619-javadoc.jar
[oracle@localhost ~]$ ls -l ords-latest
total 110032
drwxr-xr-x. 2 oracle oracle        34 Dec 12 16:36 bin
drwxr-xr-x. 3 oracle oracle        21 Dec 12 16:36 docs
drwxr-xr-x. 7 oracle oracle        93 Mar 27  2023 examples
drwxr-xr-x. 2 oracle oracle        28 Nov 24 17:50 icons
drwxr-xr-x. 3 oracle oracle        17 Nov 24 17:50 lib
-rw-r--r--. 1 oracle oracle      5996 Dec 12 05:35 LICENSE.txt
drwxr-xr-x. 3 oracle oracle        86 Dec 12 16:36 linux-support
-rw-r--r--. 1 oracle oracle       210 Dec 12 05:35 NOTICE.txt
-rw-r--r--. 1 oracle oracle 112653905 Dec 12 16:36 ords.war
drwxr-xr-x. 4 oracle oracle        38 Mar 27  2023 scripts
-rw-r--r--. 1 oracle oracle       365 Dec 12 05:35 THIRD-PARTY-LICENSES.txt
[oracle@localhost ~]$
Perform upgrade to DB
Now that you have the most recent version of ORDS you can upgrade the ORDS Metadata in the database. We must tell ORDS where the configuration directory is but we have that information from earlier…
Enter a number to select the type of installation [1] Install or upgrade ORDS in the database only [2] Create or update a database pool and install/upgrade ORDS in the database [3] Create or update a database pool only Choose [1]:
Just go with the default to upgrade ORDS in the database only and use SYS as the administrator. Remember that the password for everything in this Developer DB virtual machine is oracle. Here’s the output from running my upgrade…
Oracle REST Data Services - Interactive Install

  Enter a number to select the type of installation
    [1] Install or upgrade ORDS in the database only
    [2] Create or update a database pool and install/upgrade ORDS in the database
    [3] Create or update a database pool only
  Choose [1]:
  Enter a number to select the database pool to use or specify the database connection
    [1] default      jdbc:oracle:thin:@//localhost:1521/FREEPDB1
    [2] Specify the database connection
  Choose [1]:
  Provide database user name with administrator privileges.
    Enter the administrator username: sys
  Enter the database password for SYS AS SYSDBA:
Connecting to database user: SYS AS SYSDBA url: jdbc:oracle:thin:@//localhost:1521/FREEPDB1

Retrieving information.
Connecting to database user: ORDS_PUBLIC_USER url: jdbc:oracle:thin:@//localhost:1521/FREEPDB1
2024-01-03T13:07:08.935Z INFO        Created folder /opt/oracle/userhome/oracle/ords_config/logs
2024-01-03T13:07:08.936Z INFO        The log file is defaulted to the current working directory located at /opt/oracle/userhome/oracle/ords_config/logs
2024-01-03T13:07:09.036Z INFO        Upgrading Oracle REST Data Services schema 23.2.3r2421937 to version 23.4.0.r3461619 in FREEPDB1
2024-01-03T13:07:16.182Z INFO        Completed upgrade for Oracle REST Data Services version 23.4.0.r3461619. Elapsed time: 00:00:07.1

2024-01-03T13:07:16.183Z INFO        Log file written to /opt/oracle/userhome/oracle/ords_config/logs/ords_upgrade_2024-01-03_130708_93718.log
Symbolic gesture
This is not entirely necessary but we are going to make /home/oracle/ords/ a soft symbolic link so we can point it to whatever directory we like. If necessary, pointing it to /home/oracle/ords_previous/ if we encounter a problem.
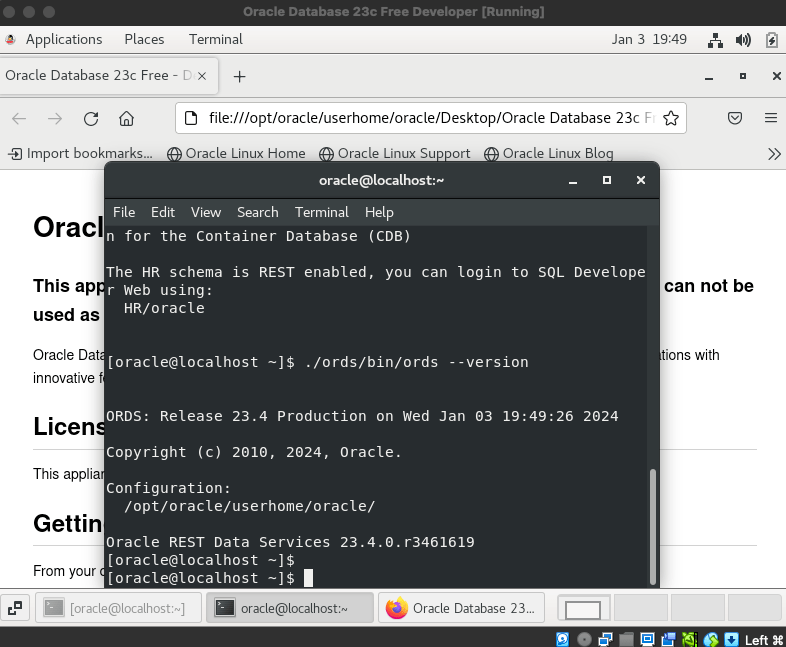
ORDS: Release 23.4 Production on Wed Jan 03 13:13:10 2024
Copyright (c) 2010, 2024, Oracle.
Configuration: /opt/oracle/userhome/oracle/
Oracle REST Data Services 23.4.0.r3461619 [oracle@localhost ~]$
That confirms we have /home/oracle/ords/ now pointing to the ORDS we just downloaded.
Serve it up!
Although /home/oracle/ords/ now points to the latest release of ORDS the currently running version of ORDS is the previous one. We could just restart the VM to address that. The ORDS service is defined with the DB service in /etc/init.d/oracle so the database and ORDS can be restarted together. Just for now, let’s find the ORDS standalone instance, stop it and start it in the terminal window just to see that the same startup command gives us ORDS 23.4.0.
# Find the currently running ORDS instance and kill it ps -ef | grep ords kill -9 <pid>
Mapped local pools from /home/oracle/ords_config/databases: /ords/ => default => VALID
2024-01-03T13:22:51.547Z INFO Oracle REST Data Services initialized Oracle REST Data Services version : 23.4.0.r3461619 Oracle REST Data Services server info: jetty/10.0.18 Oracle REST Data Services java info: Java HotSpot(TM) 64-Bit Server VM 11.0.19+9-LTS-224
That confirms the same ORDS serve command that we saw at the top of this article will startup ORDS in standalone mode listening on port 8080.
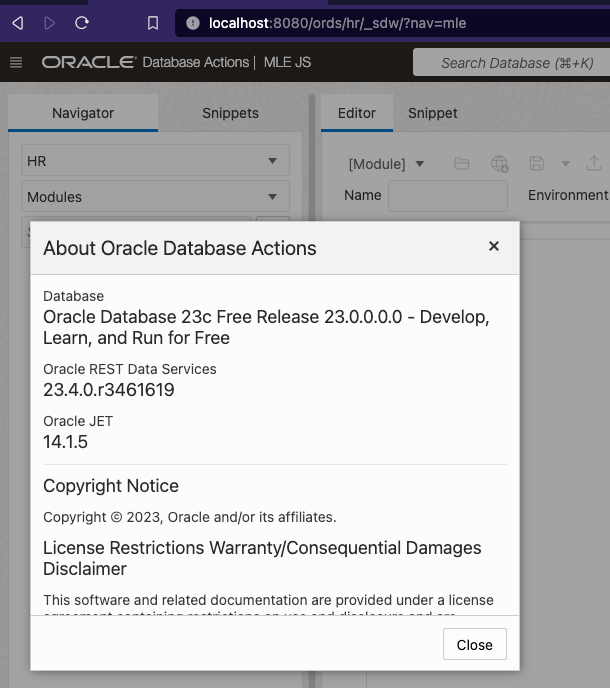
ORDS 23.4.0 running on Database Developer VM
Stop and Start
Starting ORDS in standalone mode is part of the service startup for the VM so powering off the VM and starting it again will bring you back to the clean state of new terminal windows, but the version of ORDS running is now 23.4.0. When there is a more recent version of ORDS released that can be extracted into a new directory and the /home/oracle/ords/ soft symbolic link could be changed to point to that.
Restart the VM and the version of ORDS is the latest
ORDS 23.3.0 introduced GraphQL functionality which makes it possible for a user to define complex queries on REST Enable tables and views in the database. Specific information on how to use GraphQL is in the ORDS Developer Guide. Although ORDS is known as a Java Web Application, the GraphQL implementation is primarily in JavaScript. To use the GraphQL feature, ORDS must be running on Oracle GraalVM with the JavaScript component installed.
That’s as simple as downloading the Oracle GraalVM ( for Java 11 or Java 17 ), installing the JavaScript component, and running ORDS as usual with that JVM. See GraalVM Configuration in the Installation and Configuration Guide.
Running with docker / podman / kubernetes is also straight forward but there are one or two steps that may not be intuitive. Building on concepts introduced in a previous article I’ll walk through the steps to create an image for running the latest release of ORDS on Oracle GraalVM Enterprise.
The goal is to build a docker image which is based on a GraalVM image. The build process for that image will install the required GraalVM JavaScript component and download the latest release of ORDS. The resulting image can be used to spin up a new container which is running ORDS standalone. Similar to the containers used from the above previous article, the containers will use a shared docker volume for configuration.
Getting GraalVM
GraalVM is a high-performance runtime that provides support for various programming languages and execution modes. It includes a Java Virtual Machine (JVM) that is enhanced with the GraalVM compiler, which can improve the performance of Java applications such as ORDS. GraalVM is a polyglot virtual machine that supports multiple programming languages, including JavaScript, Python and more. To use these programming languages, specific components must also be installed, and as is common, licences for their use must be agreed. The Oracle Free Use Terms and Conditions licence that ORDS is available under, and the GraalVM Free Use Terms and Conditions licence that GraalVM is available under, do not extend to these components. Although convenient Docker images are available, to run a Java application which also uses JavaScript requires that JavaScript runtime component to be installed in the image. To install that component requires an activated download token which confirms you have accepted the software licence. This article will cover getting that token, but first, which image should be used?
GraalVM Image
Oracle GraalVM Enterprise container images are published in the Oracle Container Registry and there are quite a few to choose from. The following images are available:
Image Name
Description
jdk-ee
A compact image containing the GraalVM Enterprise JDK.
native-image-ee
A compact image containing the GraalVM Enterprise native-image utility and JDK
enterprise
Provides the GraalVM Enterprise JDK along with the gu (Graal Updater) utility to enable installation of additional features.
nodejs-ee
Includes the Node.js runtime and the GraalVM Enterprise JDK.
Images available at container-registry.oracle.com
We will require a GraalVM Enterprise JDK to run ORDS which is a Java application but will also require the JavaScript component installed so we’ll need the Graal Updater utility too. That means the enterprise image is the one for us. In fact, we’ll use container-registry.oracle.com/graalvm/enterprise:ol8-java17 which gives us a Java 17 JDK. At the time of writing, the only supported Java versions for ORDS are Java 11 and Java 17.
GraalVM Download Token
To install the GraalVM JavaScript component requires an activated download token. This token indicates that you have accepted a licence agreement for using the component and in this article we pass it as a parameter when building the image. There are a number of ways to obtain a token, in fact just by using the Graal Updater utility ( gu ) to install a component will initiate it…
Downloading: Artifacts catalog from gds.oracle.com
Skipping ULN EE channels, no username provided.
Downloading: Component catalog from www.graalvm.org
Processing Component: Graal.js
Enter your download token and press ENTER, or press ENTER to generate a new download token.
Enter a valid download token:
However, at this stage up may not have the Graal Updater on your machine. The most convenient way on a unix based operating system with bash is the handy dandy GraalVM Download Token Generator.
bash <(curl -sL https://get.graalvm.org/ee-token)
That will run a script to generate a token and initiate the licence agreement process. In this scenario I just copy the token string rather than persisting it.
About to request a download token for GraalVM Enterprise Edition...
Please provide an email address and review Oracle's Privacy Policy at https://www.oracle.com/legal/privacy/privacy-policy.html.
Enter a valid email address: pobalopalous@ordsexample.org
Your new download token is: 'NzY4MDYwYTk4ZjIyMTZmNTgzYWE3NzMwNGFkOGJiMmIwZTVlYTU3MmI3YThjZmY3NzExYzFlOWQxNjgyNTUwZGNiNzUxNmNlODIxNTkwYjM0MjA4NzkwNDVhNzUx'
Please check your email inbox and accept the license to activate your download token.
Would you like to persist this token in '/Users/pobalopalous/.gu/config' on this machine? (y/N): N
Download token not persisted.
Now I have an 88 character token but it has not been activated. Next, I must check my email for a link to accept the licence.
Email for activating the download tokenClick that “Accept license and verity download token” button
The link will take you through the Oracle SSO sign-on process if you’re not already logged in. Keep the download token value safe. It will be baked into your docker image so do not go publishing the image out on the internet, in other words … distributing the software, because the token can be linked back to your Oracle SSO account.
Get Building
Now that an activated download token is at hand we can get on with building the docker image. The Dockerfile is very similar to the one used in Get started with Oracle REST Data Services (ORDS) and Docker but has a couple of extra lines for installing the JavaScript component.
#
# Defines a docker image, based on the Oracle JDK image, to run Oracle REST Data Services. During the image building
# process the most recent version of ORDS will be automatically downloaded and extracted.
#
# Volumes for configuration and lib/ext are defined.
#
# docker run -p 8080:8080 -v ords-config:/opt/ords-config/ -v ords-lib-ext:/opt/ords/latest/lib/ext ords-latest/graaljdk
#
# See https://peterobrien.blog/ for more information and examples.
#
FROM container-registry.oracle.com/graalvm/enterprise:ol8-java17
MAINTAINER Peter O'Brien

# Get an Oracle Graal EE Download token and provide that value when building the image.
# See https://github.com/graalvm/graalvm-jdk-downloader/blob/main/README.md#set-up-a-download-token-for-graalvm-enterprise-edition-installations
# docker build  --build-arg="GRAAL_TOKEN=Get your own token" --tag ords-latest/graaljdk .
# Note that token will be baked into the image.
ARG GRAAL_TOKEN
ENV GRAAL_EE_DOWNLOAD_TOKEN=$GRAAL_TOKEN
RUN gu install --auto-yes --non-interactive js

ENV LATEST=/opt/ords-latest/
ENV CONFIG=/opt/ords-config/
WORKDIR $LATEST
ADD https://download.oracle.com/otn_software/java/ords/ords-latest.zip $LATEST
RUN jar xf ords-latest.zip; rm ords-latest.zip; chmod +x bin/ords
VOLUME $LATEST/lib/ext/ $CONFIG
EXPOSE 8080
EXPOSE 8443
WORKDIR $CONFIG
ENTRYPOINT ["/opt/ords-latest/bin/ords"]
CMD ["serve"]
When running docker build with this Dockerfile the download token must be provided as an argument. Otherwise there will be a build failure similar to this:
Step 3/13 : RUN gu install --auto-yes --non-interactive js
 ---> Running in 86da6cdbc24f
Downloading: Artifacts catalog from gds.oracle.com
Skipping ULN EE channels, no username provided.
Downloading: Component catalog from www.graalvm.org
Processing Component: Graal.js
Enter your download token and press ENTER, or press ENTER to generate a new download token.
Enter a valid download token:The command '/bin/sh -c gu install --auto-yes --non-interactive js' returned a non-zero code: 5
Convenient Dockerfile
To make things even easier, I’ve created a Dockerfile that you can use and the only thing you have to change is the token value on the command line:
This specifies the GRAAL_TOKEN build argument that the Dockerfile will use to set the GRAAL_EE_DOWNLOAD_TOKEN environment variable which is used by the gu install js command when building the image.
That’s the URL for the Dockerfile build context I have created for you so you don’t have to copy the text locally. Isn’t that nice?
Run that with your download token and you’ll see something like this…
Downloading build context from remote url: https://gist.githubusercontent.com/pobalopalous/a8c78d45c69fdb40763c913e2bda82c6/raw/4b57a40Downloading build context from remote url: https://gist.githubusercontent.com/pobalopalous/a8c78d45c69fdb40763c913e2bda82c6/raw/4b57a40639385085e51dae21dec4b3fec7b1708c/ORDS_Latest_GraalVM_Dockerfile [==================================================>]  1.371kB/1.371kB
Sending build context to Docker daemon  3.072kB
Step 1/16 : FROM container-registry.oracle.com/graalvm/enterprise:ol8-java17
 ---> 64dca1a5fa2a
Step 2/16 : MAINTAINER Peter O'Brien
 ---> Running in 33db11ef151e
Removing intermediate container 33db11ef151e
 ---> d38b7a7f3b67
Step 3/16 : ARG GRAAL_TOKEN
 ---> Running in 7613b2d725f7
Removing intermediate container 7613b2d725f7
 ---> f67809364f83
Step 4/16 : ENV GRAAL_EE_DOWNLOAD_TOKEN=$GRAAL_TOKEN
 ---> Running in fa3dc864e3b5
Removing intermediate container fa3dc864e3b5
 ---> 5fb687d736d1
Step 5/16 : RUN gu install --auto-yes --non-interactive js
 ---> Running in 9fb627218998
Downloading: Artifacts catalog from gds.oracle.com
Skipping ULN EE channels, no username provided.
Downloading: Component catalog from www.graalvm.org
Processing Component: Graal.js
Downloading: Component js: Graal.js from gds.oracle.com
Installing new component: Graal.js (org.graalvm.js, version 22.3.3)
Refreshed alternative links in /usr/bin/
Removing intermediate container 9fb627218998
 ---> ecef6d97d8db
Step 6/16 : ENV LATEST=/opt/ords-latest/
 ---> Running in f661804977a7
Removing intermediate container f661804977a7
 ---> 1005a3e3690b
Step 7/16 : ENV CONFIG=/opt/ords-config/
 ---> Running in 50901e104315
Removing intermediate container 50901e104315
 ---> 8a376e3151ee
Step 8/16 : WORKDIR $LATEST
 ---> Running in bd9810fe29f9
Removing intermediate container bd9810fe29f9
 ---> c18a57d2a8db
Step 9/16 : ADD https://download.oracle.com/otn_software/java/ords/ords-latest.zip $LATEST
Downloading [==================================================>]  114.1MB/114.1MB
 ---> 3cec2554cd2b
Step 10/16 : RUN jar xf ords-latest.zip; rm ords-latest.zip; chmod +x bin/ords
 ---> Running in 50a97beac418
Removing intermediate container 50a97beac418
 ---> 3f9fff9bded5
Step 11/16 : VOLUME $LATEST/lib/ext/ $CONFIG
 ---> Running in 0276fc517e42
Removing intermediate container 0276fc517e42
 ---> 5a8b5e5947e6
Step 12/16 : EXPOSE 8080
 ---> Running in c4dbf726988b
Removing intermediate container c4dbf726988b
 ---> c2ad8e7b94d3
Step 13/16 : EXPOSE 8443
 ---> Running in da46a9b873a3
Removing intermediate container da46a9b873a3
 ---> 5619e6b04ece
Step 14/16 : WORKDIR $CONFIG
 ---> Running in d5959c70115b
Removing intermediate container d5959c70115b
 ---> 440d4e54a4ce
Step 15/16 : ENTRYPOINT ["/opt/ords-latest/bin/ords"]
 ---> Running in 4452ce4de261
Removing intermediate container 4452ce4de261
 ---> f23c5cf67824
Step 16/16 : CMD ["serve"]
 ---> Running in 9f9f69dce7ae
Removing intermediate container 9f9f69dce7ae
 ---> ab2e0a2981e0
Successfully built ab2e0a2981e0
Successfully tagged ords-latest/graaljdk:latest
If you have made it this far, you now have an ords-latest/graaljdk image ready to be put into action.
Now RUN !
This is the part we’ve been waiting for. Remember that just like in Get started with Oracle REST Data Services (ORDS) and Docker the database already has ORDS installed and the configuration directory is a docker volume called ords-adb-config which gets mapped to /opt/ords-config/ in the container.
That will run in the background so you can use the docker logs command to check the output: docker logs -f ords-latest-8080
ORDS: Release 23.3 Production on Fri Nov 17 13:32:11 2023

Copyright (c) 2010, 2023, Oracle.

Configuration:
  /opt/ords-config/

2023-11-17T13:32:11.890Z INFO        HTTP and HTTP/2 cleartext listening on host: 0.0.0.0 port: 8080
...
java.vm.name=Java HotSpot(TM) 64-Bit Server VM
java.vendor.version=GraalVM EE 22.3.3
...
2023-11-17T13:32:27.906Z INFO

Mapped local pools from /opt/ords-config/databases:
  /ords/                              => default                        => VALID


2023-11-17T13:32:28.233Z INFO        Oracle REST Data Services initialized
Oracle REST Data Services version : 23.3.0.r2891830
Oracle REST Data Services server info: jetty/10.0.17
Oracle REST Data Services java info: Java HotSpot(TM) 64-Bit Server VM 17.0.8+9-LTS-jvmci-22.3-b21
The GraphQL implementation in ORDS is based on REST Enabled tables and views. Therefore, to get any sensible use of GraphQL with ORDS one must first have a REST Enabled schema with some REST Enabled tables or views. Thankfully I already have that in my database so I can dive right in…
GraphQL in action with ORDS on GraalVM
Over to you
To sum it up, this article explained how to create a Docker image using GraalVM, specifically focusing on adding the JavaScript component needed for ORDS GraphQL. The image build process involves installing the GraalVM JavaScript part and downloading the latest ORDS release, resulting in a Docker image. Before doing so, you had to get and activate a download token so that the JavaScript component could be installed in the image. This image, when used, makes it easy to start a standalone ORDS container. You now have a straightforward solution for using ORDS GraphQL in a GraalVM environment that is ready for production.
To explore all the powerful querying options available to you with ORDS GraphQL see the relevant chapter in the ORDS Developer Guide.